Adjustable pedals?

Rat

Well-known member
Messages
1,750
Reaction score
1,298
Location
SW Virginia
Ok, quick update!

I went to put the 79cc engine on the cart for a mock up. I noticed oil on the bench the engine was sitting on. Upon inspection, I found a crack in the case. I returned the engine and upgraded to a predator 212.

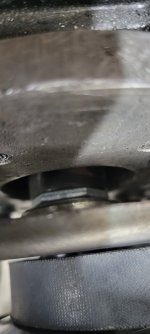
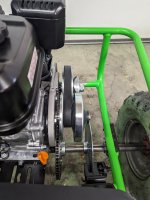
Now, in the meantime the torque converter showed up. I read the instructions and followed it precisely. On the driven side, I put on the washer and the spacer as described. However, I noticed that the inside surface of the driver side and the driven side (I think that's what they are called) we're not parallel. Having the inside surfaces not parallel didn't make sense. So I shimmed the driver side as close as I could to the driven side.

Was I correct in doing this? Or should I have left it how the directions indicated, since the bell expands as the revolutions increase?

Ive seen thin 3/4" shim washers to push it out less than a common washer will, but I've found that the common Tav2 doesn't need to be precise as much as it needs to just be "pretty damn close" so as long as the offset is under 1/16 it shouldn't be too hard on the belt. Obviously the closer you get to perfect the better, but again at some point its just OCD and a set of 0.02 is a waste of money
 

panchothedog

Well-known member
Messages
2,883
Reaction score
3,899
You want the inside ( closest to the engine ) of both to be as inline as you can possibly get them. The 212 Predator has a very short PTO shaft. Doesn't usually leave a lot of room for shimming. I use a straight edge ( any straight piece of steel will work ) on mine rather than just trying to eyeball it. You can move either one, as necessary to get the proper alignment. They even make shim kits for both 3/4" crankshaft and 5/8" driven jack shaft that are much thinner than common hardware store washers. Not always needed. I 'm pretty sure that not too far into the future you will be a lot happier with the 212cc engine as compared to the 79cc. And even box stock it will have enough power to be fast enough until she's at least 7 or 8.
 

Scout74

Member
Messages
44
Reaction score
27
Yeah I used a piece of metal between the two inside pulley surfaces to get close to parallel as I could. Thank you for confirming that for me.

Now back to work on my other issues. Haha
 

Scout74

Member
Messages
44
Reaction score
27
You should not need to shim between the shieves! Only the flatter sides need to be in line. The movable sides will align them selves automatically. Do you have pictures where you put the shims?
Yeah, I'll take some pics here shortly.
 

Rat

Well-known member
Messages
1,750
Reaction score
1,298
Location
SW Virginia
Hopefully this works good enough.
Looks "pretty damn close" to me.

My 208 has a little longer PTO shaft than a P212, and I'm using an aftermarket 9t on the shaft output that is a bit wider than the default 10t it came with.

Here's my shim work
 

Attachments

  • 20230928_194144.jpg
    20230928_194144.jpg
    899.5 KB · Views: 3

Scout74

Member
Messages
44
Reaction score
27
Looks "pretty damn close" to me.

My 208 has a little longer PTO shaft than a P212, and I'm using an aftermarket 9t on the shaft output that is a bit wider than the default 10t it came with.

Here's my shim work
Oh nice! Yeah that looks good! Glad the pros approve of my shimming work.

Now once I get my 2 piece sprocket centered properly and chain to the right tightness, it will stop throwing the chain off. Lol
 

Scout74

Member
Messages
44
Reaction score
27
So, in regards to my earlier question about the pullys inner surface being parallel, I came across this video. It's at the 5:11 mark where the guy talks about the pullys surfaces being intentionally offset for their depths? Thoughts appreciated.


Rat

Well-known member
Messages
1,750
Reaction score
1,298
Location
SW Virginia
So, in regards to my earlier question about the pullys inner surface being parallel, I came across this video. It's at the 5:11 mark where the guy talks about the pullys surfaces being intentionally offset for their depths? Thoughts appreciated.
The flat sheaves on the engine side must be parallel to not eat belts... outside of that nothing else is relevant because the outboard driver sheave moves inward as the driven outboard sheave moves outward
 

Scout74

Member
Messages
44
Reaction score
27
The flat sheaves on the engine side must be parallel to not eat belts... outside of that nothing else is relevant because the outboard driver sheave moves inward as the driven outboard sheave moves outward
Ok so what I'm calling pullys, are actually sheaves? I'll try to remember that. Thanks for the confirmation, much appreciated. 👍
 

Rat

Well-known member
Messages
1,750
Reaction score
1,298
Location
SW Virginia
Ok so what I'm calling pullys, are actually sheaves? I'll try to remember that. Thanks for the confirmation, much appreciated. 👍
Pulleys is acceptable, it's the difference between "flat head" and standard referencing the same screw driver... one being common the other propper.

The most important thing to remember really is driver (engine) which may also be referred to as a clutch by some [it's not wrong since it is a form of centrifugal clutch] and driven (jackshaft)

If you need replacement or upgrades beyond a belt, driver and driven is very important terms
 

Scout74

Member
Messages
44
Reaction score
27
Pulleys is acceptable, it's the difference between "flat head" and standard referencing the same screw driver... one being common the other propper.

The most important thing to remember really is driver (engine) which may also be referred to as a clutch by some [it's not wrong since it is a form of centrifugal clutch] and driven (jackshaft)

If you need replacement or upgrades beyond a belt, driver and driven is very important terms
Ahhh gotcha. 👍
 

Scout74

Member
Messages
44
Reaction score
27
Snowmobile clutches are a totally different animal in the way they have to be lined up because of their size. It’s best not to listen too much to those morons. They don’t always follow best or safest practices.
Oh ok, that makes sense. Ya those guys are clowns, but entertaining none the less. Especially for someone like me, who is trying to learn and needs visuals of how to do something.

Some info is hard to come by, especially those who know what they are talking about and not some 14yr old doing something for the second time.
 

Scout74

Member
Messages
44
Reaction score
27
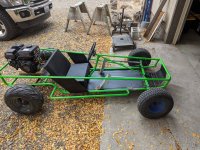
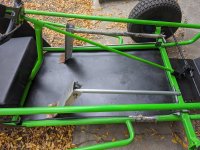
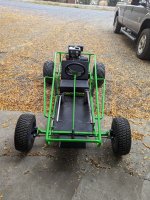
Well, since this thread is about adjustable pedals, it only seems right to show the finished product.

Thanks to William for helping me out with the pedals he made for his grandkids, my granddaughter can now drive her kart by herself.
Had to make some modifications for my setup, but it works fantastic.

I also wanted to thank everyone for their constructive suggestions, warning, advice and help. Y'all are awesome. I hope one day I will be able to lend assistance to a newbie too.

Don't worry, I'm not going anywhere. I'll be starting a new thread asking for help with rims/tires. So stay tuned for that in the future.

Thank you once again to everyone!
 

Attachments

  • PXL_20231009_202022799.jpg
    PXL_20231009_202022799.jpg
    2.4 MB · Views: 6
  • PXL_20231009_202036039.jpg
    PXL_20231009_202036039.jpg
    1.9 MB · Views: 6
  • PXL_20231009_202052133.jpg
    PXL_20231009_202052133.jpg
    2.6 MB · Views: 6

panchothedog

Well-known member
Messages
2,883
Reaction score
3,899
Nice job on the pedals. You had to move them back a little farther than I did. If the kart is going to be used mainly off road, I think your tires look perfect. Don't know what advice you could possibly need on them. Well Gramps, did you take it for a test ride yet? How's it run. Should have plenty of power.
 
Top