35HP Kart Build

Status
Not open for further replies.

Stephen115

Member
Messages
382
Reaction score
1
12/11/2018 - long over due update:

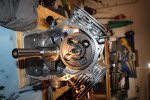
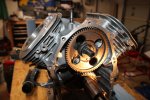
Well it has been awhile, we've mainly been gathering parts and getting the sleeves ready.

Last night we successfully put the new sleeves in. We heated the block up to 350 degrees in the oven, and then put the sleeves on dry ice for about 30 minutes. The sleeves were made to have a .002 press fit, and dropped right in after heating and cooling.

We also ordered a few OEM parts to complete the list. We hope to have some time this weekend to get her back together!

SJ


Sent from my SM-N960U using Tapatalk
 

Denny

Canned Monster
Messages
11,761
Reaction score
8,200
Location
Mayberry, Indiana
Get a matching rotor for the brake material. We have a member here who had nothing but trouble with his brakes. I finally figured out his rotor was made of too hard of material. He got a new rotor and BAM problem solved. If you use anything but a stainless steel rotor you should be fine.


Denny
 

Stephen115

Member
Messages
382
Reaction score
1
Get a matching rotor for the brake material. We have a member here who had nothing but trouble with his brakes. I finally figured out his rotor was made of too hard of material. He got a new rotor and BAM problem solved. If you use anything but a stainless steel rotor you should be fine.


Denny
Thank you for the tip! We have the factory rotor and brake pads, hopefully we will be fine. If we start having issues then this will be the first thing I look into.

Sent from my SM-N960U using Tapatalk
 

mckutzy

Well-known member
Messages
8,353
Reaction score
108
Location
bc, canada
Get a matching rotor for the brake material. We have a member here who had nothing but trouble with his brakes. I finally figured out his rotor was made of too hard of material. He got a new rotor and BAM problem solved. If you use anything but a stainless steel rotor you should be fine.


Denny

Thanks Denny...

Ya it wasnt so much as the hardness of the disc, it was the lubricity of the material, coupled with an incompatibility of pad material...
But... Yes long story short... Don't use stainless rotors by themselves... Use the whole motorcycle brake system..
 

mattluttrell

New member
Messages
11
Reaction score
0
Any other progress on the chassis? I've gone from classic cars, Jeeps, German cars and now I have the buggy bug...

I'd like to watch you build this thing. On the brake thing, you could almost grab a pull a part master cylinder from a cheap Japanese car and fab it in for $30. Flaring the lines is the hardest part. In cars the all line up. I assume it's the same here.

I noticed my buggy has similar hydraulic brakes.

Sent from my BND-L34 using Tapatalk
 

Stephen115

Member
Messages
382
Reaction score
1
Any other progress on the chassis? I've gone from classic cars, Jeeps, German cars and now I have the buggy bug...

I'd like to watch you build this thing. On the brake thing, you could almost grab a pull a part master cylinder from a cheap Japanese car and fab it in for $30. Flaring the lines is the hardest part. In cars the all line up. I assume it's the same here.

I noticed my buggy has similar hydraulic brakes.

Sent from my BND-L34 using Tapatalk

We're almost done with the rear end. We've installed suspension, axle, and sprocket. We are still working on the brakes. We have the complete brake setup from the bike, we just need to make mounts for the master cylinder and caliper. The brake pad retainer is actually part of the factory mount, so we're working on a way around that.

I'll post some pictures this week of what we have so far!

SJ
 

Stephen115

Member
Messages
382
Reaction score
1
Hello all!

Its been a while since I've been on here. Life has been very busy, which means there's little time to work on the go kart.

We have managed to do a few things. The engine is almost ready to assemble. I ordered another hone on Friday, once that comes in we can move forward with assembly.

We also put all four wheels on to get a good picture of how it is going to sit. I'm not overly excited about the factory Yerf Dog rollbar (not pictured), so we'll be making a rollbar out of the factory one.

Until next time!


Sent from my SM-N960U using Tapatalk
 

Stephen115

Member
Messages
382
Reaction score
1
Here is a little before and after of the flywheel. Would you paint the flywheel? If so, what type of paint would you use?

We also needed to replace the bearings on the crankcase cover, so we made some.


Sent from my SM-N960U using Tapatalk
 

65ShelbyClone

Active member
Messages
671
Reaction score
171
Location
SoCal
I would use some kind of spray enamel and just mask the taper and magnet. It's not going to get very hot in use and the shroud and fan will protect it from the elements. I like the cast iron engine enamel for parts like that.

Did you put any oil holes in those bronze bearings?
 

Stephen115

Member
Messages
382
Reaction score
1
I would use some kind of spray enamel and just mask the taper and magnet. It's not going to get very hot in use and the shroud and fan will protect it from the elements. I like the cast iron engine enamel for parts like that.

Did you put any oil holes in those bronze bearings?

Thanks for the input. I like the cast iron look too.

There are two bearings on the crank case cover, with the oil channel in between the two bearings. The factory ones didn't have holes, so we just left them that way. That was a something we also wondered.
 

Stephen115

Member
Messages
382
Reaction score
1
February 17th, 2019 Update:

My father and I were able to get the short block together this afternoon. We've been excited for this day, and its good to see everything come together. Although we've had to make a lot of parts for this engine, its been a fun process. We hope to be turning her over soon.

By the way... we've been filming the process :popcorn:
 

Attachments

  • IMG_9404.jpg
    IMG_9404.jpg
    268.4 KB · Views: 15
  • IMG_9429.jpg
    IMG_9429.jpg
    289.4 KB · Views: 15
  • IMG_9430.jpg
    IMG_9430.jpg
    232.9 KB · Views: 16
  • IMG_9431.jpg
    IMG_9431.jpg
    196.4 KB · Views: 17
Status
Not open for further replies.
Top