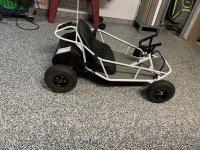
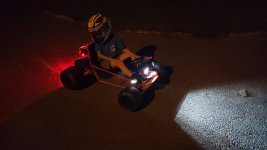
Ultimate Razor Dune Buggy Modification! Sleeper Build

Jtroy

New member
Messages
9
Reaction score
6
Hello DIY,

After monitoring the forums for years, and getting a lot of inspiration, I finally get to contribute!

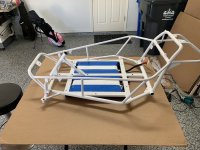
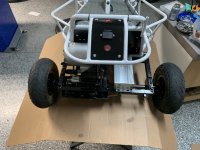
I picked up a junk razor dune buggy for $30 off Craigslist about 6 months ago and have been slowly working on it since then. My goal was to maintain the stock appearance, keep all the chain guards, switch to pedal throttle and brake controls, change the wheels, and upgrade to 48v.

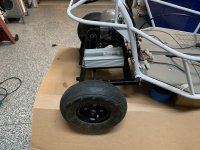
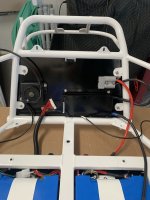
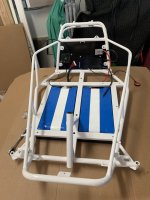
To accomplish this, I modified the frame to accept a custom underfloor mount battery box and installed a custom 48v headway 38120 battery pack with an 80 amp BMS. Added a mounting plate behind the seat to mount the BMS, and throttle to keep them out of sight. I then installed a 48v brushless motor and controller. For the motor, I made a custom adapter plate to maintain the factory chain tensioner. I also made custom brake and throttle pedals. Lastly I used razor e300 scooter wheels with custom hubs.

There were many more small modifications that went into this, and in the end, I am really happy with the fit and finish . I think I met my initial design goals, let me know what you guys think.
 

Attachments

  • F19B2781-A560-4328-8AB3-378CBCBEFE02.jpeg
    F19B2781-A560-4328-8AB3-378CBCBEFE02.jpeg
    3.1 MB · Views: 95
  • 48C2AC29-CD6E-4F20-BE09-9684BEB7013C.jpeg
    48C2AC29-CD6E-4F20-BE09-9684BEB7013C.jpeg
    2.9 MB · Views: 89
  • A437A362-3A68-497B-9125-B98B447FE59C.jpeg
    A437A362-3A68-497B-9125-B98B447FE59C.jpeg
    2.9 MB · Views: 87
  • 493F9532-F187-4466-A3FA-5566B026E7C3.jpeg
    493F9532-F187-4466-A3FA-5566B026E7C3.jpeg
    2.6 MB · Views: 86
  • 5C503D0F-7AEF-454A-9205-95230E96A99E.jpeg
    5C503D0F-7AEF-454A-9205-95230E96A99E.jpeg
    1.3 MB · Views: 83
  • 475767E2-FD36-46E1-9C29-C5026E6A2F7C.jpeg
    475767E2-FD36-46E1-9C29-C5026E6A2F7C.jpeg
    1.5 MB · Views: 85
  • BDDCEE08-82E0-4DB1-8DBA-592417025ABD.jpeg
    BDDCEE08-82E0-4DB1-8DBA-592417025ABD.jpeg
    1.7 MB · Views: 91
  • 473EC799-CAF7-44AF-B705-28CA00E00E31.jpeg
    473EC799-CAF7-44AF-B705-28CA00E00E31.jpeg
    2.5 MB · Views: 104
Last edited:

Jtroy

New member
Messages
9
Reaction score
6
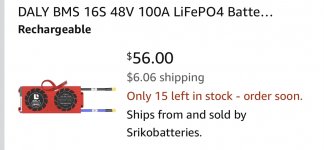
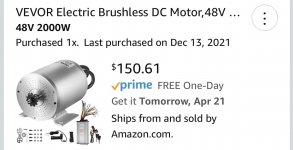
I used the 80 amp version of this BMS and this motor setup.
 

Attachments

  • 53E7B837-02ED-4BBC-9F15-E72DCA0D7715.jpeg
    53E7B837-02ED-4BBC-9F15-E72DCA0D7715.jpeg
    89.9 KB · Views: 40
  • 1D0D95CB-AD8B-4BB0-ABBA-0C589B0EBE22.jpeg
    1D0D95CB-AD8B-4BB0-ABBA-0C589B0EBE22.jpeg
    121.9 KB · Views: 41

Sinakhe

New member
Messages
1
Reaction score
1
any link or parts for the custom hub to fit the e300 wheels? I’m still new to modifying the razor dune buggy. Anything will be appreciated. Thanks
 

mlw19mlw91

New member
Messages
2
Reaction score
0
I'm also looking for the custom hub. On the Facebook group modified razors it's been said that you basically use a sprocket mount to do this
 

Jtroy

New member
Messages
9
Reaction score
6
I’m not sure about the Facebook group post, can you link the post? As for the hubs, I built them from scratch on a lathe. That was the only option I could find and they came out perfect.
 

Jtroy

New member
Messages
9
Reaction score
6
I see, that was not what I did… looks too flimsy. The cart goes 30mph in the highest motor speed depending on which sprocket setup I use and I personally wouldn’t trust that. I started with 1.5” solid bar stock and made the hub plates from 3/16 plate if memory serves. Then welded it all up and cut the key way.
 

marcleman

New member
Messages
4
Reaction score
2
How fast does this thing get?
Hello DIY,

After monitoring the forums for years, and getting a lot of inspiration, I finally get to contribute!

I picked up a junk razor dune buggy for $30 off Craigslist about 6 months ago and have been slowly working on it since then. My goal was to maintain the stock appearance, keep all the chain guards, switch to pedal throttle and brake controls, change the wheels, and upgrade to 48v.

To accomplish this, I modified the frame to accept a custom underfloor mount battery box and installed a custom 48v headway 38120 battery pack with an 80 amp BMS. Added a mounting plate behind the seat to mount the BMS, and throttle to keep them out of sight. I then installed a 48v brushless motor and controller. For the motor, I made a custom adapter plate to maintain the factory chain tensioner. I also made custom brake and throttle pedals. Lastly I used razor e300 scooter wheels with custom hubs.

There were many more small modifications that went into this, and in the end, I am really happy with the fit and finish . I think I met my initial design goals, let me know what you guys think.
 

panchothedog

Well-known member
Messages
2,940
Reaction score
3,988
Do you have links to the hubs and axel you used?
Post is 3 years old, and the O P hasn't been on here in a year and a half. You might do better starting a new thread and posting questions about what you're looking for.
 

EpsilonZero

...still cheaper than a boat!
Messages
400
Reaction score
205
I updated the video description with a parts list some time ago:

Here are the parts, minus some bolts, washers, and nuts to connect the pillow blocks and to recondition the front spindles:

From BMI Karts:

1x 400149 Custom Axle
Axle Diameter & Material: 3/4'' OD (Steel)
Axle Length is over 48: No
Length Overall Length in Inches: 28
Keyway Width: Standard
Keyway Length: Entire Length
Thread Size: Standard
Length of Threads: Standard
Step Down Axle: No

2x 400059 3/4" Axle Lock Nut (3/4-16)
2x AZ1064 5" Azusalite Wheel, 3.5" wide, 1" to 3/4" Step Live Axle (Rear)
2x AZ1061 5" Azusalite Wheel, 3-1/2" wide, 5/8" ID Bearing
4x AZ7037 4.10/3.50 Sawtooth Tire Rim Size: 5
4x AZ7132 4.10/3.50-5 Inner Tube
6x 400120K Steel Split Locking Collar (3/4" Bore)
10x AZ8442 3/16" x 3/16" x 1 1/4" Keystock
AZ2568 Steel Multi-Patterned Sprocket / Brake Hub (3/4" Bore) (Used as a brake rotor)

From Amazon/Ebay:

1x PGN - UCP204-12 Pillow Block Mounted Ball Bearing - 3/4" Bore - Solid Cast Iron Base - Self Aligning (2 Pack)
1x PGN - #25H Heavy Duty Roller Chain x 10 feet + 2 Free Connecting Links
3/4" to 1" Inch Sleeve Adapter w/Step Key

From Speedy Metals (to mount 5/8" bearings on spindles, but I welded up my own custom spindles later to add Ackerman steering):
5/8" OD {A} x 0.385" ID {B} x .120" Wall {C} DOM Steel Tube-24"
SKU: dom.625x.120-24
Cutting Tolerance: Plus or Minus 3/4"

I used a #24 25t sprocket from Redboar Chain. I have since swapped to #420 chain and deleted the jackshaft after replacing the motor, battery, and controller again.
 
Top