High Compression GX200 - Oil blowing out valve cover, gas blowing out the carb

BrownStainRacing

Well-known member
Messages
1,367
Reaction score
1,486
New Engine Build:
168F Case
GX200 Side cover (stiffer)
Standard crank (with sintered cam gear)
Standard GX200 dished piston
Aluminum cast flywheel (1.5kg)
0.052" head gasket
+.020" length connecting rod (stock type)
GX200 22cc head, very mildly ported, 27mm intake, 25mm exhaust (came with these valves installed)
Stock Springs
Stock Cam
Cylinder head studs 80mm
Side cover studs 50mm
PWK21mm carb
Custom free flow exhaust
Stock valve cover
Stock timing for first break-in
Crank side play .007", which is a bit low but I was already using my thickest side cover gasket.

I ran the engine 20 minutes from 2500-4500rpm, then 2500 to 4500 in 500rpm steps at 5minutes per step, then back down to 2500 the same way.
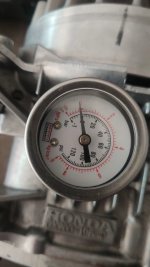
Changed the oil (5W30 this time), let it sit. I had a pressure gauge on the case, it showed zero.
After cooling, exhaust stud nuts were not as tight as previously, but not leaking.
There was so much less vibration that with my other builds, the exhaust pipe never got red and seemed very rigid.
The drained oil didn't seem to much metal in it and wasn't particularly black.
Spark plug was not showing signs of a rich mixture. But it's still rust colored as my gas has an octane booster in it, until I use up the tank.

I'm hopeful this engine will last. I'm very curious of the performance on the track. Next step is to repeat another break in session tomorrow. With any luck I'll be able to have an oxygen sensor on the exhaust for that testing as well. I'm waiting on a battery cable to run the sensor & meter.

I also changed my kart rear sprocket to limit max rpm to about 5500 at the end of the straight away. I can't be exactly sure, but it's the stock gear ratio for this kart with stock GX200.
Nice!!

You need a vacuum/pressure gauge, not a pressure only gauge.

Like this, Actron CP7803 Vacuum and Fuel Pressure Tester Kit https://a.co/d/3EDK0gc

Dont worry about the fuel pressure part, you jus wanna see how much the gauge is bouncing.

Nice break in procedure, your rings will seat quicker.

I don't like that plug color, its very weird, 😆 😂 😅 🤣

What heat range plug you running???

Those head studs look long, they are bottomed out in the block, right ???

You should be around 8.2:1 CR, right now.

Get some testing and tuning in and show us the results. 👍

Do you have any more stock stamped steel rockers arms???

Those stamped letters on the rocker arms, indicates different rocker ratio.

Stock can be anywhere from 1.02-1.08:1.
I don't worry about lift, theres not very much difference, unless you get to the 1.3:1 stamped steel rocker arms, but how fast the valves are coming off seat, and going back on seat is important. Rocker ratio will change this

A slight difference in the rocker ratio, can really wake up a stock cam, you will see it in your times.

Here, have a look, and you will see the different stamped letters and what the ratio could be,.... with a lil math.

I like the LB rockers, they are a very consistent 1.06:1, others can be way off, don't know what you got, till you measure off the retainer.


Darren

Active member
Messages
163
Reaction score
238
Location
Essex, England
Clean looking kart, nice and light. Might be an idea use a support for the exhaust.
Colour of plug is good (I'd be happy with it on a standard setup using a normal plug). Gas flowing the head will let the engine breathe a little better.
Question is, are you happy with it's performance?
Next easy improvement is to advance the timing, use a timing light to establish what it is at moment, then get some offset flywheel keys to give you 30 to 34 degrees, this will shift the power up the rev range to where it benefits you and the engine around the track.
 

busted_blocks

Active member
Messages
110
Reaction score
99
Location
Dongguan, China
Nice!!

You need a vacuum/pressure gauge, not a pressure only gauge.

Like this, Actron CP7803 Vacuum and Fuel Pressure Tester Kit https://a.co/d/3EDK0gc

Dont worry about the fuel pressure part, you jus wanna see how much the gauge is bouncing.

Nice break in procedure, your rings will seat quicker.

I don't like that plug color, its very weird, 😆 😂 😅 🤣

What heat range plug you running???

Those head studs look long, they are bottomed out in the block, right ???

You should be around 8.2:1 CR, right now.

Get some testing and tuning in and show us the results. 👍

Do you have any more stock stamped steel rockers arms???

Those stamped letters on the rocker arms, indicates different rocker ratio.

Stock can be anywhere from 1.02-1.08:1.
I don't worry about lift, theres not very much difference, unless you get to the 1.3:1 stamped steel rocker arms, but how fast the valves are coming off seat, and going back on seat is important. Rocker ratio will change this

A slight difference in the rocker ratio, can really wake up a stock cam, you will see it in your times.

Here, have a look, and you will see the different stamped letters and what the ratio could be,.... with a lil math.

I like the LB rockers, they are a very consistent 1.06:1, others can be way off, don't know what you got, till you measure off the retainer.

I did wonder about the gauge. I ordered a vacuum / pressure gauge and replace.

Plug color has to be to do with the Octane booster still in my tank. I'll be done with it in a few more runs. Since it's not covered in carbon I'm encouraged. Plug is standard. I did buy the one you suggested but didn't put it in this engine yet. I'm just using whatever stock plug came with the GX200.

Regarding the head studs. I put a ball bearing under each stud an tighten onto the ball. The should all be tight. This works for all but 1 side cover stud that has an open back. They are a bit long but still fit. I have 70mm and they are bit better. I think these were just on a closer table :ROFLMAO:

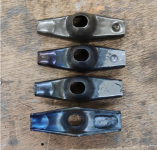
I have lots of stamped rockers but none of them have any markings. I'll try and measure them up. I had some welded up and can make any ratio I want. Here is one I tried. I didn't clamp it very well and hole is off center but you get the idea.

I was wondering in your previous post you mentioned using bored out stock carb. Does refer to just a larger jet on the stock carb or are there other changes you can do to that stock carb?

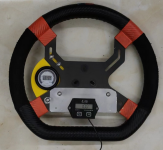
I went to the track to test today but forget my RPM gauge at home. I made a steering wheel mount for it and the oxygen gauge. So silly, drive all that way and the steering wheel was at home. Oh well, can't win em all.

Thanks again for all the support.
 

Attachments

  • rockers.png
    rockers.png
    2.2 MB · Views: 2
  • steering wheel.png
    steering wheel.png
    1.1 MB · Views: 2

busted_blocks

Active member
Messages
110
Reaction score
99
Location
Dongguan, China
Clean looking kart, nice and light. Might be an idea use a support for the exhaust.
Colour of plug is good (I'd be happy with it on a standard setup using a normal plug). Gas flowing the head will let the engine breathe a little better.
Question is, are you happy with it's performance?
Next easy improvement is to advance the timing, use a timing light to establish what it is at moment, then get some offset flywheel keys to give you 30 to 34 degrees, this will shift the power up the rev range to where it benefits you and the engine around the track
Thanks, it's a fun kart when it's on the track. I just don't know where to support the exhaust with such a short pipe. The frame is pretty far at most spots. The good news is there is very little vibration compared to before. It almost doesn't move. I'll keep thinking on how to make it better. Some long pipes with a spring joint in the middle could work.
Regarding performance, I only broke it in an hour. I'll do another 1 hour on the stand, then start running on the track. I'll be able to get a good idea of it's performance. The mechanic is the best driver we have, very consistent. You can pretty much judge your setup by the times he posts. I'm always 1 second behind his times, but also less consistent.
I don't have a timing light but it's on the to buy list. I have to do some research, I've never used one before so not exactly sure what to buy.
I have a bracket for adjusting timing by moving the coil. It's currently 7.5deg or 12.5deg but as @BrownStainRacing pointed out, we don't know what stock is. I guess it's a fine line, I don't want to move it too far up the rpm range. I'm trying to keep it to 5500rpm more or less. but I think 28-30deg maybe.
 

Darren

Active member
Messages
163
Reaction score
238
Location
Essex, England
Here's the ebay poster boy of timing lights, hundreds available .


Digital timing lights are great.
To set up, find TDC, draw a white line on the flywheel and crankcase. clip the HT pickup onto the plug lead, connect up a 12v source, run your engine at normal tick over, say 2000rpm, point the timing light at the white lines adjust the digital read out until the two meetup, the timing light will give you an accurate readout of your timing, now you can set your timing with an offset key to give you say 32BTDC :)
I know I've over simplified it. You can do the lines on the clutch side, but you have to strip the clutch to just the back plate, then you can white line that side. You might be able to mark the fan and indicate through the stop switch, that way you still have the pull start all together.
Sorry just spit balling.
 
Last edited:

BrownStainRacing

Well-known member
Messages
1,367
Reaction score
1,486
I did wonder about the gauge. I ordered a vacuum / pressure gauge and replace.

Plug color has to be to do with the Octane booster still in my tank. I'll be done with it in a few more runs. Since it's not covered in carbon I'm encouraged. Plug is standard. I did buy the one you suggested but didn't put it in this engine yet. I'm just using whatever stock plug came with the GX200.

Regarding the head studs. I put a ball bearing under each stud an tighten onto the ball. The should all be tight. This works for all but 1 side cover stud that has an open back. They are a bit long but still fit. I have 70mm and they are bit better. I think these were just on a closer table :ROFLMAO:

I have lots of stamped rockers but none of them have any markings. I'll try and measure them up. I had some welded up and can make any ratio I want. Here is one I tried. I didn't clamp it very well and hole is off center but you get the idea.

I was wondering in your previous post you mentioned using bored out stock carb. Does refer to just a larger jet on the stock carb or are there other changes you can do to that stock carb?

I went to the track to test today but forget my RPM gauge at home. I made a steering wheel mount for it and the oxygen gauge. So silly, drive all that way and the steering wheel was at home. Oh well, can't win em all.

Thanks again for all the support.
Those bored stock appearing carbs are completely reworked inside.

I tried my hand boring my own, well.....that was a total fail.

The venturi is not centered like it looks like it is, so the 1st 3 I messed up on, I got into the low side of the carb. And that cause a huge vacuum leak, nope..... not funny, 😆 😂 🤣 😄

Finally after I learned how to completely destroy perfectly good carbs, 😆 🤣 😂 😹 I got 1 opened to around .630" without destryoing it,.....but it was a total disappointment and the carb actually was better before I touched it.

So me being me, I decided to completely tear up 2 more perfectly fine running carbs, again.......not funny😁 😂

I finally wised up and traded off that boring bit before I didn't have any carbs left to tear up.

I jus could never get em to tune and perform like I can when they come from good carb builders.
There is definitely something these guys know about the insides of these stock carbs

It was jus much easier and cheaper to buy em from a good carb builder, that actually knows how to, and what to open up.

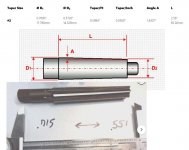
Heres that bit, if you wanna try yourself, I
dont recommend it. 😂 😂 😂 😂 😂


busted_blocks

Active member
Messages
110
Reaction score
99
Location
Dongguan, China
Those bored stock appearing carbs are completely reworked inside.

I tried my hand boring my own, well.....that was a total fail.

The venturi is not centered like it looks like it is, so the 1st 3 I messed up on, I got into the low side of the carb. And that cause a huge vacuum leak, nope..... not funny, 😆 😂 🤣 😄

Finally after I learned how to completely destroy perfectly good carbs, 😆 🤣 😂 😹 I got 1 opened to around .630" without destryoing it,.....but it was a total disappointment and the carb actually was better before I touched it.
So me being me, I decided to completely tear up 2 more perfectly fine running carbs, again.......not funny😁 😂

I finally wised up and traded off that boring bit before I didn't have any carbs left to tear up.

I jus could never get em to tune and perform like I can when they come from good carb builders.
There is definitely something these guys know about the insides of these stock carbs

It was jus much easier and cheaper to buy em from a good carb builder, that actually knows how to, and what to open up.

Heres that bit, if you wanna try yourself, I
dont recommend it. 😂 😂 😂 😂 😂

I'm not sure i'll try my hand at it just yet. I have enough that I can't do correctly with engines at the moment:p

Just to have it recorded somewhere, that's, as near as I can tell, a morse 2 taper hand reamer. The measurements all match the listing and so does the picture from local listing for the morse 2 reamer.
 

Attachments

  • carb-reamer.jpg
    carb-reamer.jpg
    70.1 KB · Views: 2
  • reamer.png
    reamer.png
    689.3 KB · Views: 0

busted_blocks

Active member
Messages
110
Reaction score
99
Location
Dongguan, China
Here's the ebay poster boy of timing lights, hundreds available .


Digital timing lights are great.
To set up, find TDC, draw a white line on the flywheel and crankcase. clip the HT pickup onto the plug lead, connect up a 12v source, run your engine at normal tick over, say 2000rpm, point the timing light at the white lines adjust the digital read out until the two meetup, the timing light will give you an accurate readout of your timing, now you can set your timing with an offset key to give you say 32BTDC :)
I know I've over simplified it. You can do the lines on the clutch side, but you have to strip the clutch to just the back plate, then you can white line that side. You might be able to mark the fan and indicate through the stop switch, that way you still have the pull start all together.
Sorry just spit balling.
Thanks, I'll look up those lights.
 

busted_blocks

Active member
Messages
110
Reaction score
99
Location
Dongguan, China
Some progress. I ran the engine on the stand for another hour. RPM up/down 2500-4500rpm. Pretty much 5minute intervals for every RPM range.
I changed the timing to +7.5deg advance. Engine certainly vibrates more than it did with stock timing.
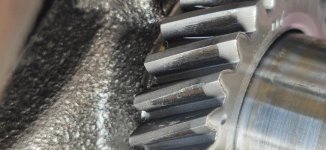
After the hour, I drained the oil and took off the side cover. Crank cam gear, sintered, looks OK. Cam lobes were good and the connecting rod was still torqued to spec. I put the cover back on, torqued it down.
Head bolts were still tight. Lash was maybe 0.0005" loose, so I re-did the lash (at room temp)
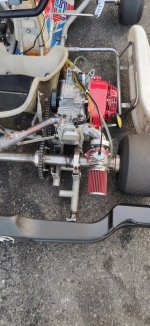
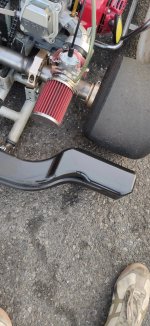
I put the engine on the kart and ran it on the track. Must be very rich, it still sprays gas out the carb, but there was no oil issues at all. It did not spray any gas when on the stand. None. At the end of the straight, the engine hits 6400rpm. This is stock gearing for standard GX200 on this kart. With the no so well tuned carb we did manage to beat stock GX200 time by a tenth or so. Not great for all the work, but it's not tuned yet either. It has hesitation when you give it gas from idle. Seems relatively responsive from 3000rpm up. The oxygen sensor is new for me, it seems to hover around 12, but changing the fuel screw doesn't seem to move it and I even tried smaller jets. This is PWK21mm carb so I'd think with small jets it should be suitable. 35 pilot jet and 95 main jet. I started with 38 pilot and 105 main.

Nothing blew up and it made it around the track in OK time. It can only improve from here.
 

Attachments

  • engine.jpg
    engine.jpg
    2.5 MB · Views: 4
  • gas spray.jpg
    gas spray.jpg
    3.1 MB · Views: 4
  • sintered cam gear 2 hours running.jpg
    sintered cam gear 2 hours running.jpg
    1.3 MB · Views: 4

Darren

Active member
Messages
163
Reaction score
238
Location
Essex, England
14.7 is your stoichiometric target for a perfect air to fuel ratio burn, never aim for this with a simple engine, 12.5-13.5 is where you should aim, this gives you enough fuel to burn, cool the valves and combustion chamber and finally reduce pinking/knock.
The fuel coming out of the carb can be attributed to many things, let's look at what you're doing-
!) Asking too much from the valve train, possible valve bounce and the cam is running out of steam, this affects the pull from the down stroke of the piston, the valve's not closing quick enough and can push some of the air fuel mix back out of the carb.
2) The fuel pump is working overtime at high revs and over pressurising the carb, I've had this and had to provide a restrictive return line to the tank, I used a fish tank plastic screw clamp, worked a treat.

The engine is working and now it's time to start adjusting stuff in small measures. Try not to push the engine past 5000, and now start tuning.
The lambda sensor is a fantastic tuning tool, you can tune a carb/injection system very quickly with it. One question, is this a wide band sensor? and can you pull a data log from the digital gauge? Wish I was this far ahead, I'm still machining parts.
 

BrownStainRacing

Well-known member
Messages
1,367
Reaction score
1,486
Some progress. I ran the engine on the stand for another hour. RPM up/down 2500-4500rpm. Pretty much 5minute intervals for every RPM range.
I changed the timing to +7.5deg advance. Engine certainly vibrates more than it did with stock timing.
After the hour, I drained the oil and took off the side cover. Crank cam gear, sintered, looks OK. Cam lobes were good and the connecting rod was still torqued to spec. I put the cover back on, torqued it down.
Head bolts were still tight. Lash was maybe 0.0005" loose, so I re-did the lash (at room temp)
I put the engine on the kart and ran it on the track. Must be very rich, it still sprays gas out the carb, but there was no oil issues at all. It did not spray any gas when on the stand. None. At the end of the straight, the engine hits 6400rpm. This is stock gearing for standard GX200 on this kart. With the no so well tuned carb we did manage to beat stock GX200 time by a tenth or so. Not great for all the work, but it's not tuned yet either. It has hesitation when you give it gas from idle. Seems relatively responsive from 3000rpm up. The oxygen sensor is new for me, it seems to hover around 12, but changing the fuel screw doesn't seem to move it and I even tried smaller jets. This is PWK21mm carb so I'd think with small jets it should be suitable. 35 pilot jet and 95 main jet. I started with 38 pilot and 105 main.

Nothing blew up and it made it around the track in OK time. It can only improve from here.
That sounds like progress!!!!! 👍

At least you remembered the steering wheel, 😆 🤣 😂 😹.

I have to agree with @Darren , you maybe way passed peak HP at 6400.

Tuning it down to 5000-5500, would be a good target rpm at the end of the straight.

I try to set em up to run 300-500 rpm above peak HP, right before braking or a hard turn.

This allows the engine to stay in the powerband longer and have more torq to the tires, when you need it.

It depends on the entrance and exit of the turn also, too much rpm drop on entrance will kill times.

More stall speed in the clutch (engagement rpm) will help rpm on exit, but too much will blow the tires off, then you play catch up with the steering wheel, and times fall off.

Is the track a road coarse, oval, bull ring, flat, banking ???

Keep testing and tuning, you will get there.

I enjoy t&t, jus as much as an all day ride.
 

busted_blocks

Active member
Messages
110
Reaction score
99
Location
Dongguan, China
That sounds like progress!!!!! 👍

At least you remembered the steering wheel, 😆 🤣 😂 😹.

I have to agree with @Darren , you maybe way passed peak HP at 6400.

Tuning it down to 5000-5500, would be a good target rpm at the end of the straight.

I try to set em up to run 300-500 rpm above peak HP, right before braking or a hard turn.

This allows the engine to stay in the powerband longer and have more torq to the tires, when you need it.

It depends on the entrance and exit of the turn also, too much rpm drop on entrance will kill times.

More stall speed in the clutch (engagement rpm) will help rpm on exit, but too much will blow the tires off, then you play catch up with the steering wheel, and times fall off.

Is the track a road coarse, oval, bull ring, flat, banking ???

Keep testing and tuning, you will get there.

I enjoy t&t, jus as much as an all day ride.
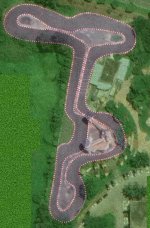
It's mostly flat with some very minor elevation changes. I drew the tack over a satellite image, it's overall 600m.

I ordered a new clutch. I'll take 2 loops off the spring and split half the weights for better engagement.

I got a new rear sprocket. I was at 10:44, I'll go for 10:38. This was my calculation, let me know if it seems correct. 5500/6400 = 86% 86%*44=38
 

Attachments

  • track.jpg
    track.jpg
    462.4 KB · Views: 5

busted_blocks

Active member
Messages
110
Reaction score
99
Location
Dongguan, China
14.7 is your stoichiometric target for a perfect air to fuel ratio burn, never aim for this with a simple engine, 12.5-13.5 is where you should aim, this gives you enough fuel to burn, cool the valves and combustion chamber and finally reduce pinking/knock.
The fuel coming out of the carb can be attributed to many things, let's look at what you're doing-
!) Asking too much from the valve train, possible valve bounce and the cam is running out of steam, this affects the pull from the down stroke of the piston, the valve's not closing quick enough and can push some of the air fuel mix back out of the carb.
2) The fuel pump is working overtime at high revs and over pressurising the carb, I've had this and had to provide a restrictive return line to the tank, I used a fish tank plastic screw clamp, worked a treat.

The engine is working and now it's time to start adjusting stuff in small measures. Try not to push the engine past 5000, and now start tuning.
The lambda sensor is a fantastic tuning tool, you can tune a carb/injection system very quickly with it. One question, is this a wide band sensor? and can you pull a data log from the digital gauge? Wish I was this far ahead, I'm still machining parts.
It's pretty close to 12.5, but I was aiming for 13 in my mind.

The sensor is a generic sensor. 4 wires, I would think it's wide band. Regarding the data, no, it's a cheap meter. Ideally I log the RPM and A/F ratio at the same time. The sensor is a voltage from 0-1V, so I can just log it with an ADC on a little dev board like an Arduino but then I don't have the RPM. Just using an action cam might be quicker. Just record the steering wheel. Mount the camera to the wheel and it will stay relatively oriented to the meter. Might be hard to drive, but doable for testing. I'll be going back Tuesday for more testing.
 

BrownStainRacing

Well-known member
Messages
1,367
Reaction score
1,486
It's mostly flat with some very minor elevation changes. I drew the tack over a satellite image, it's overall 600m.

I ordered a new clutch. I'll take 2 loops off the spring and split half the weights for better engagement.

I got a new rear sprocket. I was at 10:44, I'll go for 10:38. This was my calculation, let me know if it seems correct. 5500/6400 = 86% 86%*44=38
Nice track, looks like alot of fun.

Fast turns and tight turns, I'd say it's got it challenges.

Your calculation should give you the same top speed, if you can get it to hook coming outta some of those turns, and still be able to hit your 5500 on the straights.

You might try to split the weights 1st, test, then clip a coil or 2 off the spring.

I usally go too far on the spring, after splitting the weights then I gotta start over on the spring, 😆 🤣

But that's how we learn.
 

busted_blocks

Active member
Messages
110
Reaction score
99
Location
Dongguan, China
I was at the track yesterday trying to tune the carb. After playing around, seems like I need very small jets even for the PWK21 carb. I suspect I've been running things pretty rich. I put in 32 pilot jet and 95 main and it seems to run OK. I modified a new clutch by splitting half the weights and removing 2 coils. Engagement seems to be 2200rpm or so. It actually didn't feel great until I cranked up the idle speed to 2200rpm, more or less. Then it seemed to drive a bit better. It runs very similar to stock. Good news is that with the new 38 tooth rear sprocket, with 10 tooth front, the rpm max out at just about 5500rpm at the end of the straight.

I didn't get to play with the oxygen sensor much, only a bit at the end of the day as my battery was dead. Rookie mistake, make sure things are charged before you go. Idle seems to be about right at 13:1, maybe 12.5, but higher up it's all 10.X:1. I still need to lean it out more. Also it seems to flood the intake tube (maybe hence the spraying) with some gas. What I mean is, when I take off the carb to change the jets, there is a noticeable puddle of gas in the intake flange. This could be contributing to the rich condition. Don't think it's helping anything.

I will try slightly stiffer springs, lean things out and try again. I have a ratio rocker I made to try on the intake but want to get things dialed in before I try that. Did I mention it hasn't blow up yet? Nothing has come loose either, so there is some progress for sure.

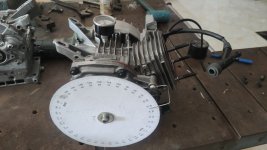
I got the timing light recommended @Darren so I will be able to get the exact stock timing number. I made a degree wheel and piston stop, so making progress there too. I just cut an old head in half and tapped a hole for a bolt. Probably over kill but it works.

I have another GX200 bottom end ready, and working on a 70mm piston bottom end now. I also got new vacuum/pressure gauges so that will be interesting to see how they read.
 

Attachments

  • vacuum gauge.jpg
    vacuum gauge.jpg
    785.4 KB · Views: 2
  • timing wheel.jpg
    timing wheel.jpg
    1.1 MB · Views: 2
  • piston stop.jpg
    piston stop.jpg
    1.1 MB · Views: 2

Rat

Well-known member
Messages
1,750
Reaction score
1,298
Location
SW Virginia
I was at the track yesterday trying to tune the carb. After playing around, seems like I need very small jets even for the PWK21 carb.
Regardless of what anyone say that carb is too small and that why it's overpowering the main jet do easily. Either get a bigger jet or bore out the air bleeds on the emulsion tube 030 works wonders usually.

√(196)×2= 28
Since that assumes there is 100% volumetric flow efficiency that no engine has or ever will achive to simplify the calculation it indicates that a 26mm is the absolute largest you should use and a 24mm is the one size that will wake up tthe beast.

When a carb is too small the negative intake pressure overpowers the main by the increase in flow velocity cause by the undersized venturi.

Likewise a too big carb is the same issue in reverse, the negative pressure cant draw adequate fuel up the jet for the lack of velocity due to the oversized venturi.

It's a little like how a wide open fire hydrant has the pressure to knock you on your a$s and push you a few feet, but a water jet the size of a toothpick at its center, at the same exact pressure would cut you right right in half clear through without any loss of footing.

I suspect I've been running things pretty rich. I put in 32 pilot jet and 95 main and it seems to run OK.
That is some stupid lean jetting, for being piss puddle rich still. Just get a bigger carb already
 

busted_blocks

Active member
Messages
110
Reaction score
99
Location
Dongguan, China
Regardless of what anyone say that carb is too small and that why it's overpowering the main jet do easily. Either get a bigger jet or bore out the air bleeds on the emulsion tube 030 works wonders usually.

√(196)×2= 28
Since that assumes there is 100% volumetric flow efficiency that no engine has or ever will achive to simplify the calculation it indicates that a 26mm is the absolute largest you should use and a 24mm is the one size that will wake up tthe beast.

When a carb is too small the negative intake pressure overpowers the main by the increase in flow velocity cause by the undersized venturi.

Likewise a too big carb is the same issue in reverse, the negative pressure cant draw adequate fuel up the jet for the lack of velocity due to the oversized venturi.

It's a little like how a wide open fire hydrant has the pressure to knock you on your a$s and push you a few feet, but a water jet the size of a toothpick at its center, at the same exact pressure would cut you right right in half clear through without any loss of footing.


That is some stupid lean jetting, for being piss puddle rich still. Just get a bigger carb already
I have several PWK24's as well. Any guess what the jetting should be? To be clear, you're saying if I use a larger carb, I'll be able to lean it out? It's easy swap for me just counter intuitive to my way of thinking. Since I don't know much about engines that's not surprising. I also have every size of jet for those carbs, so I can try any combination.
 

Rat

Well-known member
Messages
1,750
Reaction score
1,298
Location
SW Virginia
I have several PWK24's as well. Any guess what the jetting should be? To be clear, you're saying if I use a larger carb, I'll be able to lean it out? It's easy swap for me just counter intuitive to my way of thinking. Since I don't know much about engines that's not surprising. I also have every size of jet for those carbs, so I can try any combination.
In simple terms a larger carb can't suck so hard, which means it won't be able to pull so much fuel up from the bowl, and therfore will be easier to jet normally and in an appropriate range for the displacement.

Iirc the jetting on my 208 (short intake, long exhaust) is 40P/125M but I did drill the Etube to lean it further because it was being such a temperamental pain about being tuned.
I could get a size and a half too big or too lean on the main, but until I modified the tube never where it needed to be
 

busted_blocks

Active member
Messages
110
Reaction score
99
Location
Dongguan, China
In simple terms a larger carb can't suck so hard, which means it won't be able to pull so much fuel up from the bowl, and therfore will be easier to jet normally and in an appropriate range for the displacement.

Iirc the jetting on my 208 (short intake, long exhaust) is 40P/125M but I did drill the Etube to lean it further because it was being such a temperamental pain about being tuned.
I could get a size and a half too big or too lean on the main, but until I modified the tube never where it needed to be
Thanks, I'll give it a shot.
 
Top