New (to me) Razor Dune Buggy Conversion

Status
Not open for further replies.

J0SH44

New member
Messages
8
Reaction score
0
Location
NW Ohio
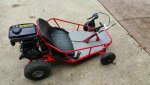
I am the new owner of a Razor Dune Buggy that has been converted from an electric motor to gas. I purchased the kart for my 6 yr old to drive around the yard. My kid has been driving 'modified' power wheels for a few years but this is the first gas-powered vehicle.

The throttle and brake are both hand-operated and located on the steering 'wheel.' I would like to transition to a pedal system but not sure exactly how to do that--so any suggestions/advice would be welcomed.

The kart has a kill switch button on the steering column, which I believe utilizes the 'low oil' sensor to shut off the engine. I would like to install a remote kill switch that I can use to kill the kart in case my kid loses control. I wasn't sure if something like http://www.ebay.com/itm/12V-DC-500-...529?pt=LH_DefaultDomain_0&hash=item51b529a9d9 would work (or something similar--either way I am not sure how to implement that...).

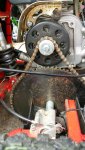
The Kart does appear to have a live axle; however, only the right rear wheel is powered--I assume that the left rear wheel must utilize bearings as it spins freely. The kart drives great on pavement--very quick and responsive--however, on grass the one wheel tends to slip a bit when starting out. To solve this I would like to try out some new tires with better off-road grip, but I have no idea what tires to buy. I think bigger tires may help as I am also afraid that the gear on my axle is going to bottom out on slightly uneven terrain as their may be 1 inch of clearance between it and the ground. So bigger tires may give me more clearance and better grip.

So I do have a few ideas, but I just don't know where to start. I would love to hear ideas (details if you have them hah) on what to do and how to do it. I don't know much about karts, so it is fair to assume I know nothing when explaining your ideas. If you have pictures or drawings, that works for me even better.

Thanks for reading and thanks in advance for any information or suggestions that you have.

I have pics in my profile and attached a few of them here.
 

Attachments

  • 20150420_114755.jpg
    20150420_114755.jpg
    117.5 KB · Views: 45
  • 20150420_120220.jpg
    20150420_120220.jpg
    89.1 KB · Views: 37
  • 20150420_114854.jpg
    20150420_114854.jpg
    147.3 KB · Views: 56
  • 20150420_114933.jpg
    20150420_114933.jpg
    146.9 KB · Views: 37
  • 20150420_115534.jpg
    20150420_115534.jpg
    108.7 KB · Views: 51
Messages
147
Reaction score
1
Location
Kansas City, Kansas
Welcome to the fourm, its a great place and congrats on your new kart!

What is the weight and gear ratio(axle sprocket tooth count/clutch sprocket tooth count) too much torque could be you slipping problem, that thing can't weight very much.
 

JoeKR

New member
Messages
26
Reaction score
0
Location
Sandusky OH
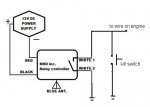
Here ya go. you remote idea will work if wired like this. "On" on the remote will be kill. Use a small SLA battery for the power source.
Run one white wire to the frame and one white wire to the hot side of the kill switch and you're golden.
 

Attachments

  • help1.jpg
    help1.jpg
    18.5 KB · Views: 14

chancer

ɔ ɥ ɐ u ɔ ǝ ɹ
Messages
9,358
Reaction score
94
Location
COMFORT, TEXAS
Nice I have 2 of these both electric. I have been wanting to do what you have there.
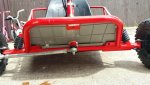
In pic 3 and 5 you can see they cut out the frame to accomidate the sprocket. But there is nothing holding the rear of the frame together, seems iffy. also the stock kart is a live axle and your set up looks live axle. You may pull off the rear wheels to see if it is missing the axle key. ( a small metal bar that fits into a groove on the axle and wheel to lock them together)
 

chancer

ɔ ɥ ɐ u ɔ ǝ ɹ
Messages
9,358
Reaction score
94
Location
COMFORT, TEXAS
I was thinking maybe the previous owner had done that on purpose, due to tire wear. In stock form these razor karts are infamous for terrible tire wear. But they come with those tiny little tires.
 

J0SH44

New member
Messages
8
Reaction score
0
Location
NW Ohio
Welcome to the fourm, its a great place and congrats on your new kart!

What is the weight and gear ratio(axle sprocket tooth count/clutch sprocket tooth count) too much torque could be you slipping problem, that thing can't weight very much.

The weight can't be much more than 50 pounds (it can lift it in and out of the back of my truck rather easily) and my kid is about 50 pounds as well. As far as the tooth count, I would have to count those myself as I have no idea. I will try to do that at some point today and post back. Probably a statistic I should know anyways. Because the hand grip (for the throttle) is wide and stiff, my kid has a hard time squeezing the throttle, so she can't really "punch it" right away but has to do a slow squeeze. That doesn't mean there still isn't too much torque I suppose but she does tend to ease into the start.

Thanks
 

J0SH44

New member
Messages
8
Reaction score
0
Location
NW Ohio
Here ya go. you remote idea will work if wired like this. "On" on the remote will be kill. Use a small SLA battery for the power source.
Run one white wire to the frame and one white wire to the hot side of the kill switch and you're golden.

Thanks Joe,

Looking at the wiring, do you think that I would be able to keep the button on the steering column as well so that the driver can kill the engine at any time as well as me with the remote?

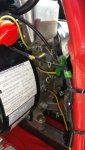
I will try to explain the wiring the best I can in the pic attached. The yellow wire coming out of the oil sensor area (Wire A) is attached to nothing.

Wire B is a combo of wires C and D. Wire B travels all the way down to the button on the steering column.

Wire C joins with D to create B. Wire C also connects to the brass piece in the center of the pic.

Wire D joins with C to create B. Wire D also connects to the on/off switch on the engine.

Wire E connects to the brass piece in center of picture and connects back into the engine off-picture.

Wire F connects to brass piece in center of pic and to the on/off switch on engine.

If i wanted to introduce the remote to this setup. It sounds like i could connect the receiver/relay to a small SLA 12v. from there I would connect one white to frame somewhere. The other white would go to wire E (I am guessing here for the most part). If that is correct that doesn't sound to difficult. I suppose I would just need to make sure I charge the SLA every now and then. It looks like if the battery dies the kart would continue to run and I just wouldn't be able to shut it off with the remote.

Thanks again Joe, your assistance is much appreciated.
 

Attachments

  • Screenshot_2015-04-21-12-09-42.jpg
    Screenshot_2015-04-21-12-09-42.jpg
    80.8 KB · Views: 14

J0SH44

New member
Messages
8
Reaction score
0
Location
NW Ohio
Nice I have 2 of these both electric. I have been wanting to do what you have there.
In pic 3 and 5 you can see they cut out the frame to accomidate the sprocket. But there is nothing holding the rear of the frame together, seems iffy. also the stock kart is a live axle and your set up looks live axle. You may pull off the rear wheels to see if it is missing the axle key. ( a small metal bar that fits into a groove on the axle and wheel to lock them together)

Hi Chancer,

I saw a conversion a couple of weeks ago so i just kept searching CL for a buggy i could convert, but instead found this one that was already converted.

When I was looking the kart over i guess i didn't really think about or take notice that the end bar was cut away. The kart does still feel pretty solid and there is another bar still directly behind the driver seat that is intact. What could be the consequences of that bar being cut?

The current axle is live, I am pretty sure of that. I believe that the rear left wheel has bearings in it. I did remove the tire and took a pic of everything. Does the picture help answer your question?
 

Attachments

  • 20150421_114714.jpg
    20150421_114714.jpg
    85.5 KB · Views: 20

J0SH44

New member
Messages
8
Reaction score
0
Location
NW Ohio
Keep in mind that reverting back to a live axle will affect the steering; can you post an overhead shot of the steering?

Thanks Fabroman,

That is what i had read somewhere--that a live axle is a little more difficult to turn than just one wheel powered. The steering as it is now is very 'responsive...' I wouldn't mind it being a little harder to turn if that is the result of the live axle.

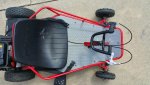
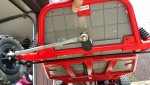
I hope the pic attached is what you mean by an overhead show of the steering. I keep thinking you want to see how the wheels are connected to the steering column so I am going to go with the literal interpretation and the underside shot. Hopefully these pics answer your question.
 

Attachments

  • 20150421_114104.jpg
    20150421_114104.jpg
    102.5 KB · Views: 16
  • 20150420_120422.jpg
    20150420_120422.jpg
    78.3 KB · Views: 22

J0SH44

New member
Messages
8
Reaction score
0
Location
NW Ohio
I was thinking maybe the previous owner had done that on purpose, due to tire wear. In stock form these razor karts are infamous for terrible tire wear. But they come with those tiny little tires.

Yeah, I would like to change out the tires at some point. I would like bigger tires all around. We live in the sticks and we won't be driving on pavement for the most part. It seems like some bigger tires would make for a better ride--less slip in grass and maybe a little more bounce in them. I would like something a little taller in the back as the clearance of the chain and sprocket on the axle is very low and makes me nervous that it will bottom out on a hill, tree root, rock, or something. I just have no idea what to even look for in the way of tires however.
 

chancer

ɔ ɥ ɐ u ɔ ǝ ɹ
Messages
9,358
Reaction score
94
Location
COMFORT, TEXAS
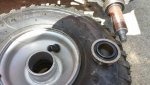
Ok yes. Someone put bearings in the rear wheel. Not sure why. What does the other side look like? If it has a bar key locking the wheel to the axle you should be able to duplicate that and then it will be a live axle.

As far as larger wheels and tires: It goes back to the other posts. You need to count the teeth on the axle sprocket and the clutch sprocket. this will give you your gear ratio. That combined with tire size will figure into how big of tires you can get. Go to the home page of the forum and look at "FAQs and Articles" there is a lot of good info there on gearing and drive ratios, and general knowledge. Also there is a speed calculator somewhere in there. Taller tires will increase top speed.

As far as the frame being cut out, I dunno if it is solid I guess its ok. but there is no rear bumper, if another, bike, scooter, kart hits her they are gonna hit the chain and gear.
 

OzFab

Well-known member
Messages
15,615
Reaction score
74
Location
Warwick Qld, Australia
That is what i had read somewhere--that a live axle is a little more difficult to turn than just one wheel powered. The steering as it is now is very 'responsive...' I wouldn't mind it being a little harder to turn if that is the result of the live axle.

I hope the pic attached is what you mean by an overhead show of the steering. I keep thinking you want to see how the wheels are connected to the steering column so I am going to go with the literal interpretation and the underside shot. Hopefully these pics answer your question.

Just about perfect, thanks...

What the pics show is that there's way too much toe out (front wheels should toe in) & very little or no ackermann, which means, with a live axle, steering will be very difficult... which is probably why the PO fitted a bearing wheel to the rear axle...

What needs to happen is the anchor points for the rear steering link (between the two wheels) need to move in, then adjust the front link accordingly; this thread should give you an idea of what I mean...
 

JoeKR

New member
Messages
26
Reaction score
0
Location
Sandusky OH
Thanks Joe,

Looking at the wiring, do you think that I would be able to keep the button on the steering column as well so that the driver can kill the engine at any time as well as me with the remote?

I will try to explain the wiring the best I can in the pic attached. The yellow wire coming out of the oil sensor area (Wire A) is attached to nothing.

Wire B is a combo of wires C and D. Wire B travels all the way down to the button on the steering column.

Wire C joins with D to create B. Wire C also connects to the brass piece in the center of the pic.

Wire D joins with C to create B. Wire D also connects to the on/off switch on the engine.

Wire E connects to the brass piece in center of picture and connects back into the engine off-picture.

Wire F connects to brass piece in center of pic and to the on/off switch on engine.

If i wanted to introduce the remote to this setup. It sounds like i could connect the receiver/relay to a small SLA 12v. from there I would connect one white to frame somewhere. The other white would go to wire E (I am guessing here for the most part). If that is correct that doesn't sound to difficult. I suppose I would just need to make sure I charge the SLA every now and then. It looks like if the battery dies the kart would continue to run and I just wouldn't be able to shut it off with the remote.

Thanks again Joe, your assistance is much appreciated.

Simplest way to hook it up would be to hook one white wire to wire D and the other to where the motors switch grounds to the engine. All other switches will work the same. I going to assume the schematic didn't help any? I didn't know you had 2 switches in parallel and didn't draw it that way.

Battery life should be good as the relay in the remotes receiver is off while the cart is running. It would be a good idea to put a switch between the receiver and the battery, that'll extend battery life.
My sage advice on carts and mini bikes would fit on a postage stamp, but you pitched one into my wheelhouse and thus the first post. I considered the need for a remote shutoff when my son talks about building crazy stuff for the grand-kids, so helping on this one was a no-brainer.
Keep us posted how this works out for ya, I'd really like to "see this in action".
 

J0SH44

New member
Messages
8
Reaction score
0
Location
NW Ohio
Sorry for the delayed responses, I am thankful for the assistance but I have a final project due this Sunday in my Statistics class that is taking up all my spare time right now. I was able to count the teeth on the axle and clutch as you suggested Chancer. It appears to be 12 and 72. I will have to do some reading to see what that means.

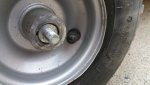
As far as the other wheel, I cannot seem to get it off the axle--even some persuasion with a rubber mallet didn't seem to work. I may try again later and see if I can get it off. I have included a picture of the tire with the center nut off the tire.

Thanks for the link Fabroman, I will read that over a few times and see if I can make the proper adjustments. If I make these adjustments, would I be able to replace the current wheels with slightly larger and taller ones?

And thank you Joe for the wiring help. My remote/relay is still shipping. Once it gets here I will try to get it set up. Your diagram and wording definitely help, I just wanted to make sure I was understanding things correctly. I will definitely let you know how it works.

I do have another question for everyone. The fuel tank seems to leak quite a bit out of the cap while being driven. The top of the tank--all around the cap--ends up covered in gas after being driven through the bumpy yard after a while. I am afraid it will start on fire. How do I prevent this from happening. I understand that air needs to enter the tank to prevent a vacuum but how do I prevent gas from spilling out of the cap (it feels like it is on tight).
 

Attachments

  • 20150424_170856.jpg
    20150424_170856.jpg
    66.8 KB · Views: 11

chancer

ɔ ɥ ɐ u ɔ ǝ ɹ
Messages
9,358
Reaction score
94
Location
COMFORT, TEXAS
Hey when you do finish your statistics final project, please do keep us informed on this. I am very interested in doing the same thing to my Razor buggy.
Ok so 72 and 12= a 6:1 gear ratio. it is simple 72 divided by 12 Everyone here at DIYGK says that is a good generic starting point for most Karts. But yes to fully understand what it all means, just study the FAQ pages.
As far as the rear axle, I went and looked at mine and both sides have a keyway and it should be a live axle "locked" rear end. It looks like there is a keyway in your wheel, it should come off but they do get stuck. I have a lawn tractor that the wheel will nor come off even when heated with a torch, and once used a sledge hammer to get a wheel of a go kart. but it will come off.
BIG tires. It is important to mention at this point ** DO NOT go buy 4.99 harbor freight wheels*** Many have tried none have succeeded. Statistically speaking they fail every time(sorry couldn't resist):sarcasm:
Replace the gas cap. a few bucks is worth not needing a burn ward.
ALSO Statistics show that 90% of all statistics are made up.:lolgoku:
 

chancer

ɔ ɥ ɐ u ɔ ǝ ɹ
Messages
9,358
Reaction score
94
Location
COMFORT, TEXAS
Just about perfect, thanks...

What the pics show is that there's way too much toe out (front wheels should toe in) & very little or no ackermann, which means, with a live axle, steering will be very difficult... which is probably why the PO fitted a bearing wheel to the rear axle...

What needs to happen is the anchor points for the rear steering link (between the two wheels) need to move in, then adjust the front link accordingly; this thread should give you an idea of what I mean...

Tony does this steering work the same. I notice on these Razor karts there is only 1 steering arm and then... is it a "drag link" that connects to the other spindle? and is this a good steering system?
 
Status
Not open for further replies.
Top