reverse trike (stingray) build start to finish

Status
Not open for further replies.

crazykart

Crazy member
Messages
1,167
Reaction score
7
Location
Swartz Creek, Michigan
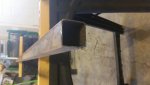
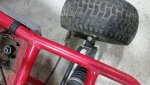
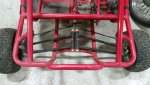
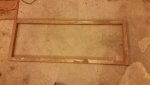
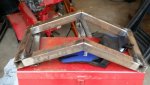
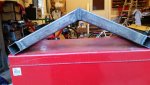
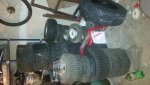
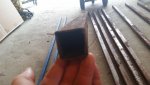
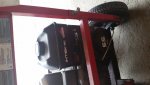
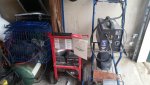
So I've set off to build my first kart by myself. This is to document my build from start to finish, and for any help/guidance/whatever along the way. I will be hopefully getting into the actual fabrication by next weekend. So far I have all the materials to start the frame, and the engine I will be using. Price is always a very big point with me as I have a family to support on a minimal wage. It will be mainly on road, but here in Michigan our roads are crap, so it has to have a suspension. Originally I was thinking a swing arm in back, and dual a arms up front, but that was starting to get complicated, and I like to follow by KISS. Then it went to single a arms in front, which presented it's own problems. Now I'm thinking a modified trailing arms system on front. Seems like it would be simpler, easier, and I won't run into as many problems. I also want to keep it as light as possible, low, long 7', wide 3-4' (one bench seat to fit 2 people, well one adult and one child at a time) so no roll cage, but I will be putting a roll bar behind the seat just in case. I'm also going with a comet 30 series to make things easiest, good acceleration, and good speed. Listing of my materials: 7 7 foot by 1 1/2" square steel tunes, the guy told me they were 1/8 thick, but looks more like 14 gage or around there. 2 7 foot by 1/2 looks to be 16 gage square steel tubes, 4 1 1/4 inch by 2 to 2 1/2 foot round steel bars looks to be 16 gage, power washer Briggs intek 190 cc 5.5 hp motor. Misc 16 gage 1/2 inch square steel tubes from the power washer frame, engine mounting plate from the power washer frame.

Total cost so far $60, $45 for the 1 1/2" tubes, $15 for the power washer (bad pump), round pipe free (was part of our old garage door opener, 1/2 square tube free from work.

Yes I know the 1 1/2" is rusty, but I will use that to my advantage as I know a chemical that turns rust into a protective coating to stop further rusting, and seal the steel.

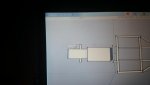
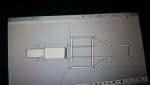
I will hopefully have the design done and uploaded the next few days, and if anyone wants to check it out just get Google sketchup and you can do so.
 

Attachments

  • 20150314_110927.jpg
    20150314_110927.jpg
    78.6 KB · Views: 23
  • 20150314_110950.jpg
    20150314_110950.jpg
    83.1 KB · Views: 18
  • 20150314_111002.jpg
    20150314_111002.jpg
    38.2 KB · Views: 18
  • 20150314_111014.jpg
    20150314_111014.jpg
    60.4 KB · Views: 20
  • 20150314_111529.jpg
    20150314_111529.jpg
    88.4 KB · Views: 29

Poboy kartman

Senior Moments Member
Messages
12,461
Reaction score
63
Location
White Settlement Texas
I have used a couple of those "rust converter " products....with mixed results...which one did you have in mind....and reguardless...I wouldn't recommend using them before welding....
 

crazykart

Crazy member
Messages
1,167
Reaction score
7
Location
Swartz Creek, Michigan
I was actually going to use corroseal, I've had very good results with it in the past. No not before welding, everything will be welded up and then sprayed inside and out.
 

chancer

ɔ ɥ ɐ u ɔ ǝ ɹ
Messages
9,358
Reaction score
83
Location
COMFORT, TEXAS
Again what's with the shopping Carts???:lolgoku:
Just kidding, its just that they keep showing up everywhere.
Good luck with your project. BTW I have that exact motor from a pressure washer on my Kart.
 

crazykart

Crazy member
Messages
1,167
Reaction score
7
Location
Swartz Creek, Michigan
Lol ah the infamous shopping cart conundrum lol. We have a store up here closing down in a few months, and someone stole a cart and left it in the parking lot at my job. Boss wanted me to throw it out, and I thought "hey, chop it up, make it smaller, easy welding cart" lol. That and I had been wanting to do something for a "floor" for my kart, so I figured I could chop the mesh part up and use it for that, basically just something for the feet to rest on.

I tell you what, they come in handy lol.
 

parkland

New member
Messages
33
Reaction score
0
Location
MB Canada
I was thinking how to prevent rust inside my tubing, and came up with spraying expanding foam 'closed cell' foam in the openings.
That should seal it up tight, and without fresh air, rust can not form.
In the boat world, there are large metal voids in some boats, that are sealed, and have gone decades without any rust progression, despite being bare metal.

Other than that, my next thing on the list, for parts that can't be sealed away from oxygen, is zinc coating paint. It's from 3m, and apparently not only protects the metal it's on, but metal all around it.

I've tried many other products, and they're just to iffy and required good surface prep. You can't always surface prep everywhere you want protection. Zinc coating is the answer I think.
 

crazykart

Crazy member
Messages
1,167
Reaction score
7
Location
Swartz Creek, Michigan
Welp, ran into a bit of a problem with the design... gonna sound stupid but, I don't have a clue what size rear tire I'm using yet.

I was gonna get a 16 or 18" 1" live axle for a mini bike, keyed with the hub adapter. I know i need the tire as wide as possible for stability and traction. I was thinking an 18x9.50-8 rear tire (Carlisle from bmikarts) with some 15x6.00-6 tires for front.

The problem is that I don't want the rear swing arm too long because of leverage issues.

I was going to make the entire swing arm about 2' 3" long, with the tire being mounted about 2" from the very back. My engine is 16" long at minimum and will need to be mounted at least 2" from the swing joint. Idk if it'll be enough room...

Guess I'll have to iron out the measurements and see what I get.
 

crazykart

Crazy member
Messages
1,167
Reaction score
7
Location
Swartz Creek, Michigan
Ok, here's my wall. Showing the base of my design as it its. Total overall length is around 7'7", the front is about 5'1" and the rear where the engine is mounted and tire is about 2'6" with an extra 9" beyond that for the tire to extend. The big box is my engine space. The widest part of the frame is 3' 3" and the front tires should extend about 4-5" passed that widest part (front designs not done yet). I'm starting to think my proportions are getting out of hand, and stability will suffer. Starting to think the whole duel seater reverse trike idea is going to have to go out the window. I really want a reverse trike, but at the same time I have to make it to where my kids can ride with me. Tbh I'm also horrible at this whole design phase. Good at building, not so good at designing. Anyone have any suggestions as to how I can make this work, or even another easy reverse trike frame design?
 

Attachments

  • 20150315_192508.jpg
    20150315_192508.jpg
    29.8 KB · Views: 11
  • 20150315_192422.jpg
    20150315_192422.jpg
    40.9 KB · Views: 20

crazykart

Crazy member
Messages
1,167
Reaction score
7
Location
Swartz Creek, Michigan
Ok, I have my rear tire, 22x11.00-8 should be good enough. Changed frame design again, and think this will be the final. I'm picking up some more steel on thursday, and planning on starting to clean some of the rust up, cut some of the main base, and start welding thursday through saturday. I'm going to order some yerf dog 15 degree a-arms from bmiparts since they're right about the length that I'm looking for 12-13". Though the 15 degrees may be a bit much. I may just got with the weld your own and set the angle myself. Welp that's it for the update. I have my frame design in another thread so I don't want to repost, but I'll probably just link it before I start at everything on thursday.

O, one more thing. Chancer and firemanjim had a great idea for the pivot points on the swing arm, which I will also be using for the a-arm mounts. I'll also be linking to that by thursday.
 

crazykart

Crazy member
Messages
1,167
Reaction score
7
Location
Swartz Creek, Michigan
Welp, steel didn't pan out, guy was an idiot. Was trying to sell me aluminum from a pool or trampoline frame.... ya no lol. So I decided to modify my design for the time being. Gonna leave the roll bar out for now, and focus on the main frame. Started cleaning the metal and it's not too bad at all. Here is my first cut (mind you I'm using a square and a 3" air cut off disc, fun fun)
 

Attachments

  • 20150326_190222.jpg
    20150326_190222.jpg
    45.2 KB · Views: 7

crazykart

Crazy member
Messages
1,167
Reaction score
7
Location
Swartz Creek, Michigan
First two matching pieces. It's funny because my brother said cutting then this way I would surely be off each cut by at least an 1/8". Welp these two are exact down to the mm. haven't slept in 56 hours because of work, and now having fun with sparks flying!

Don't worry, I won't post every cut lmao, just being a smart...bottom.:feedtroll:
 

Attachments

  • 20150326_194016.jpg
    20150326_194016.jpg
    64.2 KB · Views: 9

landuse

Moderator
Staff member
Messages
18,743
Reaction score
512
Location
Pietermaritzburg, South Africa
First two matching pieces. It's funny because my brother said cutting then this way I would surely be off each cut by at least an 1/8". Welp these two are exact down to the mm. haven't slept in 56 hours because of work, and now having fun with sparks flying!

Don't worry, I won't post every cut lmao, just being a smart...bottom.:feedtroll:

Aaaaand we're off.........
 

crazykart

Crazy member
Messages
1,167
Reaction score
7
Location
Swartz Creek, Michigan
Got the seat platform cut, and the rest marked. Decided to get some sleep last night, and woke up this morning with my mouth throbbing, so off to the dentist. 2 teeth pulled later (wisdoms finally caught up with me) and I'm down for the day. May start again tomorrow, depending on how I feel. More than likely it won't be til next weekend though. Gahhhhhh!
 

crazykart

Crazy member
Messages
1,167
Reaction score
7
Location
Swartz Creek, Michigan
So I got to working on it again, some more cut, some tacked, and spots where I will be welding ground clean.

Stopped at a local auction house this morning to pick up some tools I won, and they have a kart sitting there for next week's auction. I happened to glance at it, and got a few ideas. Looks like I'll be cutting the front end that I tacked yesterday lol. Luckily I'll just be cutting it in half, and angling it a bit. Then attaching the a-arms to that near center so they can be nice and long. Shock mounts will hook to the upper frame. Steering system should be easier on me then. I'm going to somewhat copy the attached pic, but modify it a bit. New pics uploaded.
 

Attachments

  • 20150403_094200.jpg
    20150403_094200.jpg
    68.9 KB · Views: 7
  • 20150403_094153.jpg
    20150403_094153.jpg
    80.2 KB · Views: 7
  • 20150403_094148.jpg
    20150403_094148.jpg
    84.5 KB · Views: 12
  • 20150326_203607.jpg
    20150326_203607.jpg
    61.1 KB · Views: 6
  • 20150402_215453.jpg
    20150402_215453.jpg
    77.4 KB · Views: 7

crazykart

Crazy member
Messages
1,167
Reaction score
7
Location
Swartz Creek, Michigan
Front mount reworked. Notched it at 25*, figured that would give me enough height, and it looks just about right. I can tell it's been a very long time since I really welded anything lol. I have another bar to cut and weld in still that will go top center for the a-arms to actually mount to.
 

Attachments

  • 20150403_130343.jpg
    20150403_130343.jpg
    63 KB · Views: 7
  • 20150403_192156.jpg
    20150403_192156.jpg
    76.9 KB · Views: 8

crazykart

Crazy member
Messages
1,167
Reaction score
7
Location
Swartz Creek, Michigan
Havn't made much progress this weekend so far. Ran out of flux core wire, and ordering it online was cheaper so I had to wait for it to ship in. Just got it late today so will start up again tomorrow.

Stopped at my father in laws today to fix his porch rails, and whilst in the garage to get the hardware I spotted a cool little steering wheel. Asked about it and he said go ahead, so now I have my steering wheel.

My oldest brother has a bunch of tires at his house I guess so I'll be heading that way tomorrow to see what he has. Probably will be slow going on the build next few weekends as I have prior engagements, but will update as I go...hoping some of ya'll are actually interested in following along with this build Lol.
 

Attachments

  • 20150410_220451.jpg
    20150410_220451.jpg
    43.2 KB · Views: 6

crazykart

Crazy member
Messages
1,167
Reaction score
7
Location
Swartz Creek, Michigan
Havn't posted an update in awhile because I've been super busy, but I have one now!

So the tires my brother had were all junk, but whilst searching around a local auction I came across a huge cache of tires and rims. Best part is I only paid $26 plus taxes and fees, so $31.68 all together. Huge score since I can sell what I don't want and double/triple what I paid in profit.

The next day I just happened to check the local free section of cl and found 2 snowmobiles. Both have compression and start on spray, so I'm thinking of using the smaller ones engine and clutching system instead of the 5.5 I had planned on using.

On top of that 1 of them has a nice double a-arm setup, and a good steering set up. I may just have a good 70% of the parts I need for the front suspension and steering on just that snowmobile, double score.

I know with that much engine I'm going to have to upgrade my frame design a bit, and probably rethink my rear end as far as the tire set up goes. I'm thinking since this tire lot came with 2 20x9-8 tires and rims I might just slap then on the axle side by side and go with it...I'd still consider that a trike lol.

I'll be ripping into the snowmobiles tomorrow to see what I have and what is still good. Maybe revamp my frame design a bit, and see if I won't have time to get some more welding done on it. Looks like it's finally starting to come together.

Anyone have any thoughts on anything else I may be able to use off the snowmobiles besides lights and such?

I was also toying with the idea of keeping one of the sets of skis and a track set up to throw on the kart for fun in the snow, hmmmmm. Lol
 

Attachments

  • 20150521_214610.jpg
    20150521_214610.jpg
    74.5 KB · Views: 7
  • 20150521_214644.jpg
    20150521_214644.jpg
    59.7 KB · Views: 6
  • 20150521_214653.jpg
    20150521_214653.jpg
    64 KB · Views: 6
Last edited:

OzFab

Well-known member
Messages
15,615
Reaction score
67
Location
Warwick Qld, Australia
Excellent scores; you're not far off, you can probably salvage most of the necessary parts from those snowmobiles...

Here's a thought for you: How far along are you & how long do you expect the build to take? the reason I ask is

I see a build-off entrant!
 

chancer

ɔ ɥ ɐ u ɔ ǝ ɹ
Messages
9,358
Reaction score
83
Location
COMFORT, TEXAS
Cool glad to see you back at this. Yes I was also thinking build off entry, as I finished reading I see you have been invited. I second that.
 

crazykart

Crazy member
Messages
1,167
Reaction score
7
Location
Swartz Creek, Michigan
I'm hoping to have it done before summers end, but with my schedule nothing is certain lol. Hmm I may just have to think about that though. To be honest though, with the break I had to take, and other things, I'm only about 20% done on my frame. Once that's al worked out though the rest should be a breeze for me and my mechanical inclination lol.

I'm going out to rip into those right now, see what I have, and what can be used. Sadly the big ones steering seems to be locked up...I hope it's just something easy holding it up.
 
Status
Not open for further replies.
Top