first kart build (learning to weld)

Status
Not open for further replies.

azarak

New member
Messages
37
Reaction score
0
Location
central Texas
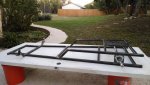
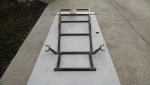
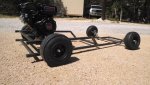
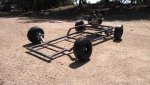
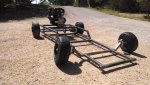
Haven't sat on a kart in probably 30 years. Never been on a race kart, fun stuff only. Had to learn to weld for work(still a LOT to learn!) Figured a kart would be good practice.
I have always had a soft spot for 60's-70's rear engine race karts. I know my design is far from a racer of 40 years ago but that's where the inspiration comes from.
Not taking anything too serious just having fun.
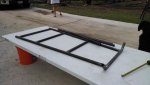
I'm a big boy and can handle criticism so be honest......what do you guys think?
 

Attachments

  • IMG_20140515_200017074.jpg
    IMG_20140515_200017074.jpg
    77.9 KB · Views: 50
  • IMG_20140515_200028880.jpg
    IMG_20140515_200028880.jpg
    93.7 KB · Views: 59
  • IMG_20140515_200128451.jpg
    IMG_20140515_200128451.jpg
    80.6 KB · Views: 48
  • IMG_20140513_180845764.jpg
    IMG_20140513_180845764.jpg
    70.5 KB · Views: 46

azarak

New member
Messages
37
Reaction score
0
Location
central Texas
The only problem I see is length. How tall are you? The frame looks like it would fit a child comfortably. Otherwise the design looks great.

The door I'm using for my build surface might be giving the wrong impression for dimensions. Its a really big door. Its almost 8' tall and well over 4' wide.
That being said, my dimensions are based mostly on guess work. There are 4 of us in the fam and I'm the tallest at 5'10" (at least for now). I plan on building another kart after this one and will adjust overall size either bigger for me, or smaller for the kids. We will see how accurate my estimations are (or aren't!)
Bumper to bumper = 66.5"
Wheelbase ======= 48.5"
Rear track======== 40"
Front track======== 38"
Front of engine to ft bumper== 54"
Frame at widest(rear)===== 27"
Frame at narrowest(ft)====16"
 

itsid

Moderator
Staff member
Messages
11,563
Reaction score
245
Location
Ruhrpott [Germany]
I think it's looking good so far (even size-wise)

Only one little thing (purely cosmetic) the front bumper section is straight, and offset to the main rails..
that looks odd to me; I understand the reason for that completely;
but just for the looks.. I think I'd made them match up the side rails.

'sid
 

azarak

New member
Messages
37
Reaction score
0
Location
central Texas
I think it's looking good so far (even size-wise)

Only one little thing (purely cosmetic) the front bumper section is straight, and offset to the main rails..
that looks odd to me; I understand the reason for that completely;
but just for the looks.. I think I'd made them match up the side rails.

'sid

you have no idea how long i struggled with that decision!
original plan was to follow the same angle of the main rails, and yes, it looked much better. but, it gets real skinny up there.
i would set the tubes up how they are and then stare at them. then i would set them up inline with the main rails, and stare at them.
i repeated this process for what seemed like hours!
but in the end the tape measure won. i don't have pedals or any steering components yet, and like i said, all of my dimensions are based on educated guess rather than experience. so i felt it better to leave myself more room to work with.
i will probably add an upper section to the front end and we will see how that changes the look of the chassis, this will be installed after pedals and steering.
but yeah, i totally agree with what you are saying.

edit: also installing them straight, but inline (same intersection/different angle) with the main rails interfered with wheel/tire clearance.
i tried it all
 
Last edited:

azarak

New member
Messages
37
Reaction score
0
Location
central Texas
Well I'm all out of parts.
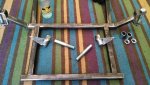
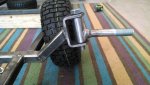
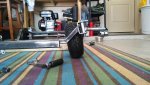
Finished the frame mounted brake caliper and axle, ran the engine for a bit to break it in. Need different tires for the ft. I also am not sure about the camber on the ft wheels, it seems excessive in the neutral position. I think I may have to purchase new spindles with negative camber built in them. I don't trust myself to cut and re weld or heat and bend the ones I have.
We will see what happens
 

Attachments

  • IMG_20140517_155027560.jpg
    IMG_20140517_155027560.jpg
    126.4 KB · Views: 55
  • IMG_20140517_154959197.jpg
    IMG_20140517_154959197.jpg
    154 KB · Views: 54
  • IMG_20140517_154946850.jpg
    IMG_20140517_154946850.jpg
    153.6 KB · Views: 75

itsid

Moderator
Staff member
Messages
11,563
Reaction score
245
Location
Ruhrpott [Germany]
indeed excessive :lolgoku:

but also bad455 ;)

I like your wheels.. those are nylon azusas right?
they look cool...
when you're done with your kart you definitely should let us know how well they hold up :D

Uhm, I think you have the spindles the wrong way around..
the edge support thingy should point downwards not up;
so swap LtoR and vice versa.

maybe that helps reducing the excessive camber a tiny bit as well ;)

'sid
 

azarak

New member
Messages
37
Reaction score
0
Location
central Texas
Well looks like I get to try my hand at making spindles after all:censored:
Yup, if I flip them the nose will be on the ground.
I put the axle together with 10* neg camber and 10* positive caster, so if I make spindles with 10* pos camber then the front should sit right and hopefully handle well.
Yes they are azusa nylons, I don't really expect too much from them, just something to get things rolling( terrible pun!)
Was going to do yard work tomorrow..........not anymore!
 

OzFab

Well-known member
Messages
15,615
Reaction score
69
Location
Warwick Qld, Australia
Use a thin cutting wheel on a grinder & only cut the side & bottom welds then bend the brackets in, pivoting on the top weld. This will reduce the excessive camber &, quite possibly, increase ground clearance...
 

azarak

New member
Messages
37
Reaction score
0
Location
central Texas
The front end geometry is based (loosely) on sprint kart specs.
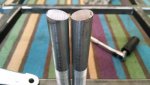
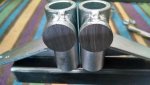
I have a chop saw and am going to cut the spindle axle off the barrel, grind the butt of the axle 10* and the re weld the axle to the barrel.
The whole point of this build was to practice welding and spindles are cheap, so why not?
Success or failure, hear we go!
 

Attachments

  • IMG_20140518_132232934_HDR.jpg
    IMG_20140518_132232934_HDR.jpg
    86.2 KB · Views: 27
  • IMG_20140518_135303830.jpg
    IMG_20140518_135303830.jpg
    115.6 KB · Views: 27
  • IMG_20140518_141703307.jpg
    IMG_20140518_141703307.jpg
    55.3 KB · Views: 22
  • IMG_20140518_141727843_HDR.jpg
    IMG_20140518_141727843_HDR.jpg
    59.3 KB · Views: 22

azarak

New member
Messages
37
Reaction score
0
Location
central Texas
OK, this turned out much better than I was expecting.
Yes the spindles are still installed upside down however the yardkart spindles I bought provide no Ackerman effect (sp?). So the tie rod tabs will have to be modified for proper steering. When the rest of my steering parts arrive I will probably cut the tabs off and reposition them correctly.
Still have some clean up to do on the welds, but the corrected angle should help with ride height also. May have to weld a spacer on spindle shaft.
So far so good
 

Attachments

  • IMG_20140518_154436733.jpg
    IMG_20140518_154436733.jpg
    80.9 KB · Views: 43
  • IMG_20140518_154410233.jpg
    IMG_20140518_154410233.jpg
    92.9 KB · Views: 35

itsid

Moderator
Staff member
Messages
11,563
Reaction score
245
Location
Ruhrpott [Germany]
See.. I know you could :D

Oh, if your steering shaft has a two hole pitman arm, than that is going to provide the Ackermann angle (well.. it should at least)

'sid
 

OzFab

Well-known member
Messages
15,615
Reaction score
69
Location
Warwick Qld, Australia
That's not exactly what I would've done, I hope it works...

I also hope you V'd bothe edges to get the weld deeper into the shaft & didn't just weld the outer surface...
 

azarak

New member
Messages
37
Reaction score
0
Location
central Texas
That's not exactly what I would've done, I hope it works...

I also hope you V'd bothe edges to get the weld deeper into the shaft & didn't just weld the outer surface...

Yes, once I had the angle right I ground the circle into a square. A 45* on four sides, then several passes on each side.
I don't want a wheel flying off
 
Last edited by a moderator:

Dieselchanic

New member
Messages
27
Reaction score
1
Location
Geiger, AL
Nice build! I love to see projects that come to life from the ground up. I built a mini chopper to learn to weld 11 years ago and it was a great experience.

The only problem I see, and I don't know if it's a problem because I tend to over engineer stuff, is the front axle where the angle is welded. If you're still learning to weld, and those welds look a little cold, I'd reinforce it there just for insurance. I'm not picking on your ability just constructive criticism. It's got the same area welded as where the spindle mounts are but the angle experiences more leverage... I included a pic showing what I'm talking about..


Kart is looking cool though!!
 

azarak

New member
Messages
37
Reaction score
0
Location
central Texas
Nice build! I love to see projects that come to life from the ground up. I built a mini chopper to learn to weld 11 years ago and it was a great experience.

The only problem I see, and I don't know if it's a problem because I tend to over engineer stuff, is the front axle where the angle is welded. If you're still learning to weld, and those welds look a little cold, I'd reinforce it there just for insurance. I'm not picking on your ability just constructive criticism. It's got the same area welded as where the spindle mounts are but the angle experiences more leverage... I included a pic showing what I'm talking about..


Kart is looking cool though!!

I appreciate the input.
And I agree that is a good place for a gusset. I tend to overbuild myself as well, which is a problem in this build as I am trying to keep weight down.
As for my cold welds...... practice practice practice.
 
Status
Not open for further replies.
Top