Mini Buggy Build Log

Status
Not open for further replies.

jman231994

New member
Messages
724
Reaction score
2
Location
Australia
Earlier you said you weren't going with a front suspension. The quad frame looks to have the A-arms on it. You can swap the mounting points and the A-arms to your buggy pretty easily. Just something else for you to think about.


Yea this came up already, they're decently rusted, a bit bent, and very stiff. Not really worth bothering with now. That and I want custom geometry, not getting stuck with whatever the quad had.

u an use locking collars on each side of the bearing

it might float a little on the spline
but its not tight with the locking plate is it

edit

actually take a pic of the shaft
i remember on my cm250 u could put the lock collar on either side of the sproket
it would just meant the sprocket is riding further out on the shaft

edit 2nd time lol

i was wondering how u would be able to get away with not welding the spacer output gear on
but u cant use a solid keyed shaft as it must slide over the engine ouput

so revised of above will save on head acres and machineing (hopefully)

get the oem sprocket with splines
weld it to a tube that fits over the eng output
get keyed shaft that fits inside the tube
weld it it
put keyed shaft though
lock collar
bearing
lock collar
output sprocket
chain and so on


Haha this is starting to sound harder than the jackshaft.

If I remember I'll take a pic of the output shaft, otherwise I'll just have a poke around. The second sprocket sits on the keyed shaft yea?

The jackshaft will be very simple anyway, I'll just weld two drive sprockets to a bit of bar and mount it up in bearings


Sent from my iPhone using Tapatalk
 

jman231994

New member
Messages
724
Reaction score
2
Location
Australia
Ok I'm definitely going a jackshaft unless the sprocket can go on back to front for more clearance. My friend got me the bearings for the jackshaft already so might as well use them haha


Sent from my iPhone using Tapatalk
 

jman231994

New member
Messages
724
Reaction score
2
Location
Australia
Swingarm went on today :) took me forever but I'm back into it now
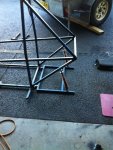
I'm still tossing up wether to make it have another layer below or not so it's all more or less just tacked together. (Shocks are just sitting there)

ImageUploadedByTapatalk1391342907.308127.jpg

Also the engine clears the seat nicely when it's sitting on the swingarm, don't have a pic though sorry


Sent from my iPhone using Tapatalk
 

OzFab

Well-known member
Messages
15,615
Reaction score
67
Location
Warwick Qld, Australia
Umm, where's the rest of it? How exactly will that work? Correct me if I'm wrong but, isn't the engine & axle assembly to be attached to the swingarm? I can't picture it...
 

jman231994

New member
Messages
724
Reaction score
2
Location
Australia
Umm, where's the rest of it? How exactly will that work? Correct me if I'm wrong but, isn't the engine & axle assembly to be attached to the swingarm? I can't picture it...


Haha yea that is the general idea of a swingarm :p

I still haven't done those bits, I just wanted it mounted up to make sure it all fits. The engine will mount to two bars running in the long axis of the buggy between the front cross bar and the second cross bar of the swingarm. And if you look back at the second swingarm design I posted it will be like that regarding the axle mounting

Edit: knocked together a really dodgy picture of what it's meant to be, best I could do on my phone sorry.

The engine mount would mount to the green bits


Sent from my iPhone using Tapatalk
 

OzFab

Well-known member
Messages
15,615
Reaction score
67
Location
Warwick Qld, Australia
How did I miss that? Now that I've seen it, good design :thumbsup:

If I may just add one or two design points:
1. IMO, your pivot mounts need to be a bit wider, to help reduce possible twist shear
2. I know there just sitting there ATM but, IMO, the shocks need to incline a little more... :)
 

jman231994

New member
Messages
724
Reaction score
2
Location
Australia
How did I miss that? Now that I've seen it, good design :thumbsup:

If I may just add one or two design points:
1. IMO, your pivot mounts need to be a bit wider, to help reduce possible twist shear
2. I know there just sitting there ATM but, IMO, the shocks need to incline a little more... :)


Haha, I didn't think it was that obscure.

I used some spare rusted out a arms to make the pivot points and I do have some wider ones, so if it comes to it I can switch them. I'll probably just test it first, there shouldn't be too much twist shear with it mounted at both sides, but well see, I might do the maths on it to see anyway.

And yea I haven't measured anything up for the shocks yet haha


Sent from my iPhone using Tapatalk
 

jman231994

New member
Messages
724
Reaction score
2
Location
Australia
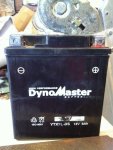
Scored a battery today from the local scrapyard for $1.50 or something. There was a wrecked road bike there and I realised the crash wouldn't have affected the battery at all...checked it when I got home, 12.3 volts. Sounds good :)

ImageUploadedByTapatalk1391491148.755491.jpg

Also picked up a boat trailer winch for $1, figured I could use it for the buggy but not so sure now, it's pretty seriously rusted on the spool. I'll clean it up and see what it's like


Sent from my iPhone using Tapatalk
 

jman231994

New member
Messages
724
Reaction score
2
Location
Australia
Yea it's pretty much exactly what I was going to buy :)

I just load tested it with some quad headlights and it didn't drop below 12.18V from 12.6 or so, I'm happy with that haha (about 70w I believe)


Sent from my iPhone using Tapatalk
 

jman231994

New member
Messages
724
Reaction score
2
Location
Australia
That's surprising, they're worth much more than that as scrap, good score :thumbsup:


Yea they were charging 60c a kg for batteries, I was expecting lead to be worth more than that, can't complain though cause I'm definitely going there with a multimeter if I ever make an electric project haha


Ok, now I hate you... (all will be explained soon enough...)


If you're willing to drive 2 hours or so for a $1 winch there was another one sitting there with a broken handle haha. In retrospect I should have got that one, probably wasn't anywhere near as rusty and the handle was an easy fix. It was a cable one, I was attracted to the strap one haha, it probably got soaked in saltwater :(


Sent from my iPhone using Tapatalk
 

OzFab

Well-known member
Messages
15,615
Reaction score
67
Location
Warwick Qld, Australia
If you're willing to drive 2 hours or so for a $1 winch there was another one sitting there with a broken handle haha.

Umm, no...

In retrospect I should have got that one, probably wasn't anywhere near as rusty and the handle was an easy fix. It was a cable one, I was attracted to the strap one haha, it probably got soaked in saltwater :(

Well, go back & check it out, you could probably make one good one out of the two...
 

jman231994

New member
Messages
724
Reaction score
2
Location
Australia
So.... I got a bit lazy haha

I finally got around to finishing up the swingarm, I had somehow managed to get it off centre so I had to realign the mounts. I'm still not sure if it's completely done though, I might put a bar across the bottom pieces to brace it

Other than that the engine mounts are on, and the shock mounts. The axle isn't the one I'm going to use, just used it for alignment

ImageUploadedByTapatalk1394246899.508008.jpg
ImageUploadedByTapatalk1394246965.725286.jpg


Sent from my iPhone using Tapatalk
 

jman231994

New member
Messages
724
Reaction score
2
Location
Australia
Thought I should probably chime back in to say I'm still slowly chipping away at this, just haven't had a whole lot of time through the uni semester. I'm also not having a huge amount of luck finding some front wheels so can't really start that much up the front end.

Uni semester ends late June I believe and I get about 4 weeks off so I'm trying as hard as I can to get some wheels before then and hopefully have it rolling or possibly even going by the time I go back to uni :)

As it stands at the moment its basically the same as last time I posted but as a recap:

Engine is in and running
Swingarm is more or less done(few welds to finish)
All originally planned frame parts are in(again a few welds to finish)
Rear hub bores were being bored out for me...hopefully still are lol
Got a nice big muffler for it that I'm modding to fit
Designing a snorkel air intake just for fun
Cut and folded a dash panel, though I dont 100% like it so might remake it

Fingers crossed all goes to plan from here :)
 

jman231994

New member
Messages
724
Reaction score
2
Location
Australia
So now I'm back at this again, of course not everything went to plan. I'm still lacking some major parts but I'm still chipping away at it regardless.

I got lucky on eBay and won a pair of nice alloy itp quad rims for 99c.....massive score there, just gotta find tyres now.

And then a week or two ago my friend rocked up holding a nice freshly machined axle....very very happy about that one! Photos a bit average, if I remember I'll get a better one tomorrow

Today I made up the cross rails for the seat to mount to, should be welded in tomorrow and then I'll get onto the fuel tank mount


Sent from my iPhone using Tapatalk
 
Status
Not open for further replies.
Top