My New Toy

Status
Not open for further replies.

OzFab

Well-known member
Messages
15,615
Reaction score
68
Location
Warwick Qld, Australia
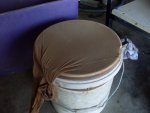
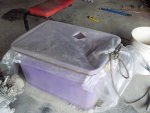
After seeing GWC's thread about his Custom-Made Sandblasting Cabinet, I was inspired; after all, I was using a storage tub covered by a sheet of plastic held on with a length of rope as a sand blasting cabinet. Although it (sort of) did the job, it was extremely messy & tedious so, I started searching for materials; $45 for a pair of gloves, a sheet of steel, figure out a way to bend it, plexiglass, hinges, fittings, filter AAAAAGH! :ack2: :smiley_omg: It all seemed to get out of control, especially when I saw this.

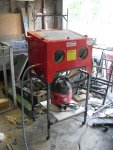
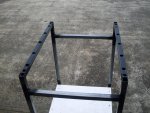
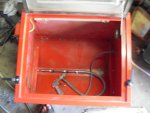
Now, you all know, I'm the biggest advocate of "if you need it, make it" but, in this case, I couldn't see the point in spending the time & money searching for & buying all the materials & making something when it clearly wasn't cost effective so, I cheated & bought one!

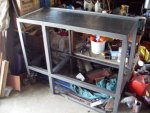
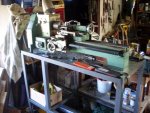
That's when the fun started: This is a bench unit so, I put it on my bench (hey, where did my bench go?).

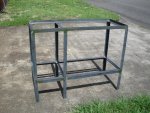
Problem 1: I needed a small step coz the bench is too tall to work the unit comfortably.
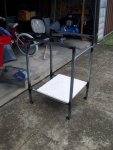
Problem 2: This thing is built for a right handed operator which is ok if you're right handed but, I'm not
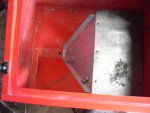
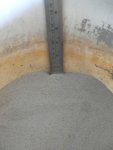
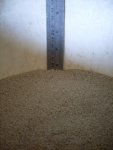
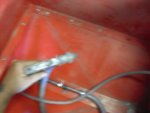
Problem 3: Unlike most sand troughs which are pyramid shaped, this one is almost triangular; it only angles in on 2 sides, not 4.
 

Attachments

  • SDC10510.jpg
    SDC10510.jpg
    89 KB · Views: 12
  • SDC10750.jpg
    SDC10750.jpg
    67 KB · Views: 17
  • SDC10757.jpg
    SDC10757.jpg
    50.9 KB · Views: 14

OzFab

Well-known member
Messages
15,615
Reaction score
68
Location
Warwick Qld, Australia
Solving Problem 3

Yep, I'm gonna work backwards...

This thing holds a massive amount of sand & has a grill to cover it. However, if the pick-up gets blocked (as it often does) I have to remove the grill (what a pita job that is), clear the pick-up, put the grill back in (see previous comment) & start all over again only for the pick-up to block again :censored: :mad2:

Not only did it need to eliminate the grill, I needed to figure out how to reduce the sand capacity & get the sand to flow back to the pick-up.

The solution: Cover half of the area with a piece of sheet metal & create a "ramp" leading off that to the base of the trough. A cut here, a bend there &...
 

Attachments

  • SDC10758.jpg
    SDC10758.jpg
    68.3 KB · Views: 15

OzFab

Well-known member
Messages
15,615
Reaction score
68
Location
Warwick Qld, Australia
Solving Problem 2

If you take note of the pic in the last post, you'll notice two loops attached to the ramp, those ae the first step in making this thing "left hand friendly".

The pick-up tube originally lay along the bottom of the trough so, with that area now covered, I needed to relocate it; hence, the loops :D

Now to relocate the air line; 2 washers, a nut & bolt & a sploog of silicone took care of the old hole &, of course, my drill took care of the new one on the other side. A small strip of gal sheet with a bend on the end became a hook to hold the gun while it's not in use.

Just in case you missed it, the flat sheet in the base became a work area to rest the job on...
 

Attachments

  • SDC10767.jpg
    SDC10767.jpg
    78.3 KB · Views: 11

OzFab

Well-known member
Messages
15,615
Reaction score
68
Location
Warwick Qld, Australia
Solving Problem 1

After taking some measurements, a bit of sketching & a bit of math, I was off to the steel merchant for a 20' length of 1" gal SHS. The problem with that is I needed 26' but, more on that later.

On my way home I stopped at the hardware store a got some castors & tube plugs to suit.

Once I had everything cut (4 legs 800mm long & 4 cross braces 530mm long) I welded together 2 identical square frames.

Then I discovered a small problem: The way I designed this was to have the weight on the cross beams, not on the legs but, due to the bolts holding the cabinet together, the cross braces sat on the end of the bolts, not on the base so, I marked their positions & started drilling. When I ran out of drill bit sizes, out came the die grinder until the holes were big enough to house the nuts so the brace would sit flat on the base. Repeat on the other frame & I'm back on track...

It was then that I discovered I didn't have enough material; I needed 4 lengths 430mm long to go from the front to the back but I only had 1100mm left. :oops: I must've messed up on the math somewhere...

Anyhoo, I cut two pieces & welded them in at the top, then I found a piece of melamine covered particle board just big enough to span from front to back, screwed it in place &... meh, it works... :D

I then trimmed down the castor plugs & fitted them, now it's mobile
 

Attachments

  • SDC10763.jpg
    SDC10763.jpg
    108.1 KB · Views: 10
  • SDC10771.jpg
    SDC10771.jpg
    30.2 KB · Views: 6
  • SDC10770.jpg
    SDC10770.jpg
    143.5 KB · Views: 6
  • SDC10769.jpg
    SDC10769.jpg
    125.9 KB · Views: 7

OzFab

Well-known member
Messages
15,615
Reaction score
68
Location
Warwick Qld, Australia
As I already have a dust extractor, I hooked it to the cabinet & off I went...

So, I suppose you're wondering, "how does it preform?" Well, check the pics below, they were taken 20 minutes apart.

...even the little princess had a go :lolgoku:
 

Attachments

  • SDC10760.jpg
    SDC10760.jpg
    130.4 KB · Views: 21
  • SDC10762.jpg
    SDC10762.jpg
    120 KB · Views: 23
  • IMAG0001.jpg
    IMAG0001.jpg
    54.2 KB · Views: 20
  • IMAG0002.jpg
    IMAG0002.jpg
    39.2 KB · Views: 20

jamyers

Well-known member
Messages
1,444
Reaction score
47
Location
Buffalo Gap, TX
Silly question: what keeps the gun from sucking up bits of carp that have been blown off the work? Does it matter?
 

OzFab

Well-known member
Messages
15,615
Reaction score
68
Location
Warwick Qld, Australia
Nice Tony! That metal cleans up pretty good. It had cement on IIRC

Correct, & lots of it :ack2:

Silly question: what keeps the gun from sucking up bits of carp that have been blown off the work?

Short answer, NOTHING!

Does it matter?

Oh yeah, it matters. If I blow off big enough chunks, they get caught in the pickup & I have to keep clearing it to get the gun to work. As well as that, I plan to filter the sand regularly; the fine grit makes life difficult too by creating like a smoke screen.

Speaking of filtering, I did just that yesterday. I already have a fine sieve so I fisrt ran the sand through that to filter out the larger chunks, then I had to figure uot how to get rid of the fine powder.

Solution: Pantyhose (or stockings). They've been used as paint strainers, why not sand strainers.

So, after ringing a few female friends, I found a pair, stretched them over the top of a bucket & slowly filtered a bucketful of sand, enough to fill the now reduced capacity hopper. The results speak for themselves:
 

Attachments

  • SDC10776.jpg
    SDC10776.jpg
    68.5 KB · Views: 9
  • SDC10777.jpg
    SDC10777.jpg
    72.1 KB · Views: 9
  • SDC10772.jpg
    SDC10772.jpg
    78.4 KB · Views: 6

fowler

New member
Messages
5,463
Reaction score
17
Location
Bullsbrook West Aus
If u wanna stop the pick up blocking then cover it in less sand

Set it so the sand is only just running over the end of the tube

We have a larger but similar set up at work
And get similar issues
 

OzFab

Well-known member
Messages
15,615
Reaction score
68
Location
Warwick Qld, Australia
Even Newer & Better Toy... FINALLY!

A bench lathe! 6 speed, 1100mm long, approx 500 between centres. I don't have much more detail atm, it's still in my trailer...

I picked it up a few days ago for $600 used; comperable new is around double that much. Went out today & got a 13mm drill chuck (I think), live centre & some tooling including a separate parting tool; there's $200 in that box :ack2:
 

Attachments

  • SDC10784.jpg
    SDC10784.jpg
    92.9 KB · Views: 9
  • SDC10787.jpg
    SDC10787.jpg
    89.2 KB · Views: 8
  • SDC10786.jpg
    SDC10786.jpg
    68 KB · Views: 10

OzFab

Well-known member
Messages
15,615
Reaction score
68
Location
Warwick Qld, Australia
Thanks fowler, now I can really get into it :drool5:

Of course, It needs a home so, I made a bench for it :D As usual, it's over engineered (that lathe is dang heavy; two of us struggled with it).

It's not finished yet, I intend to make drawers to go in the left side to hold tooling & accessories but, for now, it works. Now all I need is one or two mates to help me lift the lathe onto it :worried2:

Here's a helpful tip: Nuts welded to the bottom of the legs with a bolt attached make great levelling feet on uneven concrete slabs :thumbsup:

Sorry there wasn't more production pics, I just got in & did it without thinking about pics... :oops:
 

Attachments

  • SDC10805.jpg
    SDC10805.jpg
    92.9 KB · Views: 6
  • SDC10801.jpg
    SDC10801.jpg
    100.6 KB · Views: 9
  • SDC10803.jpg
    SDC10803.jpg
    102.3 KB · Views: 7
  • SDC10802.jpg
    SDC10802.jpg
    163.9 KB · Views: 7

OzFab

Well-known member
Messages
15,615
Reaction score
68
Location
Warwick Qld, Australia
*Twin post*

I finally got my lathe onto it's new home & managed to turn up one of many spring retainers (so far)
 

Attachments

  • SDC10820.jpg
    SDC10820.jpg
    106.2 KB · Views: 6
  • SDC10814.jpg
    SDC10814.jpg
    80.2 KB · Views: 6
  • SDC10819.jpg
    SDC10819.jpg
    82.3 KB · Views: 6
  • SDC10815.jpg
    SDC10815.jpg
    69.3 KB · Views: 5
  • SDC10818.jpg
    SDC10818.jpg
    62.9 KB · Views: 5
Status
Not open for further replies.
Top