You are using an out of date browser. It may not display this or other websites correctly.
You should upgrade or use an alternative browser.
You should upgrade or use an alternative browser.
Beginner Kart...First Build
- Thread starter JCB003
- Start date
- Status
- Not open for further replies.
qtband
Well-known member
My bracket looks similar to the one you posted. It has bolt holes so I could bolt the bracket to the one I welded on....
It fits kind of loose so it can self-center. If you look at the pic I posted, you can see they used a 1/4" rod for a brace. I suggest you brace yours in a similar fashion to be on the safe side. Keep posting the pics. Everything seems to be coming along!
It fits kind of loose so it can self-center. If you look at the pic I posted, you can see they used a 1/4" rod for a brace. I suggest you brace yours in a similar fashion to be on the safe side. Keep posting the pics. Everything seems to be coming along!
Here is the brake bracket I was talking about. I won't be able to use the current bracket I have welded to the frame and bolt the new bracket as I thought, it pushes the caliper too far back. I will have to weld another bar next to the current one to hang the new one, then weld that bar to this new hanger as the top bolt just intersects the tube frame. It's hard to see in the pic but the hole in the bracket intersects the bottom of the tube frame by leaving about a 1/4" daylight. Welding it is easier anyway. Edit: I think I will have to plug weld some threaded studs to the bracket I weld to the frame so I can bolt the new bracket to it, if I weld it all I don't think I can get the caliper on even if I take it apart, unless I cut off the bent retainer piece.

Here is a pic of my new front brake pedal setup with the shorter & stronger spring. Works much better.

souperman000
New member
I have the same caliper and mount. The caliper floats alot, causing the pads to rub a little on the rotor.
A tip - Try rolling the kart around and pressing the brake. Keep twisting that black screw on the side to adjudt the tightness against the rotor. When you get it fperfect. Use a wrench and Lock-tite that nut. The vibration on my kart caused to come loose and I lost brakes on several occasions!
A tip - Try rolling the kart around and pressing the brake. Keep twisting that black screw on the side to adjudt the tightness against the rotor. When you get it fperfect. Use a wrench and Lock-tite that nut. The vibration on my kart caused to come loose and I lost brakes on several occasions!
qtband
Well-known member
What does the other side of that bracket look like? Is it open or is there a tab like the side you have facing out?
souperman000
New member
What does the other side of that bracket look like? Is it open or is there a tab like the side you have facing out?
the other side is open for you to slide the caliper in. the rotor holds the caliper in the bracket.
OzFab
Well-known member
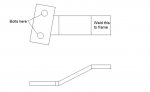
I'd suggest something like this. With bolts welded in the holes, i should do the job well.
Obviously it's not to scale, just to give you an idea
Obviously it's not to scale, just to give you an idea
Attachments
-
 Brake bracket.jpg22.9 KB · Views: 19
qtband
Well-known member
Mount it like you show in post #83, but TURN THE BRACKET AROUND. The open end faces out as you see in post #79. You can then put the caliper in the bracket & raise the axle centering the rotor. One trick...use a little masking tape to hold the pads in while you raise the axle, then pull it out when your done with the mounting. Install the caliper bolts with the nuts facing outward.
Mount it like you show in post #83, but TURN THE BRACKET AROUND. The open end faces out as you see in post #79. You can then put the caliper in the bracket & raise the axle centering the rotor. One trick...use a little masking tape to hold the pads in while you raise the axle, then pull it out when your done with the mounting. Install the caliper bolts with the nuts facing outward.
Only thing is I made the bolted adapter today!
Oh well. Masking tape trick is a good one, can't believe I didn't think of that! Pads probably dropped out 5 times while I was fitting it up.
Test drive coming this weekend.


Mcbreja
New member
I like that! Nice and simple.
OzFab
Well-known member
Next question: How do you attach that to the frame?
Next question: How do you attach that to the frame?
Just like the other one...I'm going to weld it.
Do you see a potential issue? I think it should work!
OzFab
Well-known member
Just like the other one...I'm going to weld it.
Do you see a potential issue? I think it should work!
What I meant was, the bracket appears to be some distance from the frame (or is that just camera angle?)
What I meant was, the bracket appears to be some distance from the frame (or is that just camera angle?)
I'm going to weld the 1" bar that is angled- the one touching the frame, the other bracket bolts to the 1" bar which has the threaded rods. Its 2 pieces, so I can bolt/unbolt the bracket that holds the caliper and the caliper can have some movement.
OzFab
Well-known member
So, pretty much what I suggested in post #87?
00amunet00
New member
nice! once my truck is out of the garage I really have to build something like this.. so cool so far
Did the test drive Saturday and...it runs. There are some issues that need to be worked out.
Some observations:
1. The throttle return spring I added did not work as I intended, in fact it had the opposite effect. Of course I didn't test this out on blocks before firing up the motor and the kart took off with me chasing it...I managed to grab the steering wheel and flip it over which bent the front spindle, put a small dent on the gas tank, cracked the air filter box and scraped the top of my seat. My wife said it was pretty comical, but it ended my sons chance of a test drive for the day. Freaked me out a bit too. I removed the added spring and it worked fine. Not sure why this happened, with the spring installed the motor drove the wheels, when I took it off the kart idled as it should.
2. The kart is too small for me to sit in, but I can sit on the top of the seat and drive it, it is however the perfect size for my son. I rode it around the yard and it moves pretty good. I think it might be too fast at 20mph for the yard, but maybe it will be better in a parking lot. I didn't make it for the yard anyway.
3. The steering is not great. It does turn, maybe I expected too much. I noticed some issues with the right front wheel not getting full contact with the pavement when turning left. I might not have bent the spindle back far enough after it got damaged. The front of the cart is on the lighter side compared to the rear so that might contribute to the problem. Turns better to the left.
4. Very little clearance between the rear sprocket and the ground, not a problem on pavement, but it bottomed out going from grass to the driveway, so just need to avoid doing that.
5. The brakes worked great.
6. The throttle cable needs a more solid hookup to the tab I welded on, the black plastic one is not working out too well. I probably drilled the hole too big should have gone 1/16 under size and fit it in snug, but I really need a threaded compression fitting. There were some issues with it working loose and not getting any response from the pedal. The cable also frayed some and that was causing issues with it sticking in the cable housing, so it needs to be replaced.
7. All the cables, springs and rods for the pedals make for too much going on around your feet. It's not as bad for my son because his feet are small.
8. I have a kill switch and know how to wire it, but I can't figure out a way to attach it to the frame. It did not come with a clamp. Here is what I have...I'm not really happy with it, seems kind of cheap ( and it was, so I can't really complain)
http://www.bmikarts.com/item/Toggle-Kill-Switch-400501-5917
I'm not too upset with the results from the test drive, I knew there would be bugs to work out. I would say it was a success, in that it works - now it just needs some tuning. Then I'll strip it down, repaint and reassemble with the bolts locked down.
qtband
Well-known member
Is there a throttle stop screw on the engine? If so you can lower the engine top end a little for your son. Looking good!
OzFab
Well-known member
2. I would be more worried that 20mph is too fast for your boy
3. Here it comes... Ackermann Without an Ackermann setup, the steering will always suck, even worse with a live axle. Fortunately, its an easy fix.
It wouldn't hurt to check the spindles again, just to be sure...
As for the balance issue; you were sitting on the top of the seat, sending your weight to the rear axle. Once the little guy has his butt firmly planted in the seat, it will be a different story.
6. Try using a bicycle brake adjuster to seat the cable. Unfortunately, unless there is some degree of tension on the cable, this will always be a problem
For someone whose never done this before, you've done well You only started a little over a month ago & you've already completed the first test drive & come away with a very short list (believe me, that's a short list).
P.S. The paint job isn't as pretty as it was a few weeks ago...
3. Here it comes... Ackermann
Without an Ackermann setup, the steering will always suck, even worse with a live axle. Fortunately, its an easy fix.It wouldn't hurt to check the spindles again, just to be sure...
As for the balance issue; you were sitting on the top of the seat, sending your weight to the rear axle. Once the little guy has his butt firmly planted in the seat, it will be a different story.
6. Try using a bicycle brake adjuster to seat the cable. Unfortunately, unless there is some degree of tension on the cable, this will always be a problem
For someone whose never done this before, you've done well
You only started a little over a month ago & you've already completed the first test drive & come away with a very short list (believe me, that's a short list).P.S. The paint job isn't as pretty as it was a few weeks ago...
- Status
- Not open for further replies.