Blazkowiez
Kart Aficionado
I started to write this for Hybrid, but felt I should continue to make this easier to find. Couldn't find this posted by others.
1. Removal - You must first remove the drive clutch from engine, the bolt will be on the output shaft of the motor, you'll need an impact wrench or a box end wrench and another to tap the box end using blunt force to remove the bolt. Once you have the bolt out it should come right off the shaft easily aside from any rust that keeps it on the shaft. Grease the shaft slightly with no clutch on there to make removal easier in the future.
2. Disassembly - Place the clutch assembly on a work bench or table and remove the outer cover, keep notice that the hub in the assembly has the flat side down and the molded side up which will fit exactly in the cover. Remove the hub, set it aside. Remove the bronze bushing off the backplate and set that to the side. Remove the spring pack assembly if you have not checked it recently for wear, if this is hard to remove try wedging a flat blade screwdriver for ease.
3. Analysis - See if the clutch is in good shape, the main part of the drive clutch will have an aluminum spring pack assembly which has 2 springs which when removed should spring out straight when unhooked and both pins should be firmly inside the aluminum. If either of those are wrong you may need to replace something. Check the bronze bushing for a crack where it may have broken. In the main assembly and the hub, check side to side play, this should be a fairly firm fit, it should not have much room to wiggle left and right, a large amount of play will indicate the clutch is heavily worn from use and may need to be retired. As with most things, if you notice wobble in the clutches, this is sometime repairable but usually is the kiss of death.
4. Cleaning - The hub needs to be cleaned, the best tool for this is a wire wheel on a bench grinder, clean the hub of any material. Next take a wire brush and brush out the splines in the main assembly and make sure it is nice and free of debris, it may need a rat tail file the very first time you do this, we use a diamond bit chainsaw sharpener for fine cleaning. The sides of the clutches which the belt rides on need to be cleaned to where there is no rust or pitting, it needs to be smooth. Start with a wire wheel and if severely rusted you may move to a sand paper, we use a pneumatic 3M sanding wheel to clean these when in bad shape. When cleaning the hub and main assembly that hub should be able to drop clean through the assembly into the palm of your hand with no problems. If it does not do so, it is not clean enough.
5. Re-Assembly - Place the spring pack assembly back into the main portion of the drive clutch, this should be flat side down, angled side up. If you have trouble placing this back in the assembly you may need that flat blade screwdriver, we also take use of a 4x4 as wood will not damage the assembly if you need to smack it into place. Place the bronze bushing back onto the back plate, place the hub, ridged side up back into the main part of the assembly.
6. Lubrication - This is a dry assembly, no wet lubrication PERIOD. The only part that would need lubrication would be the inner side of the outer cover on the main assembly where the aluminum piece rides on it using centrifugal force. The lubrication in question suggested by Comet is their own brand of dry lube, which is a dry moly blend, I'm sure there are other fine companies out there that offer this, but it doesnt need lubrication often, its not that big of a deal, the main thing you need to focus on is cleaning the clutch. Any wet lubrication you do put in this will create a terrible snowball effect which will collect more dirt, dust, belt fiber, debris, etc. Bad idea to use wet lube.
7. Re-Installation - Put the clutch back on your kart, backplate first with the bronze bushing, then the main portion of the drive clutch beveled side first, outer plate away from the engine etc. Screw the bolt, lock washer, and flat washer back on the kart, if you have an impact wrench this is the time to use it, if not use a box end wrench and pull the recoil to lock up the washer and keep the bolt firmly in place.
Maintenance - Comet did suggest you clean this every 5 hours of use, but if you ride in the sand or an excessively dirty area, I'd say you need to make this part of what you do following riding during the clean up and maintenance time you put into keeping your kart in good shape.
*Driven Clutch - The larger clutch on the jack-shaft assembly of the kart is considered your driven clutch while your drive clutch is the one on the motor. Primarily cleaning this is just spraying the assembly with brake cleaner and making sure the surfaces where your belt will ride are clean, you might not want to be so hasty to disassemble this clutch given it is spring loaded and must be wound back into place correctly or it will not operate at peak efficiency. This is not for beginners. An easier route to clean this would be to use the fact that it can expand as it does when in operation, pull it apart and drop a nut or something inside the clutch so that you can have it apart while sanding for ease. Simply remove the nut when done.
**Series 40 Torque Converters. Those of you who have series 40/44 Torque Converters have a much easier process for maintenance. If there is a demand we can go over that process though it is very very easy.
This next section is as integral to operation as it is to keep your clutch clean, you must have the proper belt for your clutch and set-up.
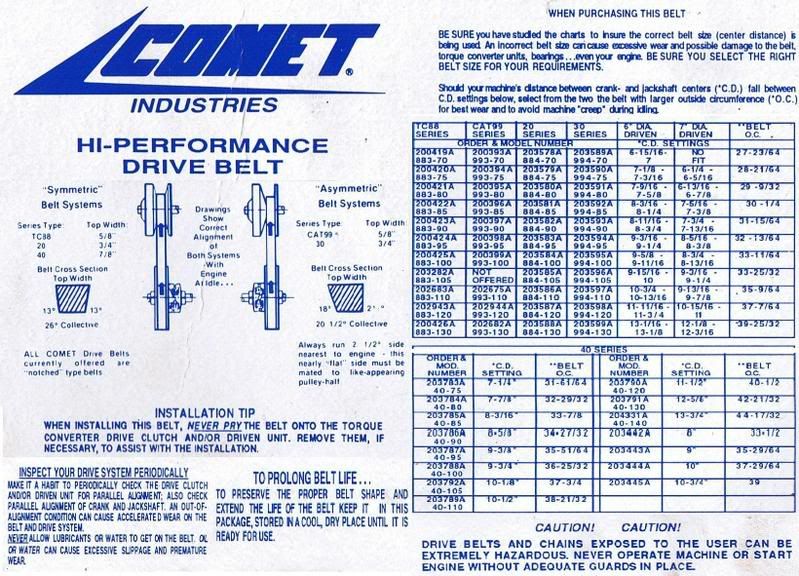
If this chart is not self explanatory first determine what sort of assembly you have. If this is a series 20 you will have a symmetrical system where the angles on the clutches will be identical. If you have a series 30, you will have an a-symmetrical system where the back plate is nearly flat, the main assembly will be angled. The next thing we must determine is that your driven clutch (on the jack-shaft) is 6 or 7" in diameter. The final thing you must measure is the full distance center point to center point between the clutches. Do not round the distance, keep it exact to the 1/16th of an inch, this really does matter.
With Comet no longer in production to supply belts you sometimes must make due with the belts given distances, for those of you with Carter karts you may have to make due with 203581,203582, or 203583 given you can adjust your assembly. When you are able to adjust there is more power. Some are more lucky than others, those of you with stock assemblies on the Torq-A-Verter backplate, those with Yerf-Dogs or Mancos, all of these still have the 2 belts in production from alternate sources, the 203591 and 203589 belts are still here to stay for now...In other words, if this is not you, take what you can get
Should your belt be too lose or worn too heavily your kart will be sluggish and preform terribly. Alternatively, if your belt is too tight it will not disengage and occasionally snap the belt immediately.
Lastly, those of you with MaxTorque Torque Converters, PM me and I'll help you cross reference your belt number to the corresponding Comet Series 20 belt. The cleaning process will be the same for you.
I can add pictures later if my descriptions are terrible or someone feels it necessary.
1. Removal - You must first remove the drive clutch from engine, the bolt will be on the output shaft of the motor, you'll need an impact wrench or a box end wrench and another to tap the box end using blunt force to remove the bolt. Once you have the bolt out it should come right off the shaft easily aside from any rust that keeps it on the shaft. Grease the shaft slightly with no clutch on there to make removal easier in the future.
2. Disassembly - Place the clutch assembly on a work bench or table and remove the outer cover, keep notice that the hub in the assembly has the flat side down and the molded side up which will fit exactly in the cover. Remove the hub, set it aside. Remove the bronze bushing off the backplate and set that to the side. Remove the spring pack assembly if you have not checked it recently for wear, if this is hard to remove try wedging a flat blade screwdriver for ease.
3. Analysis - See if the clutch is in good shape, the main part of the drive clutch will have an aluminum spring pack assembly which has 2 springs which when removed should spring out straight when unhooked and both pins should be firmly inside the aluminum. If either of those are wrong you may need to replace something. Check the bronze bushing for a crack where it may have broken. In the main assembly and the hub, check side to side play, this should be a fairly firm fit, it should not have much room to wiggle left and right, a large amount of play will indicate the clutch is heavily worn from use and may need to be retired. As with most things, if you notice wobble in the clutches, this is sometime repairable but usually is the kiss of death.
4. Cleaning - The hub needs to be cleaned, the best tool for this is a wire wheel on a bench grinder, clean the hub of any material. Next take a wire brush and brush out the splines in the main assembly and make sure it is nice and free of debris, it may need a rat tail file the very first time you do this, we use a diamond bit chainsaw sharpener for fine cleaning. The sides of the clutches which the belt rides on need to be cleaned to where there is no rust or pitting, it needs to be smooth. Start with a wire wheel and if severely rusted you may move to a sand paper, we use a pneumatic 3M sanding wheel to clean these when in bad shape. When cleaning the hub and main assembly that hub should be able to drop clean through the assembly into the palm of your hand with no problems. If it does not do so, it is not clean enough.
5. Re-Assembly - Place the spring pack assembly back into the main portion of the drive clutch, this should be flat side down, angled side up. If you have trouble placing this back in the assembly you may need that flat blade screwdriver, we also take use of a 4x4 as wood will not damage the assembly if you need to smack it into place. Place the bronze bushing back onto the back plate, place the hub, ridged side up back into the main part of the assembly.
6. Lubrication - This is a dry assembly, no wet lubrication PERIOD. The only part that would need lubrication would be the inner side of the outer cover on the main assembly where the aluminum piece rides on it using centrifugal force. The lubrication in question suggested by Comet is their own brand of dry lube, which is a dry moly blend, I'm sure there are other fine companies out there that offer this, but it doesnt need lubrication often, its not that big of a deal, the main thing you need to focus on is cleaning the clutch. Any wet lubrication you do put in this will create a terrible snowball effect which will collect more dirt, dust, belt fiber, debris, etc. Bad idea to use wet lube.
7. Re-Installation - Put the clutch back on your kart, backplate first with the bronze bushing, then the main portion of the drive clutch beveled side first, outer plate away from the engine etc. Screw the bolt, lock washer, and flat washer back on the kart, if you have an impact wrench this is the time to use it, if not use a box end wrench and pull the recoil to lock up the washer and keep the bolt firmly in place.
Maintenance - Comet did suggest you clean this every 5 hours of use, but if you ride in the sand or an excessively dirty area, I'd say you need to make this part of what you do following riding during the clean up and maintenance time you put into keeping your kart in good shape.
*Driven Clutch - The larger clutch on the jack-shaft assembly of the kart is considered your driven clutch while your drive clutch is the one on the motor. Primarily cleaning this is just spraying the assembly with brake cleaner and making sure the surfaces where your belt will ride are clean, you might not want to be so hasty to disassemble this clutch given it is spring loaded and must be wound back into place correctly or it will not operate at peak efficiency. This is not for beginners. An easier route to clean this would be to use the fact that it can expand as it does when in operation, pull it apart and drop a nut or something inside the clutch so that you can have it apart while sanding for ease. Simply remove the nut when done.
**Series 40 Torque Converters. Those of you who have series 40/44 Torque Converters have a much easier process for maintenance. If there is a demand we can go over that process though it is very very easy.
This next section is as integral to operation as it is to keep your clutch clean, you must have the proper belt for your clutch and set-up.
If this chart is not self explanatory first determine what sort of assembly you have. If this is a series 20 you will have a symmetrical system where the angles on the clutches will be identical. If you have a series 30, you will have an a-symmetrical system where the back plate is nearly flat, the main assembly will be angled. The next thing we must determine is that your driven clutch (on the jack-shaft) is 6 or 7" in diameter. The final thing you must measure is the full distance center point to center point between the clutches. Do not round the distance, keep it exact to the 1/16th of an inch, this really does matter.
With Comet no longer in production to supply belts you sometimes must make due with the belts given distances, for those of you with Carter karts you may have to make due with 203581,203582, or 203583 given you can adjust your assembly. When you are able to adjust there is more power. Some are more lucky than others, those of you with stock assemblies on the Torq-A-Verter backplate, those with Yerf-Dogs or Mancos, all of these still have the 2 belts in production from alternate sources, the 203591 and 203589 belts are still here to stay for now...In other words, if this is not you, take what you can get
Should your belt be too lose or worn too heavily your kart will be sluggish and preform terribly. Alternatively, if your belt is too tight it will not disengage and occasionally snap the belt immediately.
Lastly, those of you with MaxTorque Torque Converters, PM me and I'll help you cross reference your belt number to the corresponding Comet Series 20 belt. The cleaning process will be the same for you.
I can add pictures later if my descriptions are terrible or someone feels it necessary.