Denny
Canned Monster
That seems excessive to me also. But you may have to drive it to see how it responds but it does look like you could go shorter. Video great idea!
I only have the belt hooked up to the jackshaft... not running anything else.... it kinda seems to operate correctly. So, i dunno... I have other belts and about 1.5" of adjustment, so I guess one way or another I'll be able to make it work.That seems excessive to me also. But you may have to drive it to see how it responds but it does look like you could go shorter. Video great idea!
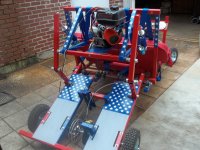
Looks great! If you don’t beat on the trans it may last a little while. If you would have put the driven on the trans atleast you would have had the belt to absorb some of the shock loads. But it looks great! Might want to add some zerks so you can grease those bronze bushings though. Carry on!


When you build one for you and yourself you can correct all those deficiencies. You need to make up a couple of sets of printed plans and make changes to them as you go. Then mail a set to me!
")
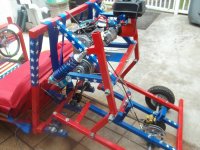
All this great work is intimidating haha. I haven't built the front suspension block yet slowly collecting components so I can mock it up as I go. I'm following your build closely. Feeling like I bit off more than I can chew with what I'm seeing haha. But with all the money in steel and having already welded the main frame. There is no turning back haha. Keep up the great work!
You just gave the best bit of advise you could ever give some one. And backed it up with facts and reasoning too!Thanks for the compliments gents, it is motivating.
I felt the same way buddy (and still do at times). Without question, I was in over my head on this project. The mantra I tell myself every time I get intimidated by a project is "you only learn how to do this stuff one way, and that is by doing it". It is sometimes overwhelming trying to learn from youtubers with skills and tools well beyond mine, but those guys didn't just show up knowing this stuff - they were intimidated once upon a time too. You had the moxy to take the project on so I reckon you have what it takes to finish it.
Do one little piece at a time if you have to. My only victory one day was cutting and drilling a single piece of angle to mount the caliper. That's all I got done that day, but it helped me get over the intimidation of building the brake system.
You'll get there. If you get stoved up, go cut just one piece of metal for the steering box... it'll get you moving again. Sometimes I take my time just getting the metal bits cut and prepared to weld, and then it is there waiting for me to tack together when I'm ready.
Just now catching up on your posts, you're doing some good-looking work. Had to pipe in my agreement on wider/longer is better when creating a swingarm or IRS for a kart. Wanted to caution on that though.anyone building their rear subframe to go wider. I went 2" longer, but I wish I'd gone at least 2" wider as well
Just now catching up on your posts, you're doing some good-looking work. Had to pipe in my agreement on wider/longer is better when creating a swingarm or IRS for a kart. Wanted to caution on that though.
I went just plain too much in that vein, see pic below. You actually can overdo it. I went super-long on the swingarm to get a crazy amount of travel with a motor rigid-mounted on a rack in the offroad mode, and when it's dropped down to track mode. Really got more than I wanted, even with the 15" floorpan/ground clearance or the 2" clearance. Note the reverse-mounted pillow blocks for the swingarm to keep it off the ground in track mode.
I can't stand the idea of me building a pogo-stick engine mounted on the swingarm on purpose, especially with a theoretical 2' of travel at the rear bumper. That's also the only way you can do it without depending on a really super strong chain tensioner or idler to take up the constantly changing chain-slack as the pogo jumps up/down.using the subframe pivot point as a jackshaft
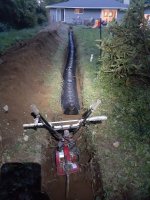
Build is looking good! Darn septic! You will get it figured out. If you are planning on replacing it yourself, and have questions, I "might" have some helpful info. Mine backed up a few years ago and I replaced all the lines+added an extra branch to the leach field. This one was a beast, but did it with a garden tiller, shovel, and about 3 gallons of whiskey. Probably $600-$700 in all took a while, but saved thousands.Just checking in gentlemen... I've been at a standstill for a 6 weeks or more. Kids started a new school, wife started on a new degree, big project at work, septic system backed up, fall clean up, cutting firewood for winter, hunting season.... you know, life happens.
I hope your projects are moving along and you all are doing well. I'm hoping to get back on this soon.