beanie
New member
- Messages
- 26
- Reaction score
- 0
Hi,
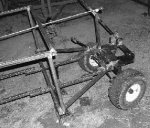
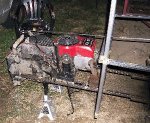
I have been working on this thing for about 20 hrs and well it is starting to look a little like something. The donor was a Sears riding mower with a 18ish hp B&S vertical shaft engine. I paid 50.00 for it and was promised it ran at one time, no mower deck.
I hauled the beast home and put a battery in it. Bought some fuel line and put some gas in the carb. Checked the oil and hooked the battery up. Well I should have looked but some Einstine had hooked the ignition kill wire to the hot side of the battery. Blue smoke.
I took the lid off the engine and found the smoke had come from the now destroyed ignition, so off to the parts store to get a replacement. Put that one, checked ALL of the wiring and hooked the battery up. No smoke this time. Held my breath and fired it up, it started up pretty good and ran ok except for sugring.
So after a new plug, new filter and a carb kit it runs ok, but still wants to hunt too much for me. I rode it around and around to see if the hydrostatic transmission was going to hold up and if the engine was too. It didn't smoke and the transmission pulls great so I guess all things said I did ok for 50.00.
My goal was to copy one of the mules or FUV's. I was going to build the frame from scratch but after looking at the transmission I saw it was going to be a major PITA to mount the engine behind the trans because of a hump on the back of the trans. I could have but the engine drive belt would have had to be offset about 30 degree.
So with that being more than I wanted to tackle, I went back to plan A which was to cut the frame into fourths. The first was the back 1/4 about 12 inches long that held the trans, and drive selector shaft and front trans supports. The next long 4th was not used. The next 4th was the engine mount and a tension pully shaft. The last fourth was another 12" peice which had the front wheels and the bay for the front axel to piviot in.
Then I laid it all out and welded 11 guage 1x1 along the bottom of the old frame parts. The back peice is 8" tall and the others are 3" tall, but they all share the same ground line. When I got it welded up it looked good as was straight and true, but after rethinking it it was to frigging short!
So out with the saw and chopped my new frame into, and I added a 14" extension and using a old RC airplane trick, used a string to true the front end to a point 1/2 the width of the rear end.
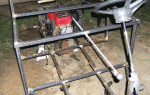
Today I got the steering back in by rotating the steering mech 180 and driving the front end from the front instead of the rear. Got the drive, fwd, rev welded together. Got the break/clutch pedal on and welded, still need to make the new linkage.
I took some photos but it was already dark, I'll take some more tomorrow.
I have been working on this thing for about 20 hrs and well it is starting to look a little like something. The donor was a Sears riding mower with a 18ish hp B&S vertical shaft engine. I paid 50.00 for it and was promised it ran at one time, no mower deck.
I hauled the beast home and put a battery in it. Bought some fuel line and put some gas in the carb. Checked the oil and hooked the battery up. Well I should have looked but some Einstine had hooked the ignition kill wire to the hot side of the battery. Blue smoke.
I took the lid off the engine and found the smoke had come from the now destroyed ignition, so off to the parts store to get a replacement. Put that one, checked ALL of the wiring and hooked the battery up. No smoke this time. Held my breath and fired it up, it started up pretty good and ran ok except for sugring.
So after a new plug, new filter and a carb kit it runs ok, but still wants to hunt too much for me. I rode it around and around to see if the hydrostatic transmission was going to hold up and if the engine was too. It didn't smoke and the transmission pulls great so I guess all things said I did ok for 50.00.
My goal was to copy one of the mules or FUV's. I was going to build the frame from scratch but after looking at the transmission I saw it was going to be a major PITA to mount the engine behind the trans because of a hump on the back of the trans. I could have but the engine drive belt would have had to be offset about 30 degree.
So with that being more than I wanted to tackle, I went back to plan A which was to cut the frame into fourths. The first was the back 1/4 about 12 inches long that held the trans, and drive selector shaft and front trans supports. The next long 4th was not used. The next 4th was the engine mount and a tension pully shaft. The last fourth was another 12" peice which had the front wheels and the bay for the front axel to piviot in.
Then I laid it all out and welded 11 guage 1x1 along the bottom of the old frame parts. The back peice is 8" tall and the others are 3" tall, but they all share the same ground line. When I got it welded up it looked good as was straight and true, but after rethinking it it was to frigging short!
So out with the saw and chopped my new frame into, and I added a 14" extension and using a old RC airplane trick, used a string to true the front end to a point 1/2 the width of the rear end.
Today I got the steering back in by rotating the steering mech 180 and driving the front end from the front instead of the rear. Got the drive, fwd, rev welded together. Got the break/clutch pedal on and welded, still need to make the new linkage.
I took some photos but it was already dark, I'll take some more tomorrow.