I will probably go with spacers. I wanted to run my spindles upside down because the tie rod connection juts downwards and I wanted to aim them inward and run my tie rods behind the steering wheel instead of the front; however, the way they were designed would put my kart 6" off the ground. I'm going to have to run them regular and weld some extensions from for the tie rod ends so they can connect.
You are using an out of date browser. It may not display this or other websites correctly.
You should upgrade or use an alternative browser.
You should upgrade or use an alternative browser.
2016 - Predator Drifter
- Thread starter ghosted
- Start date
- Status
- Not open for further replies.
chancer
ɔ ɥ ɐ u ɔ ǝ ɹ
I see you didn't get the Black Mamba Jr,
You got the 275F instead.
That cam asks for 32lb springs, right? Any reason you got the 26 lbers?
Just wanted to add Bob ^has made himself our resident 212 Expert.
He can help you hit that 62+ you were talking about last week.
Hellion
Disc brakes are for cowards
Curious, this is probably a stupid question (which do exist by the way), can you balance steel one piece wheels? I would assume so. Everyone keeps recommending balanced racing wheels for the speeds I am trying to achieve, but can't any wheel be balanced?
I kept looking for leads showing someone balancing a kart wheel on a balancing machine but all resources so far point to amateurs and pros doing it manually. Seems simple enough...
http://www.wikihow.com/Balance-a-Racing-Go-Kart-Tire
https://www.youtube.com/watch?v=xVKHp7ayW0U
https://www.youtube.com/watch?v=YA7W9HrGdzQ
In a racing setting, of course they have multiple sets of rims and tires so balancing a set temporarily (one race and the tires are tossed out) would be the thing to do as well as affixing the wheel weights with tape so they can be quickly rebalanced the next time around. I do like the tape idea, even with chrome tape so it blends in.
chancer
ɔ ɥ ɐ u ɔ ǝ ɹ
Tape on a wheel weight? Why? When they make the "self stick on" ones for fancy aluminum wheels.
http://www.ebay.com/itm/like/380369480807?lpid=82&chn=ps&ul_noapp=true
http://www.ebay.com/itm/like/380369480807?lpid=82&chn=ps&ul_noapp=true
bob58o
SuckSqueezeBangBlow
Well if you want to "squeeze" everything out of this engine, you left out the "squeeze."
You can mill the head for fairly cheap. DynoCams is the cheapest I found.
And maybe you could exchange the standard length billet connecting rod for the +0.020" one (I'd call and ask)
Did you measure the piston to deck height at top dead center?
The +0.020 Rod put my piston nicely at 0.004" in the hole.
Thinner head gasket is another way to gain a bit of compression.
0.009" is the thinnest I've seen
0.045ish" is stock (or maybe 0.040"?)
---------- Post added at 01:10 AM ---------- Previous post was at 01:00 AM ----------
Need to consider....
Piston to valve clearance,
Piston to head clearance,
Compression ratio for your cam.
I will most likely end up milling the head. I wanted to "squeeze" everything out of the engine before having to modify the actual structure of the engine.
As far as the rod goes, Jody at ARC said the standard length is all you can put on the Hemi Predator due to valve clearances (without putting a larger head gasket).
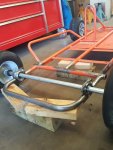
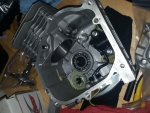
I have all of the parts in and have begun the engine build. Just received my engine mount (I destroyed the original one cutting the frame up for a live axle) and my frame is tacked together.
No idea how I am going to mount my engine plate though. I may have to make a type of bridge across the old axle and the new rear bumper.
As far as the rod goes, Jody at ARC said the standard length is all you can put on the Hemi Predator due to valve clearances (without putting a larger head gasket).
I have all of the parts in and have begun the engine build. Just received my engine mount (I destroyed the original one cutting the frame up for a live axle) and my frame is tacked together.
No idea how I am going to mount my engine plate though. I may have to make a type of bridge across the old axle and the new rear bumper.
Attachments
-
 IMG_20160925_131335.jpg159.4 KB · Views: 13
 -
 IMG_20160922_143504.jpg209.3 KB · Views: 11
 -
 IMG_20160921_132136.jpg199.8 KB · Views: 11
 -
 IMG_20160916_163131.jpg193.1 KB · Views: 12
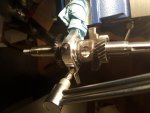
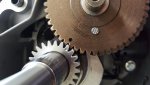
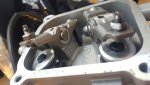
not dead yet. Just waiting on parts. Waiting on a valve spring compression tool.
I attempted to build one with a 4" C clamp and a 3/8 drive 13mm long socket. Not enough clearance, so I just ordered a tool with different size from Amazon.
Installed the rod backwards last night. Will rectify tonight after I swap dirt bike tires and visually sync 4 carbs on an '06 Katana 600
So much going on and so little time.
Attachments
-
 IMG_20161011_184818.jpg176.5 KB · Views: 14
 -
 IMG_20161006_213921.jpg234.5 KB · Views: 12
 -
 IMG_20161006_164657.jpg245.9 KB · Views: 14
 -
 20161006_122451.jpg202.9 KB · Views: 16
 -
 20160922_102831.jpg119.9 KB · Views: 12
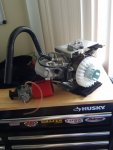
First run on the predator engine. Frame is still in the works.
https://www.youtube.com/watch?v=NuclXw05CDY
Going to see if there are any similar builds so I can get some tuning advice.
- Removed governor
- Billet fly wheel
- Chromoly pushrods
- 26lbs springs
- Upgraded spring keepers
- F275 Cam
- Billet Rod std length
- Removed low oil sensor
- Billet valves
- 22mm Mikuni Carb
- Open exhaust
- Mikuni Fuel Pump
- ARC Top plate
The video shows a stock Mikuni jets and idle. Can't wait to finish the frame so I can actually bolt it down and do some tuning without the engine walking off.
Hellion
Disc brakes are for cowards
Blipping the throttle on it's first run ever is fun and all, but make sure you do a proper break-in (run-in) procedure on that engine.
I stole the following from somewhere; some racing parts vendor no doubt (EDIT- From Briggs World Formula Engine manual):
The first 30 minutes of this engine’s life are the most important to ensure trouble-free racing. After mounting the engine, we recommend that the engine be broken in using any high grade non-synthetic SAE-rated 30 weight oil. Run the engine, no load, at idle (1,700-2,000 rpm) to allow the engine to reach normal operating temperature (5-8 minutes). Shut the engine off and allow to return to room temperature. Again start up the engine and bring up to temperature (5-8 minutes). Shut off engine and change the oil. Replace the oil (16-18 ounces) and it is time to place ‘load’ on the engine. To apply a load on the engine the easiest way to do this is to run the engine on the track. Running not higher than 6,000 rpm, take several laps (depending on course length). With the oil still warm drain and replace the oil. Repeat and slowly begin to bring the engine up to speed.
chancer
ɔ ɥ ɐ u ɔ ǝ ɹ
That thing sounds good!
FreeRunner15
=======
Y'all aint ready.
lol , This guyy
We ain't ready? All-right then. Let's See it.
Sounds real nice.
\/
Last edited:
lol , This guyy
We ain't ready? All-right then. Let's See it.
Sounds real nice.
\/
That was geared more towards my local friends that are challenging my build, but by all means I'll extend it to everyone.
---------- Post added at 06:21 AM ---------- Previous post was at 06:20 AM ----------
That sounds sick
it definitely needs to be tuned. The camera phone mic doesn't sound anything like it does in person.
Maiden voyage was a success.
Need to adjust the chain/sprocket setup, jet the carb, new rear tire, get nylon bushings for the front spindles, loctite everything and then it's off to the track.
Need to adjust the chain/sprocket setup, jet the carb, new rear tire, get nylon bushings for the front spindles, loctite everything and then it's off to the track.
Attachments
-
 20161128_170356.jpg316.3 KB · Views: 36
chancer
ɔ ɥ ɐ u ɔ ǝ ɹ
Very nice! Well done. I like the fuel tank.
Post more pics if you get a chance. and a Video too
Post more pics if you get a chance. and a Video too
Very nice! Well done. I like the fuel tank.
Post more pics if you get a chance. and a Video too
will do, waiting on some things to come in so I can make sure I don't die getting her up to top speed. The gas tank is just an aluminum catch can from Summit Racing. I think it looks pretty good.
- Status
- Not open for further replies.