1980 Honda Express RestoBuild

Status
Not open for further replies.

vette117

New member
Messages
17
Reaction score
0
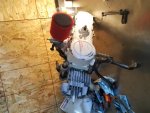
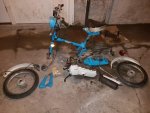
So my dad has owned this moped for as long as I can remember. He got it from a friend's garage/barn a long time ago for free. After obtaining it, it sat in the corner of his shop for the longest time as a display. My curiosity about 6 years ago had us pull it out of the corner, blow off the dust, and get it running.

Fast forward to about 5 months ago, and he handed it to me.

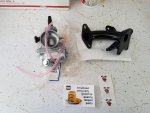
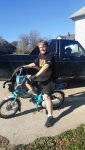
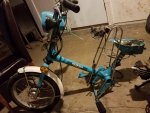
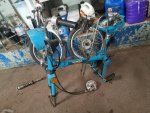
It ran no problem, but I wasn't willing to leave it be. I bought a new fuel peacock and filter. Cleaned and tuned the carb, and a few other little things. Drove it around town for a month, got a ton of looks, but decided it needed more.
 

Attachments

  • FB_IMG_1500495621914.jpg
    FB_IMG_1500495621914.jpg
    314.4 KB · Views: 13

vette117

New member
Messages
17
Reaction score
0
Now it is sitting in pieces, waiting to get cleaned up and new parts. I'll compile a list of ideas and improvements shortly. Until then, enjoy more pictures!
 

Attachments

  • 20170228_194819.jpg
    20170228_194819.jpg
    337.9 KB · Views: 3
  • 20170311_211037.jpg
    20170311_211037.jpg
    395.1 KB · Views: 2
  • 20170404_182919.jpg
    20170404_182919.jpg
    334.8 KB · Views: 4
  • 20170311_190621.jpg
    20170311_190621.jpg
    426.6 KB · Views: 3

vette117

New member
Messages
17
Reaction score
0
So, my primary goals right now are to reseal the entire engine/trans, and get an idea of what the internals looks like. If everything checks out, I'll move on to getting it cleaned up a bit.

It has leaked oil from the exhaust (2stroke) and has made a complete mess of everything. I'll start scraping, and cleaning what I can. That being said. There isn't a ton of surface area, so I might strip it down entirely and get it sent out for paint eventually. I'd rather do it while it's all apart.

Any votes for color? Original Honda Blue, or something else? I've always loved lime green on bikes..
 

Texan

Senor Member
Messages
461
Reaction score
2
Location
Deep In The Heart of Texas
Looking forward to see what you do with it. I too have a 1980 Honda Express, but its a NA50, slightly different than yours. Slowly piecing it together as it came completely disassembled and missing some parts.
 

vette117

New member
Messages
17
Reaction score
0
At this point, I'm a bit torn as the direction I want to go. I began teardown with no real idea other than At the very least I wanted to clean it up. With how simple it is to work on, and how cheap parts are, I am inclined to go further. Part of me wants to restore it as close to original as I can, but I'm an outside of the box person.

I'm leaning more towards a stripped down look. Here are my ideas (in no specific order) for that:
1. Paint Scheme - Kawasaki Green with black accents.
2. Relocated fuel reservoir. (I premix and bypassed the oil pump.)
3. Discard front fender. Trim and "tilt" rear fender forward.
4. Discard headlight/speedo pod. I would like to use an LED light bar instead. LED tails, and turns also.
5. 70cc Big bore Kit
6. New tires. I'd like to be a bit wider if it can be fit.
7. License, and register before January.
 

vette117

New member
Messages
17
Reaction score
0
If it were me, i wouldn't touch the paint. Thats just me though


Thanks for the input. I'm still on the fence, so we will see what happens with paint later down the road.

One thing I am sure of, is that I want to convert the 6v electrical system to 12v. I've been trying to find as much info on it as I can, but it is a bit overwhelming at this point. There seems to be conflicting ideas to the best way to achieve that. Anyone have some pointers or guidance?

*Edit*
I know I read somewhere that the output is unregulated. The "regulator" ends up being the 6v battery. If it isn't in place, it burns out the very expensive bulbs. I have a slight wonder if I could just put a small 12v battery, and switch all the lights to 12v and it would work?
 

vette117

New member
Messages
17
Reaction score
0
I just decided to take the plunge for more displacement today! 70cc Wizard cylinder kit, with a 46mm Hobbit head, .6mm MLM Base spacer, and an extra base gasket.

Cant wait for that fun! Ill likely have to get a bigger carb, but I'm not a carbureted expert, so I will wait until the 70cc kit is installed to decide what I need. Most people run the Mikuni 20mm carb for easy tuning. Probably my best bet, also.
 

vette117

New member
Messages
17
Reaction score
0
Today I ordered the Mikuni 20mm VM round slide carb, an MLM intake to mount it to, and a bunch of jets for the carb.

I've never had to break a motor in, but I have read a ton about breaking these 70cc kits in, and I will be extremely cautious while doing so. A lot of scooter guys use the trailtech gauges for max speed, and more importantly temperatures. I will be looking into getting one soon. A lot of people soft size these motors, not paying attention to breaking it in.*

I want an aftermarket exhaust, but it will probably wait until after the break in process. I will feel more comfortable tuning for the aftermarket after the break in is done.
 

vette117

New member
Messages
17
Reaction score
0
First round of Treats in! 70 Cylinder, Hobbit Head, MLM Spacer, and gaskets. I'm going to start tearing down the old motor shortly. I am still waiting on a couple more rounds of goodies, before I will be able to completely reassemble, but I have inspiration to get a couple of other things knocked out while I'm waiting!
 

Attachments

  • First Round of Treats - 70cc Wizard Kit - Hobbit Kit - .6mm MLM Base Spacer - Base Gaskets.jpg
    First Round of Treats - 70cc Wizard Kit - Hobbit Kit - .6mm MLM Base Spacer - Base Gaskets.jpg
    190.7 KB · Views: 3

vette117

New member
Messages
17
Reaction score
0
Another round of treats! Got the Mikuni Carb, some jets, and a fancy MLM Intake! All I am waiting for now is a couple of gaskets and a couple days off to get all the stuff assembled.

In the meantime, I have been going over the wiring diagram of the moped. I have a good amount of experience with 12V car electronics, so I think I have an idea of what I need to do to convert my 6V to 12V; but if anyone here can give some advice, I'd appreciate it! Who is the best person to ask? I can PM a detailed wiring diagram, along with my ideas to whomever can help.
 

Attachments

  • 20170724_170811.jpg
    20170724_170811.jpg
    231.4 KB · Views: 0

vette117

New member
Messages
17
Reaction score
0
All I'm waiting on now is a couple more gaskets to be able to install the 70cc Kit. I also have a high flow UNI filter on the way for the Mikuni Carb, and Carbon Boyesen reeds for some low/mid range juice!

Once the Kit is installed, I will have to spend some time tuning and breaking it in. Once the break in is done, I am going to measure the AC Voltage output of the stator to determine which voltage rectifier/regulator I need for the 12V conversion. I have a few spare 12-14V Tool batteries laying around that I might be able to use. The scoot uses a kick/wind up start, so I don't need a high cranking amp. Just enough to run some LED Lights. I'm wanting to use a small LED Light Bar in place of the headlight pod, and converting all of the other turns/tails/brakes to LEDs.

Also, follow me at *youtu.be/k4HAral-eMw
for a video log of all the work I'm putting in!
Thanks!
 

vette117

New member
Messages
17
Reaction score
0
Alright guys, today I got a ton of work done to the motor!*

I started off by cleaning up the case itself. Years of oil/dirt caked all around the casing. A few cans of brake clean and some elbow grease made it look a lot better.*

Next task was replacing the Variator cover gasket. The Philip head bolts were a PITA to remove, but I eventually got them out. The internals looked great. No majorly worn parts. Reassembled with new gasket. Filled with 5w-20 synthetic. It's what I had on the shelf, so it will do for now.*

After I finished that, it was time to tackle the 70cc kit. 4 bolts to remove the head and cylinder. Cake. Removed old piston. I used The MLM .6mm Base spacer, with gaskets on each side, and everything lined up perfectly. The cylinder kit came with the piston already in the bore, so I left it in while installing the new wrist pin and attaching to connecting rod to avoid having to compress piston rings. Installed new Hobbit Head.*

Instead of cutting the fins on the brand new cylinder, I used an angle grinder to shorten the head on the oil fill bolt. I left enough material to be able to use it still. PLENTY of space. Perfect.*

Removed the stock intake, and reed block. I replaced the reeds with Boyesen Carbon reeds. Installed the new MLM intake for the 20mm Mikuni Carb, and a UNI air filter.*

I have yet to install the exhaust, and the throttle cable, but I did crank the wind up a few times and let it turn over with a little oil. Flawless.*


So, I called it a day because I couldn't get the throttle cable in the Mikuni. I adjusted it all the way to the end, and I was just barely able to seat the cable. I was devastated. It was my impression that the Mikuni was a direct fit, even with the stock cable. Any ideas here?*
 

Attachments

  • 20170727_103554.jpg
    20170727_103554.jpg
    347.8 KB · Views: 3
  • 20170727_153625.jpg
    20170727_153625.jpg
    305 KB · Views: 2
  • 20170727_154509.jpg
    20170727_154509.jpg
    259.9 KB · Views: 3
  • 20170727_155138.jpg
    20170727_155138.jpg
    229.3 KB · Views: 2
  • 20170727_170219.jpg
    20170727_170219.jpg
    349.6 KB · Views: 5
Status
Not open for further replies.
Top