The start of a 265cc Ducar cast build with full efi control, GX200 clone

Darren

Active member
Messages
77
Reaction score
127
Location
Essex, England
Introduced myself in the appropriate section, made sure I could continue with this build before starting a thread.
Step one was the flywheel.

The Flywheel is finished, well it's really just a trigger wheel with extra bits...


I've now purchased most of the bits for the engine mechanical part of the build-
3" sleeve
Wiseco piston and rings with wrist pin etc.
ARC billet rod
ARC billet side cover
High lift cam
Billet Ali rockers 1:1.3
Molly push rods
stainless billet followers
56lb springs with retainers and lash caps
Inferno clutch
Tried pulling the sleeve, couldn't get it to move, had a proper look and researched to find the block is cast around the sleeve, stopped before doing any damage
I've called numerous machine and kart shops to get someone to machine the head and sleeve, all but one are interested in even quoting.
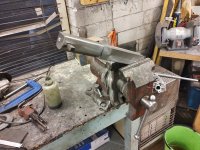
I've decided to do it myself, so my trusty old 13" swing Kerry lathe will hopefully save the day.
I'm currently making the jigs to mount the ducar block to the lathe's faceplate.
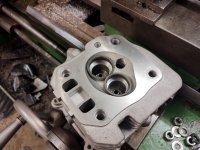
I'll also machine the head for the valves, I can shroud the valve area with a degree of greater accuracy, and without fear of catching the valve seats.
I'll post when each stage is completed, the jigs just take time, the idea is to make them re-useable for future builds.
 

Darren

Active member
Messages
77
Reaction score
127
Location
Essex, England
Still waiting on the 3" sleeve, so doing things a little out of sequence.
Today I made the intermediate flange to marry up the throttle body and the gx160 head. The valve seats are now pressed into the head and the first stage of head work has been completed around the larger seats.


Tommorrow I'l open up the inlet and exhaust ports, I'g like to get it as close as possible to a gage head.


BrownStainRacing

Well-known member
Messages
1,361
Reaction score
1,346
@Darren

Thank you for taking the time to make and post your videos here.

I've jus started porting my own heads, a couple yrs back, and notice how important working the area under the valve seat is.

It really wakes these lil engines up, from what I'm seeing.

Looking forward to your next video thanks again.
 

Darren

Active member
Messages
77
Reaction score
127
Location
Essex, England
Although I've been involved in motor racing for over 40 years. I'm no expert, I just like to tinker. I do appreciate your kind comments.
Next video will be Saturday or Sunday, I've just received all the parts from America, I can now machine the block
 
Last edited:

Darren

Active member
Messages
77
Reaction score
127
Location
Essex, England
Just dropped a new video on youtube, in this one I get about cutting out the old sleeve and putting in the new one, unfortunately it doesn't all go to plan, and I end up going a new route to get the same result
 

Darren

Active member
Messages
77
Reaction score
127
Location
Essex, England
Been a little while,
Videos to come....
I've torn into the original block and found that the liner/sleeve is stepped, I can't use it for 76mm piston.
I've done some work on the chassis, stripped and cleaned the rear axle, ordered new bearings, sprocket and brake disc carriers engine mount etc..
I've also cleaned up and plated the front stub axles.
And I've finally received my correct liner.. :)

The SOLO kart original chassis colour is a rich metallic green with gold anodised parts, so anything that is steel and rusty will be passivated yellow. We have electroplating at work, we usually passivate yellow unless the job looks better for the blue shade.

I've also purchased an intank fuel pump, My fuel tank screw top is 35mm, the tiny cheap pump is 30mm, I've tested the unit and it is good for max of 4bar (58psi), my system will run at 3 bar.
The pump only draws 1.5amps of current, this will help no end on battery life, I have quick release dewalt battery adapters which go through a min voltage cut off circuit, these then run through a voltage regulator, this enables me to run 12 to 18v batteries for a constant 12.3v dc output; stable voltage is very important when running EFI.


20240201_144005.jpg
 
Last edited:

Denny

Canned Monster
Messages
8,499
Reaction score
4,732
Location
Mayberry, Indiana
It’s about time you got back to this. I got really old waiting for you to update us. Now where’s my Geritol? Now available at drugstores near you in economy and extra plugged up too!
 

Darren

Active member
Messages
77
Reaction score
127
Location
Essex, England
Loads of kart stuff going on in the background, the small fuel pump was a bit of a find.
Block looks like a 'Pauls kart' welded block. Can't wait to get into machining the new sleeve, this is already almost mm perfect for the task, Westwood cylinder liners were quite helpful.
 

Darren

Active member
Messages
77
Reaction score
127
Location
Essex, England
Had a drive to the Kart shop, biggest in the UK and only 30mins away, spent just over £700 on stuff, gulp!
Also had some time in the workshop, finally put the new block in the lathe and started to cut out the old liner.
I have progressed a little further than the video, the new liner is almost ready to go in.


Darren

Active member
Messages
77
Reaction score
127
Location
Essex, England
The 3" sleeve is now fitted in the block, I have used permatex sleeve retainer compound, this takes around 24hrs to cure,
I'll stick the block back in the lathe on Saturday machine and finish it off.


resized   engine sleeve installed.jpg
 
Last edited:

Darren

Active member
Messages
77
Reaction score
127
Location
Essex, England
I've finally finished the sleeve, it was way too much honing work. I was being too careful with the initial removal of material with the cutter.
Next is the work on the piston, I'll build up the block so I can determine how much to take off the piston, and where I need to clearance for the rod.


Darren

Active member
Messages
77
Reaction score
127
Location
Essex, England
Still progressing with the engine, I've now finished the machining of the block and piston, trial fitted bits to address clearances.
Next move will be balancing the crank, rod and piston assembly at whatever the balance factor is recommended for this setup. I'll check the original DUCAR weights to see where I stand.

 
Top