Role
Nobility
It has been a long journey in completing this project (approximately 2 months)
HISTORY
I bought the go kart from a local and it was far less then par to say the least. It needed to be stripped completely and almost every piece on it needed to be replaced.
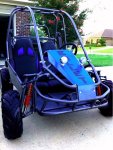
I took it upon myself to start from scratch and not just give it a face lift, but completely restore this go kart to a flawless and new state.
Steps to RESTORING it to NEW...
1. Stripped it down to the frame. (all parts off the body, all screws, washers, nuts, bolts, pins, etc)
2. Sanded all the metal down, removing all paints and rust from parts and frame.
3. Put all the bolts/screws/washers/etc in CLR (great for removing rust and calcium deposits). Then used a wire brush for approximately 3 hours scrubbing rust away that was still present (if any). I then re-dipped all the bolts/screws/washers/etc in CLR to let them soak again to remove any layers of rust under the first layer. About 95% of all the bolts came back to BRAND NEW, while the rest were hopeless.
I purchased all new bolts and hardware for any of the original bolts that didnt look sparkling new.
4. On the frame, there were a few areas underneath that had intense rust build up. After sanding away all the rust, I filled in any areas that I saw with body filler to fill in imperfections or pitting in the metal.
To follow, I used a fine grit sandpaper and smoothed the body filler. Repeated the steps a 2nd time. 2 layers of body filler for a good solid bond, and sanded twice for a smooth result to lie flush with the rest of the frame.
5. All of the metal pieces that came off the frame, I also used 2 coats of body filler along with sanding twice on any areas that called for it.
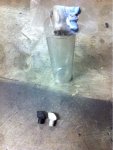
6. The rubber stops on the back of the floor grips were torn and corroded, so I used a special JB Weld rubber/plastic clay to remold new stops to ensure a solid new floor grip and to prevent them coming off.
After carefully shaping all the floor grip stops using JB weld putty, they were then sanded smooth and clear coated for protection. I then got rid of the the original black floor grip color, and went with a midnight blue to remissness with the steering wheel, seats, front grill plate, etc. Look great now!
7. Sprayed frame and parts using an Automotive grade Rust-Oluem primer and rust preventative to ensure a long lasting and protected frame. I used 2 coats of primer on all parts.
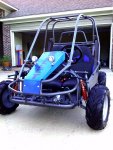
8. Painted frame/parts with an Automotive grade Rust-Oleum paint which is a unique gunmetal gray that sparkles deep from different angles in direct sunlight. To add some sparkle, I added silver flake into the paint to give it a serious shine. Double coated the frame/parts.
9. Following the paint and adding the silver flake, I double clear coated everything using automotive high gloss grade clear coat for a finished protection and wet look. It made a huge difference, looks like wet pain that's melting in the sun, super shiny.
10. Sanded all rust off brake caliper and sprocket, looks like a new piece of brushed metal in my hand.
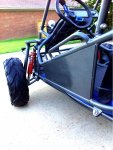
11. Primed Wheels inside - painted gray. For the outer wheels, I decided to give them some shine to match the beautiful paint, so I chromed them and then sprayed with auto grade clear coat.
12. Engine - in the pictures, you will see a Robin Subaru 169CC engine. I recently removed that engine and replaced it with a BRAND NEW 212cc Honda clone Predator engine on it. It has maybe 2 hours on it")
13. Engine mount was repainted to remissness with midnight blue color throughout the go kart.
14. Torque converter was dis-assembled and wire brushed to remove any corrosion build up or rust that was present.
15. Original torque converter belt was SPENT, so I bought a brand new Comet belt and replaced the original one.
16. Chain was taken off and wire brushed in a few different solutions, WD-40 and PB blaster. Before and after use, I lubricate the chain and sprocket with Liquid Wrench (DRY lubricant).. If you use anything WET on the chain to lubricate, you're going to be wearing liquid rust on you and it will be all over the go kart.
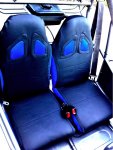
17. Seats were extremely rusted. Stripped the leather seats, and removed old wood and old cushions completely off the seat frames. Rust-Oleum makes a new item that actually bonds rust to this special primer and makes the area a new and paintable surface while also making it smooth. It worked like a charm.
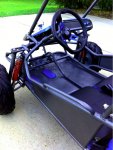
18. After painting the seat frames a matte black, I then cut board for the bottom seat and measured and cut all areas of the seat frames with new cushion and bolted it to the seat frames. In the pictures you can see it started with a metal frame, then padding, then covered in a thick cloth material (also cushioned) to cover any metal on the seat, then covered in a slick leather and vinyl racing seat material.
Not only do the seats look great, but they are probably one of the most comfortable seats you will ever sit in on a go kart. I've ridden in some where it hurts to ride because there's not enough cushion. You don't have to worry about that here, you should just worry about falling asleep in these seats they are some comfortable.
19. Lubricated each inner wheel with a high performance grease to ensure a smooth glide.
20. Grinded down the sliding tracks for the adjustable driver seat.
21. I have semi broken in the engine using these proper steps:
A. Checking oil level, spark plug, and letting the engine idle for about an hour before use for the first time.
B. After about 1 hour of driving at different speeds and not at full throttle, while the engine was still pretty warm - drain the first batch of oil to remove any build up (grime, metal flakes/pieces from the internal parts of the motor).
C. Change the oil using a 10W-30 engine oil.
I've noticed the smoothness of the engine after that first oil change. It makes a huge difference.
25. Added an additional return spring for the throttle because the setup that comes on the Predator is not all that great.
26. Sanded and cleaned metal engine guard (between torque converter and engine)
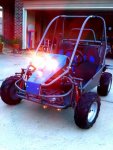
27. LIGHTS - the go kart did not have lights. I like the idea of having lights because you may want to take a spin somewhere at night or go out in the woods and if you can't see then you can't drive it. By the way, these lights are really bright, I would compare them to some high beam lights on a SUV!
I mounted two Hi powered 55 watt headlamps in the front for great visibility at night that run off a 12V or 18V battery. The headlights come with a 3 year warranty so if something happens, you will be covered under the manufacturer warranty. In addition, I didn't want to deal with wires everywhere trying to tuck them and tape them, etc. The solution was mounting a glove type box/basket underneath the front plate of the go kart. To reduce any vibration between the plate and the basket/box, I used a fleece material between the two.
In the box/basket, is where the battery and wiring are located. Need to charge it but don't want tons of headache? No problem, you don't have to brake out the screw driver or mess with a brace - just grab the battery and pull two chords and the battery is out. In addition, this box is also great for storing your cell phone, wallet, or anything you want to keep stowed away while driving around.
28. New Brake Fluid Reservoir
29. Front plate where the lights are mounted was rusted and chipped green color. After sanding it, I primed the front and back followed by a lite sand. Then painted it a high gloss black. Once dry, I free handed with painters tape, cutting each piece of each letter one by one and placing it evenly down the middle to spell out "BULLET"
After I had all the tape in place, I went over it with a high gloss blue to create a deep midnight blue. Note* - black base + regular blue color = midnight blue. After letting that dry, I followed up with silver flakes. Then peeled off the tape. I did the silver flake before removing the tape because I wanted the word "Bullet" to be solid matte and the outer surrounding areas to shine and sparkle. It came out beautifully. Once tape was removed, I sealed it with a high gloss automotive grade clear coat. It looks like a diamond!
30. Seat belts, were completely disassembled and refinished.
31. Shocks/Springs - repainted candy red & clear coated for protection. The chrome arms were re-polished and cleaned.
32. Steering wheel - was rusted and corroded. I primed, and refinished it with a midnight blue to match the other blue pieces and then repainted the center cap a high gloss black.
Well I guess that about covers it - I don't think I left anything out... if I did, I will add it above.
Let me know what you think!!!
***NOTE*** If you are using a mobile phone to view the slideshow - when clicking the link below it will redirect you to a mobile version, at the bottom of that page it will say "View the full website" - click on it and wait for full website to load. Then go back to this craigslist posting and click the link below again and it will load the slideshow. (Not sure why photobucket has made it so difficult, but I hope they resolve this issue soon)
***TO SEE THE FULL ALBUM OF PHOTOS FROM START TO FINISH use the link below
http://s1293.photobucket.com/user/r...d After Photos/Midnight Beast/Midnight Bullet
Let me know what you think!
I tried a million times to include thumbnails with links as attachments so Moderators please don't get ticked.
HISTORY
I bought the go kart from a local and it was far less then par to say the least. It needed to be stripped completely and almost every piece on it needed to be replaced.
I took it upon myself to start from scratch and not just give it a face lift, but completely restore this go kart to a flawless and new state.
Steps to RESTORING it to NEW...
1. Stripped it down to the frame. (all parts off the body, all screws, washers, nuts, bolts, pins, etc)
2. Sanded all the metal down, removing all paints and rust from parts and frame.
3. Put all the bolts/screws/washers/etc in CLR (great for removing rust and calcium deposits). Then used a wire brush for approximately 3 hours scrubbing rust away that was still present (if any). I then re-dipped all the bolts/screws/washers/etc in CLR to let them soak again to remove any layers of rust under the first layer. About 95% of all the bolts came back to BRAND NEW, while the rest were hopeless.
I purchased all new bolts and hardware for any of the original bolts that didnt look sparkling new.
4. On the frame, there were a few areas underneath that had intense rust build up. After sanding away all the rust, I filled in any areas that I saw with body filler to fill in imperfections or pitting in the metal.
To follow, I used a fine grit sandpaper and smoothed the body filler. Repeated the steps a 2nd time. 2 layers of body filler for a good solid bond, and sanded twice for a smooth result to lie flush with the rest of the frame.
5. All of the metal pieces that came off the frame, I also used 2 coats of body filler along with sanding twice on any areas that called for it.
6. The rubber stops on the back of the floor grips were torn and corroded, so I used a special JB Weld rubber/plastic clay to remold new stops to ensure a solid new floor grip and to prevent them coming off.
After carefully shaping all the floor grip stops using JB weld putty, they were then sanded smooth and clear coated for protection. I then got rid of the the original black floor grip color, and went with a midnight blue to remissness with the steering wheel, seats, front grill plate, etc. Look great now!
7. Sprayed frame and parts using an Automotive grade Rust-Oluem primer and rust preventative to ensure a long lasting and protected frame. I used 2 coats of primer on all parts.
8. Painted frame/parts with an Automotive grade Rust-Oleum paint which is a unique gunmetal gray that sparkles deep from different angles in direct sunlight. To add some sparkle, I added silver flake into the paint to give it a serious shine. Double coated the frame/parts.
9. Following the paint and adding the silver flake, I double clear coated everything using automotive high gloss grade clear coat for a finished protection and wet look. It made a huge difference, looks like wet pain that's melting in the sun, super shiny.
10. Sanded all rust off brake caliper and sprocket, looks like a new piece of brushed metal in my hand.
11. Primed Wheels inside - painted gray. For the outer wheels, I decided to give them some shine to match the beautiful paint, so I chromed them and then sprayed with auto grade clear coat.
12. Engine - in the pictures, you will see a Robin Subaru 169CC engine. I recently removed that engine and replaced it with a BRAND NEW 212cc Honda clone Predator engine on it. It has maybe 2 hours on it
13. Engine mount was repainted to remissness with midnight blue color throughout the go kart.
14. Torque converter was dis-assembled and wire brushed to remove any corrosion build up or rust that was present.
15. Original torque converter belt was SPENT, so I bought a brand new Comet belt and replaced the original one.
16. Chain was taken off and wire brushed in a few different solutions, WD-40 and PB blaster. Before and after use, I lubricate the chain and sprocket with Liquid Wrench (DRY lubricant).. If you use anything WET on the chain to lubricate, you're going to be wearing liquid rust on you and it will be all over the go kart.
17. Seats were extremely rusted. Stripped the leather seats, and removed old wood and old cushions completely off the seat frames. Rust-Oleum makes a new item that actually bonds rust to this special primer and makes the area a new and paintable surface while also making it smooth. It worked like a charm.
18. After painting the seat frames a matte black, I then cut board for the bottom seat and measured and cut all areas of the seat frames with new cushion and bolted it to the seat frames. In the pictures you can see it started with a metal frame, then padding, then covered in a thick cloth material (also cushioned) to cover any metal on the seat, then covered in a slick leather and vinyl racing seat material.
Not only do the seats look great, but they are probably one of the most comfortable seats you will ever sit in on a go kart. I've ridden in some where it hurts to ride because there's not enough cushion. You don't have to worry about that here, you should just worry about falling asleep in these seats they are some comfortable.
19. Lubricated each inner wheel with a high performance grease to ensure a smooth glide.
20. Grinded down the sliding tracks for the adjustable driver seat.
21. I have semi broken in the engine using these proper steps:
A. Checking oil level, spark plug, and letting the engine idle for about an hour before use for the first time.
B. After about 1 hour of driving at different speeds and not at full throttle, while the engine was still pretty warm - drain the first batch of oil to remove any build up (grime, metal flakes/pieces from the internal parts of the motor).
C. Change the oil using a 10W-30 engine oil.
I've noticed the smoothness of the engine after that first oil change. It makes a huge difference.
25. Added an additional return spring for the throttle because the setup that comes on the Predator is not all that great.
26. Sanded and cleaned metal engine guard (between torque converter and engine)
27. LIGHTS - the go kart did not have lights. I like the idea of having lights because you may want to take a spin somewhere at night or go out in the woods and if you can't see then you can't drive it. By the way, these lights are really bright, I would compare them to some high beam lights on a SUV!
I mounted two Hi powered 55 watt headlamps in the front for great visibility at night that run off a 12V or 18V battery. The headlights come with a 3 year warranty so if something happens, you will be covered under the manufacturer warranty. In addition, I didn't want to deal with wires everywhere trying to tuck them and tape them, etc. The solution was mounting a glove type box/basket underneath the front plate of the go kart. To reduce any vibration between the plate and the basket/box, I used a fleece material between the two.
In the box/basket, is where the battery and wiring are located. Need to charge it but don't want tons of headache? No problem, you don't have to brake out the screw driver or mess with a brace - just grab the battery and pull two chords and the battery is out. In addition, this box is also great for storing your cell phone, wallet, or anything you want to keep stowed away while driving around.
28. New Brake Fluid Reservoir
29. Front plate where the lights are mounted was rusted and chipped green color. After sanding it, I primed the front and back followed by a lite sand. Then painted it a high gloss black. Once dry, I free handed with painters tape, cutting each piece of each letter one by one and placing it evenly down the middle to spell out "BULLET"
After I had all the tape in place, I went over it with a high gloss blue to create a deep midnight blue. Note* - black base + regular blue color = midnight blue. After letting that dry, I followed up with silver flakes. Then peeled off the tape. I did the silver flake before removing the tape because I wanted the word "Bullet" to be solid matte and the outer surrounding areas to shine and sparkle. It came out beautifully. Once tape was removed, I sealed it with a high gloss automotive grade clear coat. It looks like a diamond!
30. Seat belts, were completely disassembled and refinished.
31. Shocks/Springs - repainted candy red & clear coated for protection. The chrome arms were re-polished and cleaned.
32. Steering wheel - was rusted and corroded. I primed, and refinished it with a midnight blue to match the other blue pieces and then repainted the center cap a high gloss black.
Well I guess that about covers it - I don't think I left anything out... if I did, I will add it above.
Let me know what you think!!!
***NOTE*** If you are using a mobile phone to view the slideshow - when clicking the link below it will redirect you to a mobile version, at the bottom of that page it will say "View the full website" - click on it and wait for full website to load. Then go back to this craigslist posting and click the link below again and it will load the slideshow. (Not sure why photobucket has made it so difficult, but I hope they resolve this issue soon)
***TO SEE THE FULL ALBUM OF PHOTOS FROM START TO FINISH use the link below
http://s1293.photobucket.com/user/r...d After Photos/Midnight Beast/Midnight Bullet
Let me know what you think!
I tried a million times to include thumbnails with links as attachments so Moderators please don't get ticked.
Attachments
-
 22D433FF-2409-479A-9750-FFA02FB14644-21891-00000CBB54038342_zps94ae8d1f.jpg248.7 KB · Views: 14
 -
 1D338594-546F-456A-8BBC-E862DC4387D5-21891-00000CBB4C0C3A71_zps41d87a19.jpg279.5 KB · Views: 12
 -
 4CA2D412-F01B-45CC-821B-FC2443ECBE63-21891-00000CBB41BA43FD_zps24d893dc.jpg259.6 KB · Views: 12
 -
 416C22A8-AF50-41DD-AEB2-081F5A20E37C-21891-00000CBB37A825B7_zpsded2e884.jpg263.6 KB · Views: 17
 -
 AF3D12A1-EF94-4A3F-8097-B0C0B4CFFC52-21891-00000CBB310551E8_zps7c525a9c.jpg311.6 KB · Views: 11
 -
 FD848C31-5D76-4FEF-B461-8FB54A2CE45D-21891-00000CBB214BDDDE_zps4e56b1e4.jpg302.7 KB · Views: 13
 -
 C3676AD2-22F3-4A8E-8514-EC07B12C21E9-21891-00000CBB5B4D0DF0_zpsc092a6dc.jpg315.8 KB · Views: 10
 -
 D09950FC-FB97-4E70-8B92-F9C1AC325560-21891-00000CBB621D5FE0_zps22803e81.jpg95.6 KB · Views: 11
Last edited: