Will this be worth it?

12348910

Active member
Messages
289
Reaction score
194
Why can't you use that frame and put the powerwheels plastic on it for the race???

You might have to cut to fit the plastic, but that's what zip ties are made for.....right, 😆 🤣 😂 😹
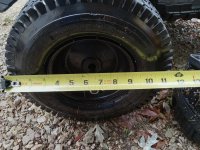
Well my grandma and grandpa got me and my brother those for Christmas. I measured but it will need a lot of cutting And welding but I asked them if I could use it and they said they would rather not because then my cousins can use. and the axle isn’t wide enough so it would look dumb and wouldn’t fit right. But it was definitely a good thought
 

BrownStainRacing

Well-known member
Messages
1,365
Reaction score
1,350
Well my grandma and grandpa got me and my brother those for Christmas. I measured but it will need a lot of cutting And welding but I asked them if I could use it and they said they would rather not because then my cousins can use. and the axle isn’t wide enough so it would look dumb and wouldn’t fit right. But it was definitely a good thought
😆 🤣 😂 😹 😆

You are a thinking lil dude, I definitely give you credit for being interested and wanting to learn this hobby.

Yea, listen to grandma and grandpa, they know a thing or 2.

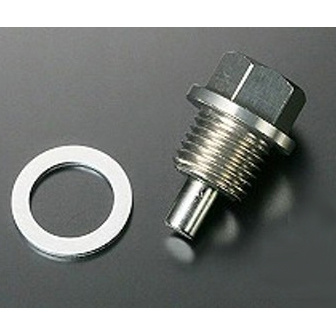
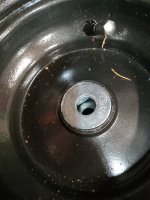
On your new pred engines, I recommend getting magnetic oil drain plugs to help get all the metal coming out during breakin.

Also, I find straight 30 weight oil works best for breaking em in. 2 or 3 oil changes then switch to whatever your favorite flavor is.

I run mobile1 10w30 full synthetic in mine after break in. It seems to stay cleaner and last long to me.

Here's some magnetic oil drain plugs.
Jerry Dover knows his stuff, usually got the best prices, always got the best advice, saves on my shipping when he can. Very good guy to deal with. My #1 supplier.

Good luck and have fun young fella, you are doing a fine job 👍.


12348910

Active member
Messages
289
Reaction score
194
😆 🤣 😂 😹 😆

You are a thinking lil dude, I definitely give you credit for being interested and wanting to learn this hobby.

Yea, listen to grandma and grandpa, they know a thing or 2.

On your new pred engines, I recommend getting magnetic oil drain plugs to help get all the metal coming out during breakin.

Also, I find straight 30 weight oil works best for breaking em in. 2 or 3 oil changes then switch to whatever your favorite flavor is.

I run mobile1 10w30 full synthetic in mine after break in. It seems to stay cleaner and last long to me.

Here's some magnetic oil drain plugs.
Jerry Dover knows his stuff, usually got the best prices, always got the best advice, saves on my shipping when he can. Very good guy to deal with. My #1 supplier.

Good luck and have fun young fella, you are doing a fine job 👍.

When I break it in, is it better to do that before I mount it on the power wheels or after? How do I break it in I have heard a few different ways?
 

BrownStainRacing

Well-known member
Messages
1,365
Reaction score
1,350
When I break it in, is it better to do that before I mount it on the power wheels or after? How do I break it in I have heard a few different ways?
I break em on a test stand. Usally they stay on there for 3 or 4 days.

I turn the idle up above 2500 rpm, and run up and down throttle from 2500 to 4500 the first 15- 20 mins. This allows the cam and lifters to break in together. I've ruined a bunch of cams and lifters in the past. I havnt lost a cam lobe in a while doing it this way.

After that up and down, 15-20 mins, I set it to run at 3000 rpm steady for 5 mins, then turn it to 3500 for another 5 mins, then up it to 4000 for 5 mins, then 4500 for another 5.

Then I start turning it back down to 4000 for 5, 3500 for 5. Do this till I get back down to 2500 for 5 mins.

What I'm doing here is building different heat in the engine and getting the rings to seat to the cylinder. Keeping an eye on the temp with a gauge or infrared temp gun.

Sometimes, I have to cover some of the blower air inlet holes to get the heat up. Depends on the outside weather.

After all that, I drain the oil while its still hot, refill it. And let the engine set over night.

The next day, I go around a check bolt torque spec.

Start with the flywheel nut, then the side cover bolts, then the head bolts, then I check valve lash.

There ALWAYS will be 1 or more bolts not in spec, and valve lash always needs adjusted again. This is the bolts stretching and contracting during the hot and cold cycles.

Valve lash is from the valve train parts wearing in together. ALL NEW ENGINES WILL LOOSE LASH DURING BREAKIN.

After that, I start it back up and run steady at 2500 for 5, 3000 for 5, ect, ect, ect, til I get back up to 4500, then start turning it back down til I get back to 2500 again.

I don't have to do the up and down throttle for 15-20 mins anymore, because the cam and lifters are already broke in.

Again, watching temps as I raise and lower rpm.

Drain the oil again, refill again and let it sit over night again.

I keep doing this until the bolts stay torqued and the valve lash dont have to be adjusted any more.

This way works and I never have to check bolt torque or valve lash again.

My son's engine has over 300 hrs on it, never have I done any thing to it except oil changes, air and fuel filter changes. Same spark plug I put in it over 15 months ago.

Mine, I'd say around 120-150 hrs, and have not done any thing, not even a spark plug change. Jus oil, air and fuel filter change.

I don't like problems on the trails, so I spend alot of time on the test stand, checking, tuning, torqueing.

It works for me.

You could always throw it on and run it, 😆 🤣 😂 😹 😆 like 90% of MOST do.
 

12348910

Active member
Messages
289
Reaction score
194
I break em on a test stand. Usally they stay on there for 3 or 4 days.

I turn the idle up above 2500 rpm, and run up and down throttle from 2500 to 4500 the first 15- 20 mins. This allows the cam and lifters to break in together. I've ruined a bunch of cams and lifters in the past. I havnt lost a cam lobe in a while doing it this way.

After that up and down, 15-20 mins, I set it to run at 3000 rpm steady for 5 mins, then turn it to 3500 for another 5 mins, then up it to 4000 for 5 mins, then 4500 for another 5.

Then I start turning it back down to 4000 for 5, 3500 for 5. Do this till I get back down to 2500 for 5 mins.

What I'm doing here is building different heat in the engine and getting the rings to seat to the cylinder. Keeping an eye on the temp with a gauge or infrared temp gun.

Sometimes, I have to cover some of the blower air inlet holes to get the heat up. Depends on the outside weather.

After all that, I drain the oil while its still hot, refill it. And let the engine set over night.

The next day, I go around a check bolt torque spec.

Start with the flywheel nut, then the side cover bolts, then the head bolts, then I check valve lash.

There ALWAYS will be 1 or more bolts not in spec, and valve lash always needs adjusted again. This is the bolts stretching and contracting during the hot and cold cycles.

Valve lash is from the valve train parts wearing in together. ALL NEW ENGINES WILL LOOSE LASH DURING BREAKIN.

After that, I start it back up and run steady at 2500 for 5, 3000 for 5, ect, ect, ect, til I get back up to 4500, then start turning it back down til I get back to 2500 again.

I don't have to do the up and down throttle for 15-20 mins anymore, because the cam and lifters are already broke in.

Again, watching temps as I raise and lower rpm.

Drain the oil again, refill again and let it sit over night again.

I keep doing this until the bolts stay torqued and the valve lash dont have to be adjusted any more.

This way works and I never have to check bolt torque or valve lash again.

My son's engine has over 300 hrs on it, never have I done any thing to it except oil changes, air and fuel filter changes. Same spark plug I put in it over 15 months ago.

Mine, I'd say around 120-150 hrs, and have not done any thing, not even a spark plug change. Jus oil, air and fuel filter change.

I don't like problems on the trails, so I spend alot of time on the test stand, checking, tuning, torqueing.

It works for me.

You could always throw it on and run it, 😆 🤣 😂 😹 😆 like 90% of MOST do
I Thought the max rpm was 3800?
 

ezcome-ezgo

G'me sumthin to write on
Messages
4,799
Reaction score
1,378
Location
Atlanta, GA
Jeez, seems like a lot of work for a $150 engine going in a recreational, not often used vehicle. Don't get me wrong, I understand why you do it, but for Joe Public?
 

BrownStainRacing

Well-known member
Messages
1,365
Reaction score
1,350
Ouuta
I Thought the max rpm was 3800?
Outta the box is probably closer to 3600.

They will differ.

Look up under the air box, between the carb and blower housing. You will see a THROTTLE STOP SCREW. Itba big Phillips head with a spring behind it.

These can be completely screw in or out, no telling where it's set at. That's why it adjustable.

Up under the tank, you will see the governor arm, 2 springs, 1 smaller is with the throttle rod. The bigger spring by itself, closer to the block is the governor control spring.

The holes in the gov arm, is for different applications, for instance roto-tillers, log splitters, water pumps, and any thing else people need the engine to run.

The last hole is more suitable for mini bikes and go kart applications. It raises the max gov rpm up around 4200-4600, depends on the build and tune. But it also allows more throttle control from the twist grip or throttle pedal.

Some applications need the throttle to act more like a on/off switch. The last hole acts more like a variable switch, or throttle control.

Here's a pic of the arm and spring.

I'm not saying go and change anything, jus look and learn for now.
20230326_154133.jpg
 

BrownStainRacing

Well-known member
Messages
1,365
Reaction score
1,350
Jeez, seems like a lot of work for a $150 engine going in a recreational, not often used vehicle. Don't get me wrong, I understand why you do it, but for Joe Public?
😆 🤣 😂

It's really not work to me. I'm more patient in my old age now.

I'm jus old and don't trust alot things any more.

I see alot very simple problems that could have been caught early, if somebody took the time to run em a lil bit on the stand or frame for that matter.
Usally simple bolt torque, loose side cover leaking oil, head gasket leaky, carb bout to fall off.

Mostly very simple stuff.

Most mini bikes are a pain to get to the valve cover or head bolts, that's the main reason I spend so much time on the stand.

Besides, I make alot of money off Joe Public, 😆 🤣 😂 😹 😆
 

12348910

Active member
Messages
289
Reaction score
194
Ouuta

Outta the box is probably closer to 3600.

They will differ.

Look up under the air box, between the carb and blower housing. You will see a THROTTLE STOP SCREW. Itba big Phillips head with a spring behind it.

These can be completely screw in or out, no telling where it's set at. That's why it adjustable.

Up under the tank, you will see the governor arm, 2 springs, 1 smaller is with the throttle rod. The bigger spring by itself, closer to the block is the governor control spring.

The holes in the gov arm, is for different applications, for instance roto-tillers, log splitters, water pumps, and any thing else people need the engine to run.

The last hole is more suitable for mini bikes and go kart applications. It raises the max gov rpm up around 4200-4600, depends on the build and tune. But it also allows more throttle control from the twist grip or throttle pedal.

Some applications need the throttle to act more like a on/off switch. The last hole acts more like a variable switch, or throttle control.

Here's a pic of the arm and spring.

I'm not saying go and change anything, jus look and learn for now.
View attachment 143811
Thanks. I never knew that was a thing
 

12348910

Active member
Messages
289
Reaction score
194
You learning, kid!!!

Keep it up 👍
Just to make sure, if I would do what you explained the rpm’s will go higher but would the governor still be attached? What would happen if I remove the governor would it rev way higher or would it be about the same As the adjustments that you mentioned?
 

BrownStainRacing

Well-known member
Messages
1,365
Reaction score
1,350
Just to make sure, if I would do what you explained the rpm’s will go higher but would the governor still be attached? What would happen if I remove the governor would it rev way higher or would it be about the same As the adjustments that you mentioned?
Please don't remove the governor.

You need more hands on experience.

The throttle stop screw and spring adjustment jus turns up the rpm of the governor, its still works jus like normal.

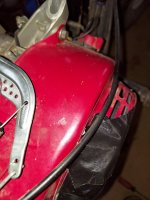
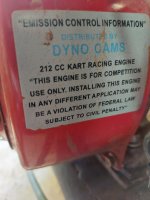
That red engine in that pic is my son's Ducar 212, it comes outta the box with the governor tuned to 5300 rpm max ....SAFELY without exploding.

It is NOT A PREDATOR UTILITY ENGINE.

It's a go kart race engine, built and tuned to turn 5300 rpm being safe and reliable.

20230421_125514.jpg
 

Rat

Well-known member
Messages
1,593
Reaction score
1,067
Location
SW Virginia
Here is what I plan for brakes. They came off of a kids razor electric four wheeler But need pads. By the way the atv only went 3-4 mph so the brakes won’t affect anything since the pads have been junk for over a year And me/my brother have been able to stop in time. View attachment 143805
160mm, same as a standard issue MTB rotor.

The pads for those calipers are actually quite cheap

My 208 will spin as high as 5500 (loaded) without exploding the stock cast iron flywheel and I've only spiked it to 6800 ONCE (unloaded) but this is because I have the mechanical background and experience to deal with an ungoverned engine and the only factory parts left is the case, head, crank, and flywheel.

What @BrownStainRacing didn't mention is that pretty much all stock coils limit the to between 4k and 5k. I know he didn't mention it to spare some explaining... but Im mentioning it to further reinforce the fact that removing the governor only to gain between 200 and 1k rpm isn't worth the effort or risk.
Being able to turn 4500+ and make more power than stock is where things start turning expensive fast.

As for the body, if it were me I'd take a Sawzall to it and cut the floor out leaving only the width of the saw shoe attached. This gives a perimeter rail to remount by as well as some stability for the plastic so it doesn’t just end up all floppy on you.
I'd leave all of the original front and rear bracing for the seat and battery tray until very last and only remove what's absolutely necessary.

I would then add lateral bracing made from 3/4" aluminum flat bar stock where possible to save weight but regain as much rigidity as possible. You don't want this thing to shake, rattle, and flop pieces into the moving tires or block up the steering... despite how low it will sit, wiping out is going to hurt like hell. Wear a helmet (preferably a full face motorcycle helmet not some bicycle crap) or it just might even be fatal if the thing flips and rides you instead
 
Last edited:

12348910

Active member
Messages
289
Reaction score
194
20231202_142844.jpg20231202_142702.jpg20231202_101911.jpghere is what I did to my wheels. I put two washers on that are the same size od and about the same size Id then a pipe to take up space then 2 washers for the wheels to stay more stable then the pipe then 2 more washers. Now I just need to weld a washer onto the axle so I can put the wheel on and bolt it to the car.

Also I give credit to my dad for the idea but I kinda changed what he said and I added the 2 washers in the middle so it's more stable.
 

12348910

Active member
Messages
289
Reaction score
194
20231202_103256.jpg
I also have a air horn hooked up to a milwaukee tool battery that I will mount at the end. (It is really loud like as loud as a semi trucks horn)

I know if you zoom in the sprocket is on the wrong side but I just threw everything together really quick to take it to school like its not even welded its losely put on. And the front shocks aren't painted yet
 

Rat

Well-known member
Messages
1,593
Reaction score
1,067
Location
SW Virginia
View attachment 143842

here is what I did to my wheels. I put two washers on that are the same size od and about the same size Id then a pipe to take up space then 2 washers for the wheels to stay more stable then the pipe then 2 more washers. Now I just need to weld a washer onto the axle so I can put the wheel on and bolt it to the car.
That wouldn't have been cut cockeyed if you had used a proper pipe/tubing cutter... very lively you're going to have a bad wobble because of what you've done.
Also I give credit to my dad for the idea but I kinda changed what he said and I added the 2 washers in the middle so it's more stable.
The 2 in the middle will be more problematic than helpful. What you should have done is measure twice, before you cut once and used a solid piece.
View attachment 143844
I also have a air horn hooked up to a milwaukee tool battery that I will mount at the end. (It is really loud like as loud as a semi trucks horn)

I know if you zoom in the sprocket is on the wrong side but I just threw everything together really quick to take it to school like its not even welded its losely put on. And the front shocks aren't painted yet
WAY BAD FORM!!!

That much axle outboard of the bearings is going to bent the hell out of them before you even get to race.

I expect a lot if chain throws because of the puny axle diameter alone, but that much axle outboard is just SO BAD no matter what the diameter is.

As for the airhorn, why?
If it's a drag build you want to reduce weight not glob extra nonsense on. I can assure you that your horns are not as loud as a semi, them direct drive tankless units just don't have the output capacity of a unit running off a tank fed by a much higher efficiency compressor. I've got a twin trumpet on my bike, I'll give you as much as they are louder than an electric dual tone car horn... but they have nothing on a semi, firetruck, or train
 

12348910

Active member
Messages
289
Reaction score
194
That wouldn't have been cut cockeyed if you had used a proper pipe/tubing cutter... very lively you're going to have a bad wobble because of what you've done.

The 2 in the middle will be more problematic than helpful. What you should have done is measure twice, before you cut once and used a solid piece.

WAY BAD FORM!!!

That much axle outboard of the bearings is going to bent the hell out of them before you even get to race.

I expect a lot if chain throws because of the puny axle diameter alone, but that much axle outboard is just SO BAD no matter what the diameter is.

As for the airhorn, why?
If it's a drag build you want to reduce weight not glob extra nonsense on. I can assure you that your horns are not as loud as a semi, them direct drive tankless units just don't have the output capacity of a unit running off a tank fed by a much higher efficiency compressor. I've got a twin trumpet on my bike, I'll give you as much as they are louder than an electric dual tone car horn... but they have nothing on a semi, firetruck, or train
I know they are cut crooked but it was my first time cutting and i didn’t have much pipe left. How could the washers in the middle be worse? If you look the pipe has a large inner diameter way bigger than the axle and the washers are just about the same size so I feel like they would make it more stable if the axle is supported 3 times on each sized instead of 2. Also the horn I had on my bike for fun but I kinda just put it there for a picture I’m not sure if I will use it until after the race. I do understand what you mean about the axle width but it doesn’t look that bad in person the picture makes it look worse.
 
Last edited:

Rat

Well-known member
Messages
1,593
Reaction score
1,067
Location
SW Virginia
I know they are cut crooked but it was my first time cutting and i didn’t have much pipe left. How could the washers in the middle be worse?
because you cut so crooked it's likely to cause more issues than it will solve.
If you look the pipe has a large inner diameter way bigger than the axle and the washers are just about the same size so I feel like they would make it more stable if the axle is supported 3 times on each sized instead of 2.
If it were cut straight, probably would
I do understand what you mean about the axle width but it doesn’t look that bad in person the picture makes it look worse.
If it looks that bad in a pic, it's that bad.
You will bend those wimpy axles or possibly worse.
I'm actually surprised @Denny or any of the other long time kart builders haven't rang the bell on it yet.
 

Thepartsguy

Well-known member
Messages
1,154
Reaction score
900
That wheel setup just an axle through washers is a bad idea.. IF that’s a stepped axle it will create extra problems with tightening those wheels your trying to use. One side would have to hang off the step so the nut could cram the rim up against the washer welded to the axle. I see wheel wobble being another problem and that will lead to problems throwing the chain. And keeping it straight during a race. You said the wheel bearings where to big? Are they 3/4 bearings and you have a 5/8 axle? Grinding the welded washer off the axle If/when you do get the correct hub tires will leave a big groove in the axle on both sides making It weaker. Measure the axle size and start tire searching.. 5/8 tractor wheels are all over junkyards..
 
Top