dengieboys drift

Status
Not open for further replies.

dengieboy

New member
Messages
85
Reaction score
0
Location
Essex England
hi all I'm bob from deep in the Dengie(an area in east Essex!) I'm 43 and love anything with an engine. This all started by watching a film on Youtube of these blokes on a drift trike with a motor. Wow it looks fun and easy to build so with some help from mates donating bits i'm slowly building one. This has progressed over a year or two to were i have it now. I have only just found this forum so here is a quick update on what i have done so far. Any help and advice please say your mind as i bounce off good ideas! IMG_0448.jpg

IMG_0451.jpg

IMG_0455.jpg


So first off is the Huffy frame donated by my good mate Collin this was chopped. The crank hole and the hole left after the top tube was cut out were plated and T.I.G welded. We figured that we would have to make it car boot size for getting it about. In mind for this project i had an old engine off a old 1950's Ransome's lawnmower which with a little work should do nicely. The engine is a B.S.A f12 side valve which i was told by the bloke a bought the mower off had been bought from new and had been serviced every year till one year it refused to start. So a strip down was needed to see what was wrong. On inspection the engine was in A1 condition apart from a badly pitted exhaust valve seat. this was sorted with a quick valve grind
 

Poboy kartman

Senior Moments Member
Messages
12,461
Reaction score
62
Location
White Settlement Texas
Well. ..ol'chap....not every bodie....on this forum. ...was able to complete university with top marks in all areas.....some of us were found lacking in the finer points of world geography. .....

I'm not sure if Essex is in England. ....or it's the file in the cabinet drawers for ex-wifes that comes after RX.....:lolgoku:

Welcome to the forum and please fill out your profile. . (and include Country for us dummies! !!)
 

firemanjim

Just kartin' around....
Messages
5,247
Reaction score
83
Location
Houston Texas
:welcome2:
If you want to finish that project, you came to the right place.....
Did you say a year or 2 to get that far? Well, put down the tea and crumpets, and get to work man...... :thumbsup:
 

dengieboy

New member
Messages
85
Reaction score
0
Location
Essex England
Engine tales

So with the engine in bits other jobs were done. The engine was cleaned decoked the carb (a small Amal) was stripped and cleaned in my ultrasound bath. The engine was a all aluminum unit with a cast iron liner so it had to be shinny so then out came the wet and dry and the polishing started. The carb was treated to the sameIMG_0461.jpg
IMG_0460.jpg
IMG_0458.jpg

The barrel and head were cleaned masked up and sprayed with exhaust black paint. The cowling and fuel tank were stripped back to bare metal filled with two pack filler. These were then acid etched then sprayed with grey primer (four coats rubbed down in between) IMG_0449.jpg

IMG_0465.jpg

IMG_0464.jpg

IMG_0468.jpg
 

Attachments

  • IMG_0450.jpg
    IMG_0450.jpg
    63.8 KB · Views: 20
Last edited:

dengieboy

New member
Messages
85
Reaction score
0
Location
Essex England
The next problem was engine spares i needed a head gasket and a carb overhaul kit and a set of points. So after a little internet time i found Meetens Ltd who were very helpful. So for less than a £10 i had said parts in the post to me. After many hours of chatting with my good mate Ric and looking at the engine the next job was a clutch. The B.S.A engine had a Ransome's clutch with a massive flywheel which must have weighed 5lb!!!. After much chatting it was decided it had to go as we thought that weight would stop the engine revving up quick plus the engine all ready has a flywheel (built in magneto) so the large clutch flywheel could go. so after a bit more thought and some internet time (Ebay!!!) we decided on a Suffolk cult lawn mower clutch A.because its small B.because spares for it will be cheap and easy to find. So a second hand clutch and drive sprocket were bought for £20. These were then cleaned masked and sprayed with etch and treated to a few coats of paintIMG_0852.jpg

The plan was to find a foot bearing that fitted the output shaft so we could support the clutch this was done with a little machining work on my lathe (i had to sleeve the shaft to suit the bearing). Then i removed the old clutch and tried fitting the new one problem!!......:oops: 
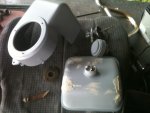
it didn't fit so i had to take the new clutch back to my lathe and machined the tapered hole in the clutch back plate to suit the end of the crank shaft of the engine. Result...! new clutch fits a frame for the engine and clutch was then welded up and every thing was mocked up it was beginning to look the part


Everyone needs a Ric!
 

dengieboy

New member
Messages
85
Reaction score
0
Location
Essex England
Seating were to put your bum!

With the engine coming on my attention went back to the frame which had been taken back to bare metal and been etched. The search for a suitable seat was on and after a little while on the bay i found a seat from a kids gravity trike for the costly price of £10!!!!!
IMG_0491.jpg

Result me bum fitted!! but the colour!:smiley_omg: My first thoughts were to get it covered but then come up with a great idea............! My friend and i am into custom VW's and am members of renegade dubs and one of our good mates has just started his own business called Absoflockinlutely you can find ray on the facebook he does top work basically he can take anything and cover it with fluff so it looks and feels like a old school action man head!!!! its very hard wearing and can be washed. So i have the only flocked drift trike seat in the UK i will post a picture of it when my trike is ready all i'm going to say is it lights up in the sun and the colour i picked is as mad as your hat
 

RiverSideRun

New member
Messages
64
Reaction score
1
Location
NJ
If I were you I would just clean it and spray it black but if you have a buddy or mate who does some cool ish go for it
 

dengieboy

New member
Messages
85
Reaction score
0
Location
Essex England
frame

We have a seat the engine was coming so we looked at the frame. Which after more tea at least 1cph (cup per hour) we slowly started to think about the rear axle. So after a little Ebay time a second hand 50mm diameter Pro cart axle was bought for £10 when this turned up it was a liitle long so was chopped in half. To this was added with more Ebay time a pair of bearing carriers and a pair of stub axles and a nice pair of rear cart wheels along with a rear sprocket carrier

IMG_0761.jpg

This is a picture of the rear axle mock up you can see the seat base has been welded on as well. we use 20mm x 6mm flat steel from my scrap box two(handed) axle bearing mounts were cut from a small length of 40mmx40mmx6mm angle iron again from my scrap box. We had decided way back when we chopped the frame that we would keep the forks and head stock and front brake as the chrome on the forks did not have any rust or scratches we then needed some were to put our feet......... big up needed now to my mate Collin's son Harry is ten years old and thinks what were doing is quite cool he donated the B.M.X front foot pegs which after having some metal removed on my lathe fitted a treat

IMG_0497.jpg

IMG_0499.jpg

A few more pic's of axle and seat position
 

dengieboy

New member
Messages
85
Reaction score
0
Location
Essex England
Engine tales tuning

With the frame coming on we went back to the engine. At a guess we think its was around 3HP in standard form, we weren't sure if this would be enough power to drift with. It's ok having a nice looking engine but it has got to be free revving. The cylinder head was ok but we removed a little of the aluminum around the edges of the combustion chamber the whole head was smoothed and polished the head the top of the piston was also polished. I had all ready sorted the valves(when i stripped the engine the exhaust valve seat required lapping) the valves went first to my lathe here they were spun up and very carefully with a small round file a little of the back of the mushroom head was removed after which they were polished with wet and dry till i was happy i lapped both valve these were finished with some very very fine diamond paste which a friend had given me a few years ago. the valve clearance was then checked and adjusted. I then started to think about inlet and exhaust.

The inlet manifold being aluminum needed to be polished so like i had done on the engine all the casting lines were first removed with a fine file then flatted with wet and dry then a session on my polishing mop the inlet looked the part the inside of it was just smoothed out using a small fine sanding drum on a flexishaft to allow for a bit better air flow. Now the exhaust..........:stir: the standard exhaust had to go it was designed to be quiet plus it was made from mild steel and even with a clean and paint would not have looked nice. So after some thought we decided what ever we made had to be made from stainless steel so out of a bit of 4mm stainless plate we cut and machined a nice manifold we have left the rest of the exhaust till we have the engine mounted on the back of the frame. While we worked on the engine as we went we have changed as many of the mild steel bolts that we could for stainless items (looks much better)

IMG_0760.jpg

While all this was going on i found on Ebay another B.S.A f12 engine. This engine was different to mine from the picture i could see the recoil started was aluminum mine was steel hmmmmmmmmm!!!!!!!! it had to be bought plus the rest of the engine might be handy for spares so for £30 i was the owner of a second engine with the plan to swap the cowling and recoil starter which after many many more hours of polishing rubbing down and painting was ready to go on my engine
 

davidbooth1991

New member
Messages
283
Reaction score
0
Location
Nottingham UK
Good job mate. I don't know what's going
Its asif the British population are all becoming Interested in karting..and building things. Lol sorry Jim but they don't eat crumpets in Essex. I thought it was all champaygne and kebabs. You guys live the dream :thumbsup:
 

dengieboy

New member
Messages
85
Reaction score
0
Location
Essex England
I have control Sir!

We Brits do not like to do a job twice so all things are talked over and all thoughts are taken on board before we do anything. With the rear axle,wheels,seat and forks mocked up the whole trike sat in my front room in front of my seat for about a week while we thought about what we had to sort out next. This trike is half mountain bike (the whole front end including the handle bars) and the engine had come from a 1950's mower now the mower throttle was a simple thumb throttle we wanted a twist grip. plus the mower throttle cable that we kept(never throw away anything!!) was going to be to short to reach from the bars to the carb on the back of the engine.


To add to this we had seen another possible problem we wanted a twist grip now these normally come on motor cycles with large diameter bars mountain bike bars are smaller diameter!! hmmmm cup of tea time. After a lot of thought we came up with a solution at about the same time that B.S.A were making my mower engine they were also making a small two stroke 125cc motor cycle called the Bantam it was like a push bike with an engine but with very small diameter bars!! and the small Villiers engine that it had has a small Anmal carb like the one on my engine........ I wonder....... Ebay.......£17......... go on then. A few days later we had a throttle no polishing because it is nickel platted! nice! made things nice back then( will get a picture of it up here soon)
 

dengieboy

New member
Messages
85
Reaction score
0
Location
Essex England
The B.S.A

Now i have found this great forum has anyone else out there played with one of these F12 engines before?. My engine was used just because i had it kicking about my workshop. I know a lot of people on here use a briggs or a honda. I would say to prep my example has taken me at least 150 to 200 hours to were i have it now. Even today we had another great idea about the air filter which was a horrible pressed steel item so that has been chucked in the spares box. Looking at the cast aluminum elbow in which it sat there is a lot of restriction which will be removed then we will find a K and N filter for it again will get some pictures of it up on here tomorrow
 

davidbooth1991

New member
Messages
283
Reaction score
0
Location
Nottingham UK
Hey man I've never come across these engines so I'm too sure. It's not my strong point
One of the others will bob along soon. I'm more fabrication / welding..... Are you modifyimh you frame palm in any way???
 

firemanjim

Just kartin' around....
Messages
5,247
Reaction score
83
Location
Houston Texas
Unfortunately for us, we didn't get too many BSA products over here. We did have BSA dirt bikes, and the Bantam was one of them. The BSA's were,and are still high $$ items here. I sold a wreck of a bike a couple years back for $500..... It was in poor,I mean POOR condition, but 90% 95% complete original.
My dad would tell me stories of him and his buddies riding BSA's in their teens. He said he would beat just about anyone in town. His wasn't a fancy hopped up one either. It was something he found in a barn and bought it fairly cheap. Didn't run, so he fixed that.... Then him and his buddies "tinkered" with it till it was smoking every body around..... Now he collects the relics he comes across and they sit in his barn..... See how that circle works..... I might be the next lucky guy to get a "barn find".....
A boy (40year old) can dream..... :lolgoku:
 

dengieboy

New member
Messages
85
Reaction score
0
Location
Essex England
Picture as promised

So today was a good day untrike related news finally have my new workshop floor finished new building up soon!!. On the trike side of things engine and clutch mocked up and some new pictures taken outside

trike pics 001.jpg

trike pics 002.jpg

trike pics 004.jpg

It is looking monge as we say in deepest Essex. A few more bolts need changing. But i'm loving that paint if i do say so myself!! and the polishing on the edges of the cooling fins

trike pics 006.jpg

A quick picture of the Bantam twist grip

trike pics 003.jpg

Now this is a picture looking down to the top of the cast elbow were the old tin air filter sat note the very small hole in the middle is will look a lot different when you next see it!! i will get some close up pictures of the frame up in the morning
 

dengieboy

New member
Messages
85
Reaction score
0
Location
Essex England
Frame

So here are some frame pictures

trike frame pics 001.jpg

trike frame pics 002.jpg

trike frame pics 003.jpg

trike frame pics 004.jpg

The main welding was done with a gas less M.I.G welder its not a nice looking weld but it is strong!. Today's job is going to be looking at mounting the engine above the rear axle (this might take some time with lots of cups of tea!!!) will get back to you all soon wish me luck!!!!!!!
 
Status
Not open for further replies.
Top