
 |
Fig. 18 |
 |
Fig. 19 |
 |
Fig. 20 |
 |
Fig. 21 |
 |
Fig. 22 |
 |
Fig. 23 |
 |
Fig. 24 |
Convert Car Starter Motor for Go Kart Use
How to Make a DIY Electric Motor for Your Kart
This is part three of the plans. Click for Part 1 or Part 2
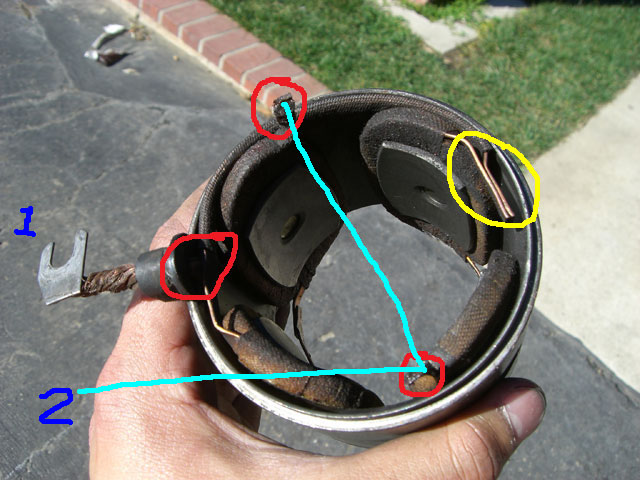
Fig. 18: Now to the field magnet coils: the blue number 1 is one of the contacts and number two will be
the second contact. The contact on top circled in red will need to be connected to the contact circled in
red on the bottom. As we can see, the point circled in yellow already has a cable running behind the top
contact and connecting to the red circle in the middle where contact 1 is.
Fig. 19: The copper wire attached to contact point 1 has been removed and yellow 10 gauge wire was soldered to it. The remaining two contact points are connected with blue 10 gauge wire, with a second blue wire connected that will lead out of the case for access. Protect these wires with heat shrink.
The field coils are now complete.
Figs. 20 - 22: Red 10 gauge wire is soldered to one of the brushes that originally lead to the field coils. The yellow line in Fig. 20 is where a second wire will attach from the opposite side. These wires should be protected with heat shrink so they don't short out.
Fig. 23: Test assemble the brush plate with the rotor and the field coils together to check fit and ensure the contacts don't short out. Ensure that the cables will be clear of any moving parts. Note: this picture does not show the yellow discussed in Fig. 20, but it should be completed at this stage.
Fig 24: After you're certain there are no shorts and no moving parts problems, re-assemble the starter by replacing the rear screws and bolts and the E clip. You may need to drill a larger exit hole to get all of the wires out.
Using the Motor
The motor should now have four available terminals:
- The casing itself for the rotor
- Field coil #1, yellow
- Field coil #2, blue
- The red wire for the rotor.
Connections
Connect yellow from the field coil to positive.
Forward - connect blue to red, the case to negative.
Reverse - connect blue to the casing, red to negative.
Note: You may need to remove the one way bearing on the shaft, or alternatively weld it in place and use as a mount.