Help/ advice on throttle linkage

Wesmantooth

New member
Messages
4
Reaction score
2
Hey everyone, it’s been a while since I’ve been on here Hope everyone’s doing good.
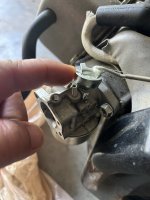
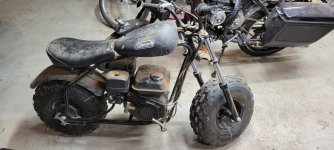
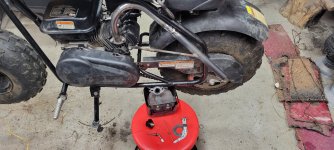
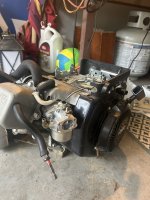
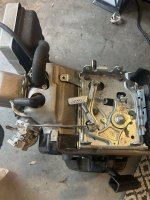
With that said, I’m looking for advice I have come across a 250 cc Briggs & Stratton 1150 series 11 hp motor originally on a Husqvarna pressure washer. My plan is to put it on my manco EZ rider. I cannot find how I would convert the throttle linkage anywhere. Does anyone know if there is a kit to change the linkage or what the best way to do it is? Any help or suggestions would be greatly appreciated. Thanks.
 

Attachments

  • IMG_4827.jpeg
    IMG_4827.jpeg
    1.7 MB · Views: 12
  • IMG_4826.jpeg
    IMG_4826.jpeg
    2 MB · Views: 12
  • IMG_4825.jpeg
    IMG_4825.jpeg
    1.9 MB · Views: 12
  • IMG_4824.jpeg
    IMG_4824.jpeg
    1.7 MB · Views: 12
  • IMG_4828.png
    IMG_4828.png
    2 MB · Views: 11

Rat

Well-known member
Messages
1,523
Reaction score
995
Location
SW Virginia
If you're not removing the governor, you only need to attach a cable stop and attach a cable to the exsisting control. You'll need to loosen the pivot screw just enough for it to swing freely as well.
 

Wesmantooth

New member
Messages
4
Reaction score
2
If I were to do that, wouldn’t that mean that this (image below) throttle plate lever should be spring loaded? thanks for your help.
 

Attachments

  • IMG_4829.jpeg
    IMG_4829.jpeg
    1.5 MB · Views: 3

Rat

Well-known member
Messages
1,523
Reaction score
995
Location
SW Virginia
If I were to do that, wouldn’t that mean that this (image below) throttle plate lever should be spring loaded? thanks for your help.
The exsisting throttle plate is spring loaded via the governor and such, loosening the nut on the throttle pivot will alow the exsisting throttle control to "slip" back to idle... just add a cable.

If you go with the remove everything (governor included) method, then yes you'll need an alternative idle return spring for the throttle which will take a bit of fiddling to find a suitable anchor point and operating angle to function without any sticking or binding.

I've done this many many times on various engines and there is no finite way to explain what needs to go where because it comes down to geometry and available anchoring points.

If a GX200 type throttle plate was compatible with the block casting I'd suggest that because it would be easier to work from... the governor arm and valve cover bolt locations say it won't be.

My suggestion is leave the governor alone and use it as the idle return as well as for its intended safety purpose and just drill a hole in the end of the exsisting throttle control lever to attach a cable to.
Then use the bolt at the back of the gate to hold the cable stop or drill a hole where needed to mount one (cheap cantilever bicycle brakes can be disassembled for both the cross drilled cable anchor and adjustable cable stop) and then loosen the throttle pivot to swing freely (some wobble should be considered normal at the point where it swings freely without sticking).
 
Last edited:

Wesmantooth

New member
Messages
4
Reaction score
2
I’m gonna go with your suggestion that makes a lot of sense. I should get around to assembling it in the next couple of days.
Man, I really appreciate the help. It may seem super simple to some of y’all, like a no-brainer lol, but I want you to know that help is greatly appreciated. Thanks
 
  • Like
Reactions: Rat

Rat

Well-known member
Messages
1,523
Reaction score
995
Location
SW Virginia
I’m gonna go with your suggestion that makes a lot of sense. I should get around to assembling it in the next couple of days.
Man, I really appreciate the help. It may seem super simple to some of y’all, like a no-brainer lol, but I want you to know that help is greatly appreciated. Thanks
I just did a governor delete on a Hisun 196cc (factory Coleman CT200U-EX) and all I did was make a new linkage rod to connect to the butterfly as the governor had, run straight to the throttle control instead, then rerouted the governor spring as the throttle idle return spring to a tiny hole I drilled at the top of the case behind the flywheel where it meets the shroud.

Simple and effective, the hardest part was figuring out the functional pull geometry and Z bending the handmade rod. At first glance it still looks full stock.
 

Attachments

  • 1000001946.jpg
    1000001946.jpg
    2.2 MB · Views: 2
  • 1000001962.jpg
    1000001962.jpg
    2.5 MB · Views: 2

Wesmantooth

New member
Messages
4
Reaction score
2
Here is a picture of the actual go kart. Sorry, wish I had better pictures it’s actually a really solid frame. So far I’ve only worked with 212cc predators on a couple manco dingo’s. Outside of my snapper RER experience.

Do you think this size motor on this size kart is worth it with the governor still intact. and also I don’t know what brand torque converter I should go with or if it even matters.
 

Attachments

  • IMG_4700.jpeg
    IMG_4700.jpeg
    5.1 MB · Views: 8

Rat

Well-known member
Messages
1,523
Reaction score
995
Location
SW Virginia
Do you think this size motor on this size kart is worth it with the governor still intact.
As long as it runs good, and you nail the final drive gear ratio absolutely.
I don’t know what brand torque converter I should go with or if it even matters.
"Brand" is irrelevant. The one you go with is the one that matches the PTO size... 30 series for 3/4" and 40 series for 1".

Belts are a different story, and critical. You need to use Genuine Comet belts otherwise what you "save" on getting others will turn more expensive quickly as you begin replacing them constantly.

You can use the stock belts for initial set up, alignment, and testing purposes, but you must understand they stretch fast which translates to high rpm going slow. The TC you get will determine the belt type and size you need, so until you choose one based on the PTO nobody can tell you really
(40 series is symmetric, 30 series is asymetric)
 
Top