Redneck Packrat
Member
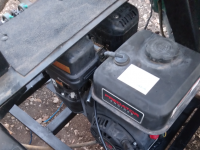
Mud. Finally. Got a hair over two inches today. Not much done today but over the shank of last week and the weekend, I got quite a bit of odds and ends done to it. I left off with hooking up the FnR gearbox shifter and its cables. A week ago my air intake and muffler came in, so I replaced those two things which gave me a LOT of clearance under the seat frame. Still got the gas tank to go, but it should've been here today. Being plastic, doesn't matter if it gets wet so I'll go see if it's there in the morning. To recap, this is what the factory intake and exhaust look like. I should've gotten a better pic showing how tight it is, but you get the idea....

After I got 'em in, there was a huge gap. Beginning to think a 420cc with the same type setup might just fit....hmm....best get that idea out of my head, I'd be shredding that rear end pretty quick....

Next, on to the bed, since I didn't yet have the fuel tank in hand. Remember back at the beginning, where I noticed that someone had chopped the hind end off this thing, and did a crummy job of it to boot? Well, I put that back on. I cut out and laid the two bed rails and the front cross piece up there, squared the cross piece off of the seatback uprights and the frame rails with the factory frame. All of that checked out with the square and the 3:4:5 measuring...

Then, I clamped that securely to the frame, in the exact place I wanted it, and started adding the butt back to the frame. That short piece right over the bumper in the above pic is the start of that. A few more pics of that extension...


Built a box out of a couple more pieces down and back to the frame right above that 'bumper' part. In the top of those is where I put my hinge, which on the buggy is a piece of 3/4 inch black pipe welded into the square tubing right at the top end of it. Cut some ears to weld to the movable part of the bed, and got the result below...


Moment of truth: Will it raise, or did I weld something together that shouldn't've been welded?
 ....to be continued.... ("You may only attach ten files...")
After I got 'em in, there was a huge gap. Beginning to think a 420cc with the same type setup might just fit....hmm....best get that idea out of my head, I'd be shredding that rear end pretty quick....
Next, on to the bed, since I didn't yet have the fuel tank in hand. Remember back at the beginning, where I noticed that someone had chopped the hind end off this thing, and did a crummy job of it to boot? Well, I put that back on. I cut out and laid the two bed rails and the front cross piece up there, squared the cross piece off of the seatback uprights and the frame rails with the factory frame. All of that checked out with the square and the 3:4:5 measuring...
Then, I clamped that securely to the frame, in the exact place I wanted it, and started adding the butt back to the frame. That short piece right over the bumper in the above pic is the start of that. A few more pics of that extension...
Built a box out of a couple more pieces down and back to the frame right above that 'bumper' part. In the top of those is where I put my hinge, which on the buggy is a piece of 3/4 inch black pipe welded into the square tubing right at the top end of it. Cut some ears to weld to the movable part of the bed, and got the result below...
Moment of truth: Will it raise, or did I weld something together that shouldn't've been welded?
....to be continued.... ("You may only attach ten files...")Attachments
-
 1661217709384.png696.8 KB · Views: 3


