Turning a huge paperweight into a workhorse (EZ Go into gas powered ranch buggy)

Messages
38
Reaction score
42
Location
Texas hill country
Was given an old EZ Go that donated its 36v motor to a paddleboat project. Thing was destined to be hauled across the scales after giving up its motor, so I made a deal for it with the intent of repowering it with a Predator 212. Fast forward a year and life has finally decided to give me a break from other things and let me chase my own dang squirrels for a change.

1657423111305.png 1657423571050.png 1657423703993.png
1657423702400.png


When I got the thing, there was a half a trailerload of scrap square tubing etc. that was going across the scales too, so I threw it on...
(This is only part of it, I've built odds and ends out of this pile for months...and last I heard, paddleboat buddy has accumulated a whole nother pile of stuff he's gonna drag across the scales. One man's trash.....well, you know....)
1657423475475.png

Not a whole heck of a lot of motivation right about this time of day...
1657423259808.png

I'll have more next week. Gonna drag it up to the shop and start cutting out rotten battery boxes and all that housekeeping and prep stuff.
 

Attachments

  • 1657423625112.png
    1657423625112.png
    1.8 MB · Views: 7

Denny

Canned Monster
Messages
8,478
Reaction score
4,713
Location
Mayberry, Indiana
That is a txt Work Horse if it was a gas model that would have been an expensive kart in its day. Hope you still have the box.
If you get the motor to rearend coupler it will save you time of having to go to a machine shop to get one made. Not to mention the cost. Then you can just weld your sprocket on to it. Run a bolt through it and bolt the sprocket on. You will have to drill and tap the input shaft of the rearend.
Bet I’m a bigger pack rat than you!
 
Messages
38
Reaction score
42
Location
Texas hill country
Okay. It's up at the shop now. Brakes work. Work very well. Both sides.

1658720083111.jpeg

All the way from the barn, I was dreading having to pull the back wheels and free up rusted shoes or, worse yet, find that the thing had sat in water and the rear end was toast. Dug a couple decent furrows pretty much all the way to the shop building, until I had to get off to move a hanging basket that I could duck around but the canopy wasn't gonna miss. Occurred to me to check and sure enough, the parking brake was set. What's that acronym? SMDH. Yeah, that's it.

Anyways, rolled up and set to cutting out rotten battery holders and unplugging spaghetti that won't be needed by a gas burner... anybody need a wiring loom or a speed controller for an old golf buggy? LOL

1658720334233.jpeg 1658720419941.jpeg

1658720532809.jpeg

Some of the piles of drops and scraps I've got to work with:
1658720749366.png 1658720797528.png 1658720840499.png

Got the canopy off of it and the leaves and junk blown off of it, and by that time it was past time to go light a fire for supper. During the summer and as far into the fall as we can stand it, we cook and eat EVERY meal outside, just to make it easier on the air conditioner. Come fall and it cools off enough to be playing with sheets of tin, I'm enclosing a cookshed enough that we can continue that practice later into fall and sooner in spring....AND when it's raining (if it ever does again SMDH --there, I used it again!)

It did get too dark for decent pics of as far as I got today but if I remember, I'll take some starting point pics tomorrow. Plan is to use that 3/16 x 1 1/2 x 1 1/2 angle and put a couple of runners that cage around the back axle somehow tightly enough to not move around but loosely enough to have a little movement, then ride them on a piece of that box iron running transverse and resting on the frame rails. That'll give me the ability to have the engine and transmission system held a constant distance from the electric motor mount so I don't have slacky chain when the suspension flexes.

I'll go into how I'm thinking of adapting the splined shaft coming out the rear end into something useful in another post. Need some pics that I haven't yet gotten to refer to when 'splaining that. I have a picture in my mind but I don't feel like typing a thousand words ;)

More as it happens. Probably tomorrow.

Oh. Yeah. The rototiller is slowly and quietly trying to back away, as it appears to have just realized it's fixing to 'volunteer' something to the build :yawn::rolleyes: I did sweet-talk it and explained that if things go the way I intend, that it's going to get a brand new engine. If not, it'll get its own engine back before springtime :cheers2:

1658721501816.jpeg
 
Messages
38
Reaction score
42
Location
Texas hill country
Poof! The engine jumped off the tiller!
1658802090276.png

Mounted the torque converter on the engine. Took several rounds of brake cleaner and Free-All, chased by compressed air, to get the gunk out of the until-today unused mounting holes both in the crankcase and in the end of the crankshaft. (When you don't have metric taps and dies, you just wash and hope. It did work. (Oh, and see the blue and red can there? Never Seize. Put it on everything you might even think you might need to disassemble.) I decided to line everything up on a table inside, to be sure everthing's gonna fit and make sure of how wide and how long to make the mount plates. Got the FnR gearbox lined up behind the engine and lo and behold, I discovered my first (of probably many) forgot-to-order parts. I have no driver sprocket for the gearbox. DOH! That's not really crucial just yet, so I left the thing set kinda sorta where it might wind up going and measured up ....just to be sure. That table is just about as wide in the pics as the hole where I'm setting the stuff into is long. Table's 36" wide and the rails I made are 37" long, but they overhang about 3 1/2" past the axle input shaft, so as long as I've got a few inches left on the table I can get it all crammed in there. Looks like it's gonna fit, since all that's left is a chain and jackshaft back at the axle input. Folks, question: Do I have the FnR gearbox oriented properly?
1658802088741.png 1658802562064.png

Now, on to the frame. I cut the two side rails of the engine platform out of 1 1/2 x 1 1/2 x 3/16 angle. Why'd I choose that size? Simple: That's what I have ;) The width came from the tight fit on the right hand side, and making that somewhat symmetrical by placing the left side about the same distance in from the frame rail.
1658802292363.png

The back is cut out as a saddle over the axle housing. I'm not making that end rigid either. It'll float with the suspension while (hopefully) dampening any front-to-back changes in the distance from the jackshaft to the FnR output. I'll cage that onto the axle shaft with muffler clamps and nylon-insert locknuts. The axle housing is 2.125" OD, going to use 2 1/4 muffler clamps and tack them to the angle iron, where they'll swivel but not bounce...too much...
1658803624529.png 1658803715873.png

Front crossmember is 19" wide and sets in the angle. That whole mess is sitting on a wider piece just as a "jackstand" to mock it all up. Plan is to drop the front down to where the bottom of the engine platform is even with the undersides of the buggy and then build some hangers to come up and ride on the frame rails. Probably make those out of 1 1/4 square tubing, 1/8 wall. Maybe thicker if I can find a piece laying around. Reasoning is, I'm going to cage it onto the frame rails by using 1 1/2 square tubing with a little piece of flat bar as a cap over it, bolted on at least one side so I can remove it without tearing it apart should the need arise. I'm also curious if it's going to wear badly, so I know I'll chase that squirrel if the noises ever change.
1658803783293.png

Nothing's welded yet. Got to that point and it was time to go start the fire for supper. Yeah, I cheated. I used propane. Oh well....it was GOOD.... Peewee approved!
1658804092216.png 1658804501332.png
 

Denny

Canned Monster
Messages
8,478
Reaction score
4,713
Location
Mayberry, Indiana
Like the dog! Yes the gearbox I’d facing the correct way. Looks good so far. On the gas models in the center on the frame they used a biscuit rubber mount with a bolt through it. Kind of like the engine mount for a 57 Chevy with a V8. And it pivoted with a bolt through the center.
 
Messages
38
Reaction score
42
Location
Texas hill country
Like the dog! Yes the gearbox I’d facing the correct way. Looks good so far. On the gas models in the center on the frame they used a biscuit rubber mount with a bolt through it. Kind of like the engine mount for a 57 Chevy with a V8. And it pivoted with a bolt through the center.
Peewee's been around for a lotta years...about 15 or 16 of 'em if I remember right. He's retired now. Still very vocal about his love for bacon and all things meat, though. Sounds like he's whining but he just 'likes to talk' as Mama says. Never could figure out what breed he is, always called him a meat pointer, until Bosslady said he's a whineraner :ROFLMAO:

Sitting for another round of parts to be delivered. Jaw coupler for differential input and the two sprockets I thought I'd ordered but come to find out they were still sitting in the 'save for later' folder from almost a month ago :mad2:

They're saying Aug 1 for delivery. So..... until then....no progress pics :/
 

Denny

Canned Monster
Messages
8,478
Reaction score
4,713
Location
Mayberry, Indiana
Peewee sounds like a great dog. The start out as our pets (we think) in reality we are their pets. They sure do tell us around and what to do. I had a coyote pit bull mix that was way too smart. She took off on her favorite golf kart one day. Me and the guys working for me had a hell of a time catching her. Finally she wrecked out.
 
Messages
38
Reaction score
42
Location
Texas hill country
My wife has ridden a wheelchair since a car wreck 40 years ago. About 15 years ago she had to transition to a power chair. I was sitting at the computer one night after I'd helped her to bed when I heard the beep-beep of her chair being powered up, then the click of the brakes releasing when the controls were moved.

I was a little slow on the uptake, it took me a few seconds to realize that I should NOT be hearing those particular sounds, as there were no 'authorized drivers' for that piece of machinery. About that time I hear the whine of the chair wrapping out to full speed and it comes shooting out into the living room with a panicked cat standing on the armrest!

Just before the 'point of no return' the cat had the presence of mind to jump off the chair, which caused the chair to slow and stop.....about two inches from the brand-new sliding glass door out onto the porch!

We learned that night to plug the chair into the charger every night, as that disables its motors.
 

Denny

Canned Monster
Messages
8,478
Reaction score
4,713
Location
Mayberry, Indiana
Yea, a lot of people don’t realize animals sometimes want to go bye by on their own without us. My mistake was just leaving the key in the ignition. 3 of us stood about 30 feet or less away and watched her turn on the ignition. I wonder what our faces looked like when she actually took off. When she wrecked out later she got off the kart wagging her tail so hard and smiling so big her teeth showed all the way back in her mouth. Maxie was one happy girl. Never left the keys in anything after that!
 

ezcome-ezgo

G'me sumthin to write on
Messages
4,764
Reaction score
1,335
Location
Atlanta, GA
Hmmm. So the way to get rid of all these critters is to leave self-propelled devices sitting around? Interesting.
 
Messages
38
Reaction score
42
Location
Texas hill country
Got a little done this evening around other obligations. Stuck together the basic frame for the engine to mount on, and started on the motor mount plate. I made it long enough that I can mount both the engine (with TC on it) and the FnR box behind it. Got dark on me so I snapped some pics and called it a good day.

My roll of chain and chain breaker were lost in shipping. They were supposedly, according to Amazon, delivered to my local post office on the 25th and have been "running late but still in transit" after being "checked in" at our little two-man operation with one rural route and like 40 boxes. Yeah, right. What happened, I suspect, is that my box fell out of the bin it was being transported in on the Amazon delivery truck, and wasn't noticed until later, then was pitched into any random handy bin still in the truck and delivered to a post office somewhere within several hundred miles of here. I trust these guys here in my local post office, known 'em for years, they LIVE HERE, they wouldn't b.s. someone. I don't think the box ever left the truck in Mountain Home, Texas. Long story short (if that's possible at this point :ROFLMAO: ) I did get ahold of Amazon who did cancel and refund, and my 2nd order of stuff I was counting on having yesterday for this weekend, well it'll be here Tuesday. Maybe.

Was thinking I needed the chain before doing any more puttin' together of stuff, but not really. I can straight-edge off of the TC's backing plate and square up the FnR box, and with the 1 1/2 inches of slide I built into the engine, I can adjust the chain on that end. The input shaft of the FnR box is long enough where so long as I get the thing square with the engine, I have enough leeway to slide the sprocket enough to line stuff up when the chain gets here. I'll be stuck after tacking things until I get chain and hook it all up and do a live test up on jackstands, though, until probably Wednesday at the earliest (since this time the order is coming UPS and they get here about 6 pm.)

Plan is to tack everything in place and set it back into the buggy, then build the pillow block mount off the axle. I'm pretty sure I've got the room to take up slack in the back chain (from FnR box to axle) with an idler in the return side when in forward gear. I don't know how loose I'm going to have to leave that one to account for the suspension. Probably not too terribly loose, as I'm going to block the springs quite a bit from where factory stops are. Maybe a piece of 2" square tubing as a spacer to shorten the distance from unloaded to spring stop. Might ride a little rougher with a load, but oh well. Might eat a chain under load, if that's all it does, I'll know better than to load it that insanely. Might also find some way to engineer something springy of some sort into the idler and make it into a tensioner. (I can Rube Goldberg with the best! LMAO)

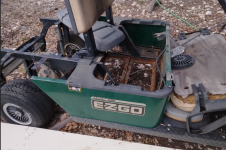
Not too many pics for today, just two, of work done. Peewee spent his Saturday lounging in the shade and 'supervising' from afar; he didn't do anything interesting or photogenic today!

That's a piece of 3/16" flat plate that came with this place. Found it under a couple inches of oak leaves under a tree in the front yard. It's in one of the pics of the drops and scraps I have at my disposal to create this Frankenstein. I cut it 6" wide and 19" long; most of the ready-made ones are 5x14 or so, and <1/8" thick. I should be okay.
1659239384115.png

The square tubing piece under the back of the motor mount is nothing more than a spacer to give me an idea of how and where the mount plate is going to ride. Gonna put a couple of little short ape hanger style ears on the front (nearest camera) to ride on the frame rails to hold the front of the plate down, I don't know if it'll have enough torque to pick itself up with a load in it or going up a bit of a hill, but I sure don't need the seat goosing me!
1659239666146.png

Yeah, I use all Harbor Freight and Hyper Tough tools. I have for 25 years. Well, HF and Walmart, whatever store brand they had at the time I needed something. Have had good luck, especially with the latest incarnations of HyperTough and Warrior brands. And of course Predator, that's one heck of a good line they have. I've got an old generator that's so old it's BLUE but has a Predator engine. Last time I started it up it was one pull and settled in like it was new. I think I bought it in 2005... 5500 watt. Ran like a champ through Harvey in '17 when we rode that one out 5 miles from its first landfall in Aransas County, and then again in '21 through the Valentine's ice storm... Nothing bad I can find to say about either place's quality of stuff. Sure it's not Snap-On or Mac, but don't abuse it and it'll do what you need to do. </soapbox> ....and no, I don't work for either place....
 
Last edited:
Messages
38
Reaction score
42
Location
Texas hill country
Made things look a little different again today. A few pics, but mostly sittin' and lookin' at it and letting my brain chase its own mental squirrels.

Turns out I didn't need big ol' ape-hangery type gullwings to get the engine platform somewhat level. Just a piece of 5/8 hot roll tacked to the top of the square tubing did the trick. Engine sits in there with about an inch of clearance over the tallest part--the air cleaner. Enough to prove it out to work, then I'll pull the trigger on getting the snazzy looking intake and the gooseneck for the exhaust and go from there.
1659326008448.png 1659326069570.png

There's just bolts dropped into the holes on the engine mount, and the FnR is just sitting there on the back of the plate. That's about all I can do until the chain shows up Can probably tack the plate to the frame. Giving some thought to mounting the FnR box to where it'll slide too, then I can have slack adjustment on that part without an idler. But other than that, I've gone as far as I can until Amazon's delivery Wednesday (if it happens this time.)
1659326205549.png

Plan is to get the rest of the parts in and mounted, build the tower for the jackshaft's pillow block(s) (I have four, depends on how it goes whether I use one or two) and crank it up on jackstands and see if I lose any chains etc. If all goes well, then disassemble the whole shootin' match and finish welding everything up, then shoot it with a good coat or two of black paint. The body looks good enough I'm probably going to leave it as-is for time being....or paint it some camo type theme since it's very likely going to also be used as a go-to-the-deer-blind buggy.... heck, it might even BE a second deer blind!

I was sitting there designing the jackshaft mount in my head, and realized that someone had bobbed this guy's tail. Look at the frame rails. No way that came from the factory with bare metal and rough cut edges. Shouldn't be a problem to add some length back out on that, enough to put a 4-5 ft long flatbed on it. Thinking about hinging it to make a dumper out of it. Might never get used but it'd be a cool thing to tinker with. Looks like I have plenty of room to put a scissor in there and maybe a little 2500# HF winch. Those back springs, by the way, are STIFF! It doesn't squat when I step my 200lb self up onto the back 'bumper', and definitely doesn't slosh around like a golf cart. I bet that thing would stand having about half a bucket of dirt, at least, from my tractor's front end loader on it. Well, it'd probably hold it up, but might have to gear down the driven somewhere if I load it up like that. I'm not addicted to going fast, so I really don't care if it goes 8 mph flat out instead of 12-15. I'd rather have the increased ability. Might even eventually roll a 2nd axle up under there once I get things smoothed out enough where it doesn't need to off-road any time I use it.
1659326277461.png

This is turning into a real promise of fun just waiting to be had!
 
Messages
38
Reaction score
42
Location
Texas hill country
Well, just wandered down to the gate and found a box. Clearly the chain came in a day earlier than they were expecting. So....something (maybe not much, as I committed to a trip to town today and that takes time) will change on the ol' buggy by dark!
 
Messages
38
Reaction score
42
Location
Texas hill country
Well, didn't happen til today. Somehow those trips into town blow up into all-day excursions. After going over and playing with the buddy's paddleboat for a while, came home and when it cooled off this evening I started cutting out and piecing together the jackshaft mount. Tacked a piece of 1 1/2 angle to the axle housing and suspended the jackshaft with a piece of haybale string. Next I cut and drilled mount holes in a couple pieces of that same angle iron for base mounts for the two pillow blocks... Then started measuring and cutting little pieces of square tubing to go between the two. Got it all clamped together when it got to where it was almost too dark to get to the next stopping point, so snapped some pics and wandered off to do evening chores.
1659668984745.png 1659669072209.png

Yeah, nothing is lined up beyond rough, within-a-half-inch placement. I've got that much room to move stuff after I stick this jackshaft tower together. The FnR box is still just laying on the mounting plate, and the mounting plate itself is still just laying on the frame. All that'll get tacked together but needed to build this tower first, and line everthing up from there forward. My thinking is, the only absolute for placement on this whole thing is the input shaft on the rear axle, so I kinda need to build forward from there. That jaw coupler is a 13/16 inch 090 series I got off of eBay. Other end is 5/8 with 3/16 key cut. Doesn't quite fit over the shaft splines, but with about 15 min of work with a rattail file, it wallered out just enough to fit onto the 19 spline shaft. I drilled and tapped two more set screws into the coupler, so it's got three of them kinda sorta evenly spaced, biting into the shaft. I tightened 'em on enough to leave a mark, then took a little air 3" die grinder and smoothed the area, made a dimple out of it, then hossed down on the set screws. Jaw coupler half didn't move with some fairly persuasive whacks with a 2x4, so. We'll see. If it gets squirrelly I'll tack the sucker on. (Listen, fella---when I say stay, you STAY! LOL) As Andy says, we'll let 'er wobble.
1659669168480.png

Oh, and see that rusty *** piece of square tubing laying across the frame? I scored a pantload of those pieces from paddleboat buddy. They're leftovers from him cutting down cable spools to build the paddles for his stern paddles. Too good to go to scrap. They'll make a nice frame for a bed for this thing....and even a trailer to drag behind it. Again, might have to gear it down a bit to do that, but I'll gladly give up some speed for more hauling ability.

1659670095781.png
 

Denny

Canned Monster
Messages
8,478
Reaction score
4,713
Location
Mayberry, Indiana
You should have just bought the motor to rear coupler like I said and saved a bunch of money. Your sprocket for the rear is going to be too small.
 
Top