Having a bunch of money is often a requirement for gokarts 
You are using an out of date browser. It may not display this or other websites correctly.
You should upgrade or use an alternative browser.
You should upgrade or use an alternative browser.
SpiderKart modified Grand Daddy build
- Thread starter Kentguy13
- Start date
Having a bunch of money is often a requirement for gokarts
I've realized this years ago... but its still cheaper than some alternatives. lol. This is why its a hobby and not a career.

Well making some progress.... but I’m having a steering issue that I’ve started another thread on in the discussion section. Here’s the link: http://www.diygokarts.com/vb/showthread.php?p=534784#post534784
Looking good
I bought new rims for the 110 mm bolt pattern, but they are too wide for what I want. I guess they go on the shelf for a future project. I’m having a hard time finding 110mm rims that will accommodate a tire smaller than 19” based on the frame dimensions.
A few thoughts for the day...
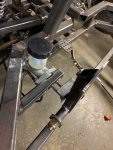
1. I may change the set up on the master cylinder and the way the pedal engages the pushrods. Right now the pedal just pushes a metal bracket that I welded to the rods. I’m thinking if connecting them to the pedal somehow, maybe with a bolt that I can drill thru the pedal upright that acts as a hinge. Something like this:
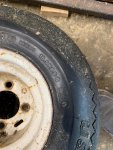
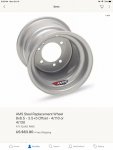
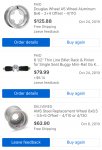
2. The front wheels came in last week with the metric 4/110 bolt pattern required for the hubs. After receiving them, I noticed I didn’t do a very good job measuring. I was hoping to install the golf cart tires, 18.5x8.5-8, on the 8x8.5 rims. I am far from a tire expert (although slowly becoming one due to trial and error), but apparently I needed smaller wheels than the width of the tire. I have more wheels on the way, ordered 8x6 wheels today. I hope these work with the tires I have. If not, I’ll just give up and buy the wheel spacers that go from 4x4 to 4/110.

3. I went back over my build log, and apparently I was oblivious to the mechanics of the steering set up. The plans call for a 8” steering rack, I installed a 14” rack. No wonder the Bump Steer is so bad. I purchased an 8.5” rack today off eBay, that’s all I could find close to the measurement needed.
1. I may change the set up on the master cylinder and the way the pedal engages the pushrods. Right now the pedal just pushes a metal bracket that I welded to the rods. I’m thinking if connecting them to the pedal somehow, maybe with a bolt that I can drill thru the pedal upright that acts as a hinge. Something like this:

2. The front wheels came in last week with the metric 4/110 bolt pattern required for the hubs. After receiving them, I noticed I didn’t do a very good job measuring. I was hoping to install the golf cart tires, 18.5x8.5-8, on the 8x8.5 rims. I am far from a tire expert (although slowly becoming one due to trial and error), but apparently I needed smaller wheels than the width of the tire. I have more wheels on the way, ordered 8x6 wheels today. I hope these work with the tires I have. If not, I’ll just give up and buy the wheel spacers that go from 4x4 to 4/110.


3. I went back over my build log, and apparently I was oblivious to the mechanics of the steering set up. The plans call for a 8” steering rack, I installed a 14” rack. No wonder the Bump Steer is so bad. I purchased an 8.5” rack today off eBay, that’s all I could find close to the measurement needed.
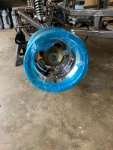
1. The new wheels came in, and they fit great and look even better. I called a few tire shops to have the old golf cart tires taken off the other rims and installed on these. It took several calls to different places before I found a place able and willing to do it. Supposedly most hydraulic tire machines only go down to a 10” wheel, these are 8”. After dropping them off to the willing shop, they called me a few hours later saying they were unable to get the tires off the old rim. They are probably 12-14yrs old... and apparently as hard as a rock.
They were able to have some new golf cart tires in by morning, so new rims and new tires.

2. Next project: tie rods and the new 8” steering rack.
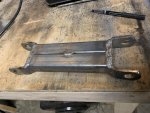
First obstacle was finding a way for the standard thread rack to attach to the metric thread tie rod. The rack came with a heim joint, but with the tie rods having a ball joint, I figured it might be easier to just fabricate my own rack end from plate steel and a bolt end welded together. I feel pretty comfortable with the turn out.
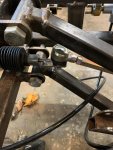

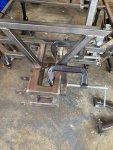
3. Still have a “bump steer” issue. I measured the center bolt holes off the steering rack and compared it to the pivot point of the A-arms. I’m still 2” off. Instead of buying a 4th steering unit (and this was the smallest I could find), I’m just going to fabricate some more. Time to cut/grind the hinge brackets off and add 1” to both sides. It’s tedious work, but manageable.

They were able to have some new golf cart tires in by morning, so new rims and new tires.


2. Next project: tie rods and the new 8” steering rack.
First obstacle was finding a way for the standard thread rack to attach to the metric thread tie rod. The rack came with a heim joint, but with the tie rods having a ball joint, I figured it might be easier to just fabricate my own rack end from plate steel and a bolt end welded together. I feel pretty comfortable with the turn out.


3. Still have a “bump steer” issue. I measured the center bolt holes off the steering rack and compared it to the pivot point of the A-arms. I’m still 2” off. Instead of buying a 4th steering unit (and this was the smallest I could find), I’m just going to fabricate some more. Time to cut/grind the hinge brackets off and add 1” to both sides. It’s tedious work, but manageable.


Happy Quarantine building friends. I am crossing my fingers that I’ll get this dang thing road worthy this summer. Not much new to report right now. I did adjust the front suspension again and minimized the bump steer some more, but still having an issue with the outside wheel turning more than the inside wheel. Any suggestions? I’ll get pictures up hopefully by the end of the weekend.
Cheers
Cheers
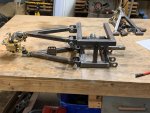
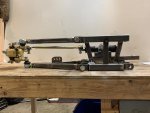
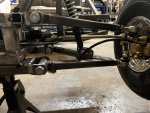
Well I went back to the drawing board. The geometry was off on the front suspension, and after hours of sifting thru this site and a little google I think I have it figured out.
The pivot points are all equal now, and the tie rods will be parallel when I’m done. The calipers that I purchased are not square, so the top rail is 9” where the bottom rail is only 7”. I hope to have this welded back together soon. I’m running very low on shielding gas.
To verify that the bolt holes on the steering rack were in the correct position

I had to fabricate new holes to extend the length of the rack

Welding the new front suspension rack to the frame.

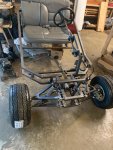
Wheels are finally back on the kart! It still needs a little fine tuning, but I think I’ve got the problems worked out.


I had to fabricate new holes to extend the length of the rack

Welding the new front suspension rack to the frame.

Wheels are finally back on the kart! It still needs a little fine tuning, but I think I’ve got the problems worked out.


Looking good!!!
Looking good!!!
Thanks! Always a fun project, I just wish I didn’t have 100 other projects simultaneously slowing this one down. Lol.
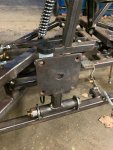
Well with the new front frame modification it changed the steering shaft geometry. Today I was able to fix it. Here are a few before, during, and after pics.
It still needs a support welded in, but today’s temps were expected to hit 90F. That’s too hot for me to weld ��
I’m also in need of a new brake pedal design. I don’t like the pushrod system I have for the master cylinder. Any suggestions?


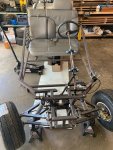
It still needs a support welded in, but today’s temps were expected to hit 90F. That’s too hot for me to weld ��
I’m also in need of a new brake pedal design. I don’t like the pushrod system I have for the master cylinder. Any suggestions?


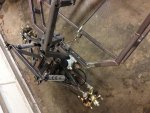
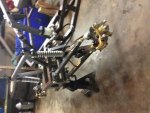
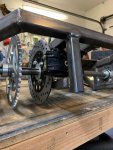
Managed a good half day in the garage today. I started with the intention of getting the brake lines hooked up and bled, but ran into some obstacles. The back caliper mount was in the way of my brake line. The auto parts store couldn’t help me, so I decided to cut the mount off and fabricate a new one on the other side of the caliper. I wish I would have built it this way to start.
Next, to run the line to the master cylinder. When I went to attach the line to it, the same problem surfaced. This brake system originally came with banjo bolts, but my line to the rear was too short so I converted it to steel with some special fittings from www.summitracing.com. It’s now time to move the master cylinder (it’s off the kart, ran out of energy to complete today).
I did get around to adding a post support to the steering column. I also centered the rear axel and tightened all the collars and rotor.
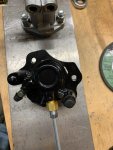
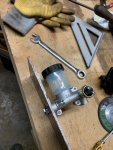
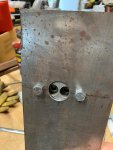


Two days in a row! Brakes are installed, just working out the bleeding of them. I was having a hard time priming the master cylinder for the rear caliper. I called my brother up and borrowed the vacuum tool. By the time I got home it was dark, now I’m headed to the lake for a few days. I’ll report back next week.
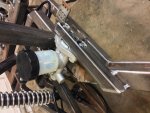
Here is a the latest design of the master cylinder/pedal design. I really like this one. The sliders make it much more reliable.


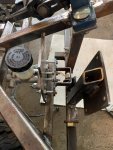
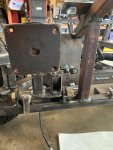
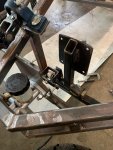
Here is a the latest design of the master cylinder/pedal design. I really like this one. The sliders make it much more reliable.


I have worked on this... but it’s been one step forward, and two backwards the past few months. I could not get the brakes to bleed. I was thinking the master cylinder (MC) was bad, so I bought a car MC. It was a monster on this thing. It didn’t work either. Then I decided to go back to go kart MC, so bought a 3rd. No luck.... Finally, the neighbor realized I had the calipers upside down. I switched the left and right so the bleeders were on the top and all was good in the universe again.


Last edited:

