"SchizoBallz" gets a new thread started...........

madprofessor

"Loose Cannon Creations"
Messages
2,899
Reaction score
888
Location
Jacksonville, Florida
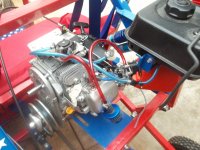
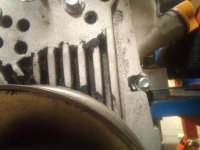
Took one quick look at engine back at shop, something that would be easy to do, found it right off. Pulled valve cover to verify mechanicals, found intake rocker and its shaft laying inside. The outside circlip was missing from shaft, couldn't find it in there anywhere. At least the lash cap was still in place and the pushrod wasn't bent. Got me into it now, kept going.
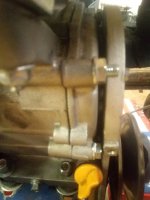
Unbolted motor, drained oil (Earth conscious), pulled off sidecover. Need to replace bolts with my stud set anyway. No circlip found, even with a magnet. Thinking it must be down a pushrod tunnel, stopped on lifter guide plate. Magnet too big to probe around down there, will get a smaller one. Now have to wait on parts. Rocker shaft circlip(s), performance gasket set, permanent-duty Loctite, Royal Purple Break-in oil, a new Comet belt for my Chinese CVT, etc..............plus a bunch for the new steering setup.
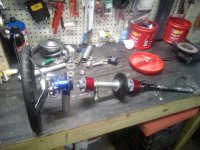
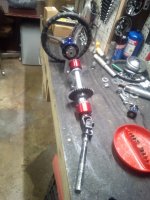
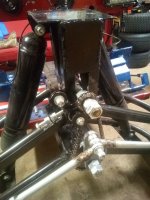
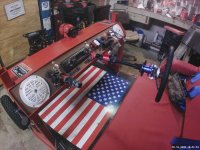
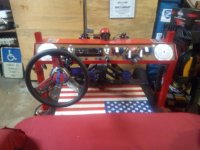
Steering has 3/4" round stock shaft from wheel's quick release hub welded inside 3/4" EMT conduit, passes through 1" EMT conduit welded through dash arch. Not a tight fit there, so it rattled. Had welded some thin patch metal onto 3/4" EMT for the loose fit rattle, turned out that while it would turn very free statically, it would bind badly turning it against resistance. And there's still not enough degrees of steering wheel for my taste, even after gearing the chain-drive from shaft to pitman arm for a 13:32 reduction in gearing, didn't translate to same reduction in wheel.
Ordering a 35B12-3/4 sprocket for left-drive position, will be using a 35B20-3/4 and chain I have for the direct-shafted center-drive position. Probably getting another small idler sprocket I can make into a chain tensioner for it. Also getting 2 more quick-release steering wheel hubs (matching red ones), some 3/4" allthread and more rod couplings....................that ought to keep me busy a while.
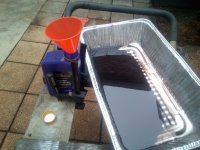
Note: See pic below? Good Earth conscious tip for oil changes. Bar clamp on each side of empty bottle keeps it solid for funneling in the oil. Starts way back when you put oil in, saving the empty for later oil changes.
 

Attachments

  • IMG_20210630_143321.jpg
    IMG_20210630_143321.jpg
    2.5 MB · Views: 7
Last edited:

madprofessor

"Loose Cannon Creations"
Messages
2,899
Reaction score
888
Location
Jacksonville, Florida
First good test of Campark 4K equivalent of GoPro camera successful in advance of using it for kart testing. Chose "Open Shot Video Editor" as my free downloadable software for it, learning curve only mildly steep, very happy with it in the end. Still have to learn the parts about adding the included or uploaded music, voice-over, text, and animation.
Note on animation: Requires a separate free download of "Blender" animation software, haven't done that yet.
So far, I recommend the Open Shot as something any of us can do, don't even need a camera. You can just take the micro SD card from somebody's shoot, and hook it to your computer with a card reader.
Price note: Brand new Campark 4K is from ebay for $54, custom case for it was $8. Basically the same as GoPro, highly recommend it.
 

madprofessor

"Loose Cannon Creations"
Messages
2,899
Reaction score
888
Location
Jacksonville, Florida
Finally wired another 9' of 18/2 solid thermostat wire to end of cheap Chinese induction tach's wire, found out it actually does work the same when made longer. So now have tach ziptied temporarily to back of siren on dash arch, will be able to see it next time.
Millwright, this past post I did will tell you what I now know about an el cheapo Chinese digital tachometer from ebay, just under $10, self-contained battery, comes already defaulted to 4-stroke single cylinder engines. I recommend it now that I know your wire can be as long as you want to make it. Not much bigger than a matchbox, LCD (liquid crystal digit, not light emitting diode as in LED) display.
 

madprofessor

"Loose Cannon Creations"
Messages
2,899
Reaction score
888
Location
Jacksonville, Florida
FOUND IT!!! Bought a real small magnet telescoping 16" pocket retriever from my favorite auto parts store. Stuck it down the intake pushrod's passage all the way down to the lifter guide plate, had an unbroken circlip on the magnet when I pulled it back out!
About new circlips: My performance guy doesn't have any, he said folks are taking their rocker shafts to Home Depot and Lowe's to fit up for new circlips on the spot. So I am too, with shaft and old circlips in hand.
Got the new sprockets in for chain-drive steering setup for center- and left-drive. Scrapped idea to use existing 20-tooth and a new 12-tooth. Bit the bullet for a 36-tooth and a 13-tooth. Left-drive position should be like power steering. Got in hi-perf gasket set and Loctite red 271 permanent threadlocker for new sidecover studs, can reassemble motor now.
DON'T BELIEVE MISSING BITS OF YOUR ENGINE HAVE MAGICALLY DISAPPEARED, AND IT'LL BE ALRIGHT IF YOU DIDN'T FIND ANYTHING! THINK LOGICALLY ABOUT WHERE YOU CAN'T FULLY SEE, (like the bottom of the pushrod passage in my case), GET THE RIGHT MAGNET OR ANY OTHER TOOL IT TAKES, AND FIND THE BROKEN BITS! YOUR MOTOR WON'T HATE YOU AFTERWARD.
 

Millwright

Active member
Messages
115
Reaction score
28
Millwright, this past post I did will tell you what I now know about an el cheapo Chinese digital tachometer from ebay, just under $10, self-contained battery, comes already defaulted to 4-stroke single cylinder engines. I recommend it now that I know your wire can be as long as you want to make it. Not much bigger than a matchbox, LCD (liquid crystal digit, not light emitting diode as in LED) display.
Ya thanks, I'll probably end up trying one of those digital cheapos, I was hoping for a nice 4" analog if such a thing exists.
 

Millwright

Active member
Messages
115
Reaction score
28
I was having a closer look at your build here. Very complex! Looks like it took a lot of planning.
I noticed some pockets on the dash, and behind the seat, do you have a removable roof for it?
With the wild paint scheme and big bench seat, this thing just screams "Party Wagon"
Overall, very nice construction.
 

madprofessor

"Loose Cannon Creations"
Messages
2,899
Reaction score
888
Location
Jacksonville, Florida
If you mean the open ends of 1.5" square tubes, no not a roof. Instead of a roof there'll be an easily removeable cheap replacement canopy for a lawn glider from Walmart, which will need its own light frame to support it on the roll cage.
The open tubes are for a 3-piece roll cage setup, 2 sides and the center section. Need to weld on 2 short 1.5" square tubes about 4" long to top bar behind seat to do it. 3/8" square bail lockpins will secure 1" EMT conduit with 3/4" EMT and maybe 1/2" EMT inserts into the square tubes. It'll be in 3 pieces to facilitate transport when desired.
Party Wagon? Did I write about the 2 special pushbuttons behind a padlocked steel cover? Padlock's for the open container law.............
Those 2 pushbuttons fire 12vdc pumps to dispense Cuervo 1800 and Kahlua out of spouts on the dash. Or any beverages you fill the bottles with.
Notice the Blaupunkt AM/FM stereo, remote, bluetooth, MP3, USB, AUX, speakerphone, media receiver unit with Pyle 4" dual cone marine speakers? Can even hear it over the hi/lo pair of 105db horns and the cheesy little siren. Oh, there's 6 Red, White, and Blue lighted toggle switches on the dash too.
Of the planning: Took an afternoon in my comfortable shop chair with a coffee mug and my feet up on the desk thinking about what I would have if I could have anything and everything that I wanted. Then I got to work building it. Figured it out as I went.
I really need to post some pics that are more recent, there's different stuff now. Will take some pics next week to post up on here.
 

madprofessor

"Loose Cannon Creations"
Messages
2,899
Reaction score
888
Location
Jacksonville, Florida
Finally worked on the ingenuity some more. Pics show putting the puzzle pieces together trying to figure out the 2-position steering. Wheel has its blue quick-release hub on itself, but the 2 red parts are quick-release hubs for the steering shaft. Close hub will pop off to move between the left-drive and center-drive spots with the steering shaft on that side of dash arch.
The far hub will stay between the u-joints of the steering shaft in front of the dash arch. It has a hex hole all the way through itself for a hex mandrel, but will be used as a slip-connector that can shorten/lengthen a little bit at will, and still firmly control the steering.
Figured out that the binding of the steering when turning more than about half of the travel was the fact that my fixed connector for the front of the steering shaft isn't a bearing. Like in other places all over the kart, the "bearings" and "hinges" are actually 3/4" allthread actually screwing
in/out of their 2.25" long couplings, unique only to my kart. That's why the steering needs to have some slip to screw in/out.
The big gear in the pieces is where there'll be a chain-drive from the fixed center-drive over to the left-drive, and gear reduction will make the left-drive spot feel like power steering.
Other pic is the chain-drive w/tensioner I built for the front, connects steering shaft up high down to pitman arm down low. Gearing is to increase steering wheel turn degrees.
 

Attachments

  • IMG_20210718_164713.jpg
    IMG_20210718_164713.jpg
    2.5 MB · Views: 6
  • IMG_20210718_164745.jpg
    IMG_20210718_164745.jpg
    2.5 MB · Views: 6
  • IMG_20210710_163030.jpg
    IMG_20210710_163030.jpg
    2.8 MB · Views: 6
Last edited:

madprofessor

"Loose Cannon Creations"
Messages
2,899
Reaction score
888
Location
Jacksonville, Florida
Forgot to update this thing...........Motor's all back together now, and the circlip/E-clip mystery is solved. Metric of course, it's a 7mm circlip that holds the rocker shafts in on a Predator 212 hemi motor. Put a brand new one on the inside end of the intake rocker shaft, then started to set the valve lash, found it just crazy out of whack loose. Was scratching my head for a minute, then realized both lash caps were missing. Of course the rockers were loose, duh! Don't know what I did with the caps.
They were both there when I first opened her up and found the circlip missing and rocker falling off. Even that cap was still on. Oh well, Jerry had sent me some, so I put new ones on. Finished installing all 6 sidecover studs to replace OEM bolts, gasketed everything up, filled her to the lip with Royal Purple Break-in Oil again, spark plug back in, etc. Will lock the motor mounts down and start her up this week, put a master link in the dual-drive chain, and go try out the new steering setup. A little prayer to begin with, don't want to drag her another 0.7 mile back to the shop again.
Clips, don't fail me now! Any more grief from this thing and I'll turn it into a tunnel-ram blown motor. Ram the motor down a tunnel and blow it up.
 

madprofessor

"Loose Cannon Creations"
Messages
2,899
Reaction score
888
Location
Jacksonville, Florida
Well, it's official now, power steering ROCKS! I may only have 180 degrees of steering wheel in the center-drive position, but.................
I've got 500 DEGREES of steering wheel in the left-drive position! That 13:36 sprocket ratio surpassed expectations. Can't spin the wheel with one finger, but it's awesome nonetheless. Compared to center-drive it might as well be real power steering. Left and center pics below.
Left/center steering chain somehow ended up a little loose after I fought like mad to get a master link into it because it was tight, don't know what happened there, but I'm not going to make a tensioner for it until a test run proves it needs one.
Next effort, it's time to lock the motor down and crank it up for the first time since throwing the intake rocker. If all goes well with it and the rain, I'll take it out for a test run. Note on pics below: Steering shaft looks long, but actually is comfortable there. Test run will determine if it needs shortening, and everything comes apart with wrenches, it can all be disassembled. Shaft just needs to get 2 nuts removed, cutoff wheel shortens it in 10 seconds, reassemble.
 

Attachments

  • IMG_20210815_152558_1CS.jpg
    IMG_20210815_152558_1CS.jpg
    1.4 MB · Views: 4
  • IMG200216-185354F.JPG
    IMG200216-185354F.JPG
    3.9 MB · Views: 4
  • IMG_20210815_152522.jpg
    IMG_20210815_152522.jpg
    2.5 MB · Views: 4
  • IMG_20210815_152532.jpg
    IMG_20210815_152532.jpg
    3 MB · Views: 3
  • IMG_20210815_152648.jpg
    IMG_20210815_152648.jpg
    2.6 MB · Views: 3

madprofessor

"Loose Cannon Creations"
Messages
2,899
Reaction score
888
Location
Jacksonville, Florida
It does complicate the where-to-sit decision-making process doesn't it? The dual sets of pedals also. That power steering makes up my mind though, riding single or not, I love that side. I could say the inspiration was not wanting to roll over left when jumping it over or off of stuff while sitting in the left seat, and that's a good thing but not true.
Whole kart's design was to appeal to everybody, the broadest possible market, when it's finished and I need to sell it off to start the next project. 1 or 2 seats, dual or center-single harness, long travel or flat track suspension, exhaust silenced or popped off, multiple media stereo, dual booze dispensers, and the Stars And Stripes paint job. That paint was difficult, but no single color will appeal universally. Our flag though? Anybody that doesn't like that, I wouldn't be willing to sell it to anyway.

EDIT: If you're going to replace sidecover bolts with studs and Loctite 271 in a Predator 212 like I did, think about the nicely flat backplate of a CVT if using one. Mine hangs straight down from motor, and I'm pretty sure when I get back to the shop that some excess stud length will have to be cut off of a stud or two to get the CVT backplate flush to the case. Maybe notch out the backplate for the bottom right stud, see the bolt head in attached pic below.
 

Attachments

  • 100_0166.JPG
    100_0166.JPG
    2.4 MB · Views: 1
Last edited:

madprofessor

"Loose Cannon Creations"
Messages
2,899
Reaction score
888
Location
Jacksonville, Florida
Drained the old gas from the tank, broke the transparent plastic filter between tank and fuel pump, straight-plumbed it to get it running. Emptied fuel can, got 2 gallons ($3.499 per gal.) of pure 90 octane ethanol-free fuel.
Got everything bolted down tight and ready to run the motor without the clutch. Cranked right up, got it revved up/down a bit, then tried to flor it watching the tach. For some reason it wouldn't quite hit 3600 rpm, and yes the governor's long gone.
Then because I was manually moving the throttle on the thing by hand the cable sheath came out of the end fitting and hung it up at like 2800-3000 rpm. Took a few seconds to find out why, and it sputtered out after unhanging it. Couldn't crank it after that, left it to cool until Tuesday.
Hoping I didn't throw another circlip off the rocker shafts, but too hot and sweaty in the shop to keep working.
 

madprofessor

"Loose Cannon Creations"
Messages
2,899
Reaction score
888
Location
Jacksonville, Florida
About those studs I installed for my sidecover in place of the OEM bolts..................Yes, you definitely have to cut some of them off at the nut to clear a CVT backplate. Which ones depends on how you mount your backplate, mine is straight down from the engine.
There was one that I chose not to cut because the backplate could be notched out 1/2" to clear it. There was one other I could have notched out the backplate for but didn't because it would have cut out 1 of the 4 threaded bosses for the plastic shroud I will definitely use, so it got cut off. There were two others that did get cut off flush to their nuts.
Dang studs are a pain with a CVT, but my performance guy in N.C. says they'll keep the cover on. First pic below shows the notch cut out for a stud. Second pic shows the cut off bolt that would have taken out the threaded boss if notched out for, and how long the studs are on another one that wasn't cut off.
 

Attachments

  • IMG_20210825_130327_3CS.jpg
    IMG_20210825_130327_3CS.jpg
    1.4 MB · Views: 0
  • IMG_20210825_130501.jpg
    IMG_20210825_130501.jpg
    3.2 MB · Views: 0
Top