chancer
ɔ ɥ ɐ u ɔ ǝ ɹ
This is a frequently asked question.
How do I hook up a Predator kill switch?
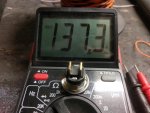
In this Pic I show the Stock unmolested Wiring:
Notice the Yellow Wire going Down into the Block.

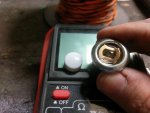
In this Pic I have unplugged the Yellow wire going Down into the Block.
This is the low oil sensor. You want it Disconnected or your engine will shut off during cornering.
(note) If you are removing you internal Governor you can also remove this low oil sensor in the block.

Now you just tape off the Yellow wire from the Block. The other end of the now disconnected Yellow wire is going in to the "Gold Box" Extend this wire to your Driver compartment ( I put mine right on the steering wheel) and add a switch. In this Pic I show a simple (non lighted) door bell momentary switch. Put your extended wire in one side and run a wire to ground from the other side of the switch.

On my Daughters Kart I have this button on the steering wheel within thumbs reach.

Here is the deal. The "Gold Box" is Magic.
Most engines require that you Ground them to kill the engine. So you have to hold down a button wired to ground continuously until the engine stops. Or wire a ground to a Switch.
Since the "Gold Box" is meant to sense a signal from the low oil switch it immediately Kills the engine with a momentary switch. This allows the use of a momentary button on the Predator. Great for safely killing the engine in an instant with the touch of a button.
You Do not have to use a "Doorbell button" In fact lately the non lighted ones are harder to find at the hardware store. Any Momentary switch (horn button) will work. Here is a nice all metal one I picked up at O'Reilly auto parts for 10 bucks. And a link to a $3.50 nonlighted button http://www.1800doorbell.com/gbase-dh1202.htm

Here is a simplified Complete version of the Wiring. On this Krate Racer I was able to use the factory wiring. You can see the "gold box" yellow going to one side of the button, and the other side of the button going to an engine bolt for ground.

How do I hook up a Predator kill switch?
In this Pic I show the Stock unmolested Wiring:
Notice the Yellow Wire going Down into the Block.
In this Pic I have unplugged the Yellow wire going Down into the Block.
This is the low oil sensor. You want it Disconnected or your engine will shut off during cornering.
(note) If you are removing you internal Governor you can also remove this low oil sensor in the block.
Now you just tape off the Yellow wire from the Block. The other end of the now disconnected Yellow wire is going in to the "Gold Box" Extend this wire to your Driver compartment ( I put mine right on the steering wheel) and add a switch. In this Pic I show a simple (non lighted) door bell momentary switch. Put your extended wire in one side and run a wire to ground from the other side of the switch.
On my Daughters Kart I have this button on the steering wheel within thumbs reach.
Here is the deal. The "Gold Box" is Magic.
Most engines require that you Ground them to kill the engine. So you have to hold down a button wired to ground continuously until the engine stops. Or wire a ground to a Switch.
Since the "Gold Box" is meant to sense a signal from the low oil switch it immediately Kills the engine with a momentary switch. This allows the use of a momentary button on the Predator. Great for safely killing the engine in an instant with the touch of a button.
You Do not have to use a "Doorbell button" In fact lately the non lighted ones are harder to find at the hardware store. Any Momentary switch (horn button) will work. Here is a nice all metal one I picked up at O'Reilly auto parts for 10 bucks. And a link to a $3.50 nonlighted button http://www.1800doorbell.com/gbase-dh1202.htm
Here is a simplified Complete version of the Wiring. On this Krate Racer I was able to use the factory wiring. You can see the "gold box" yellow going to one side of the button, and the other side of the button going to an engine bolt for ground.