Model T fiberglass body go kart project

Stew

Member
Messages
50
Reaction score
4
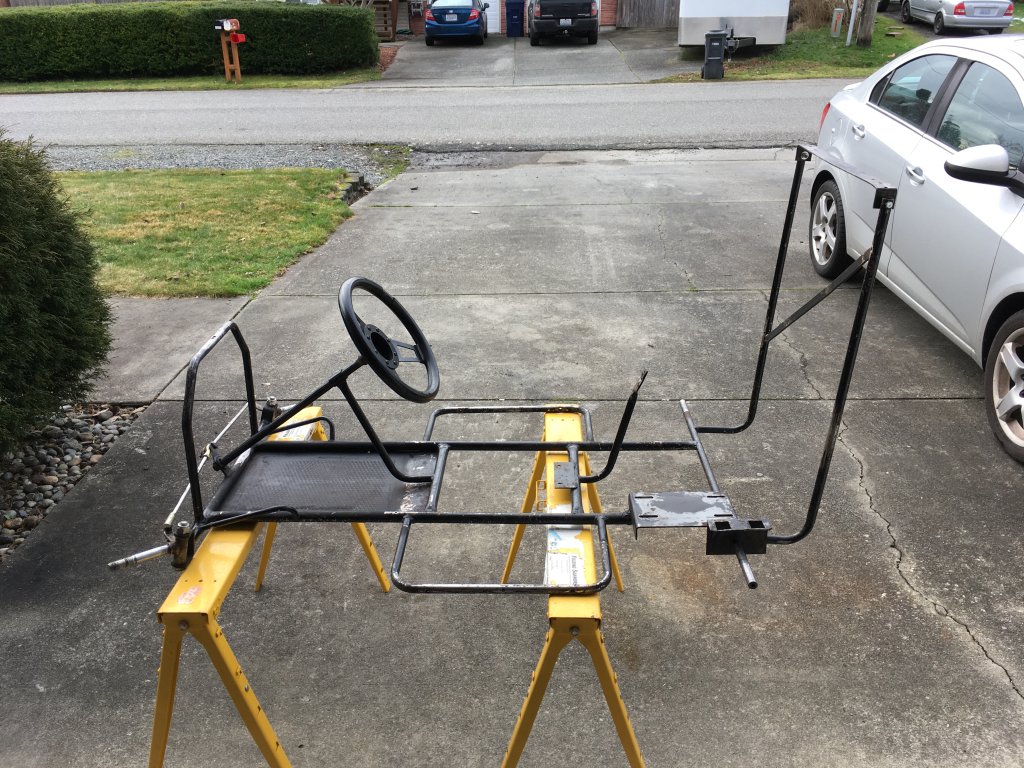
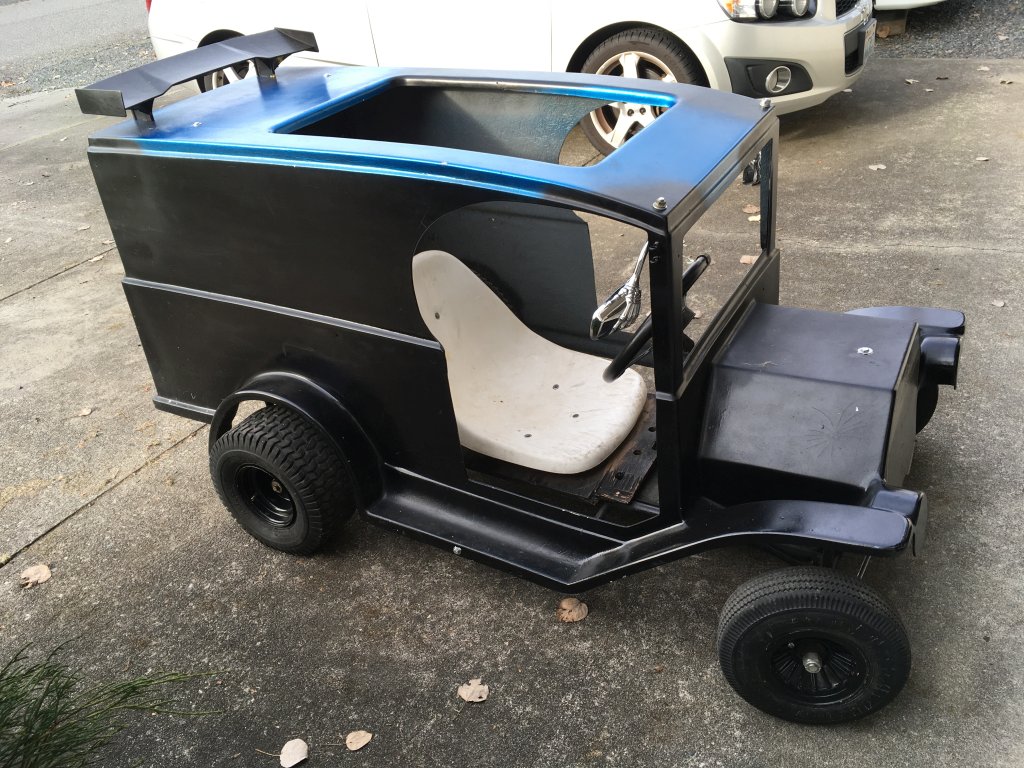
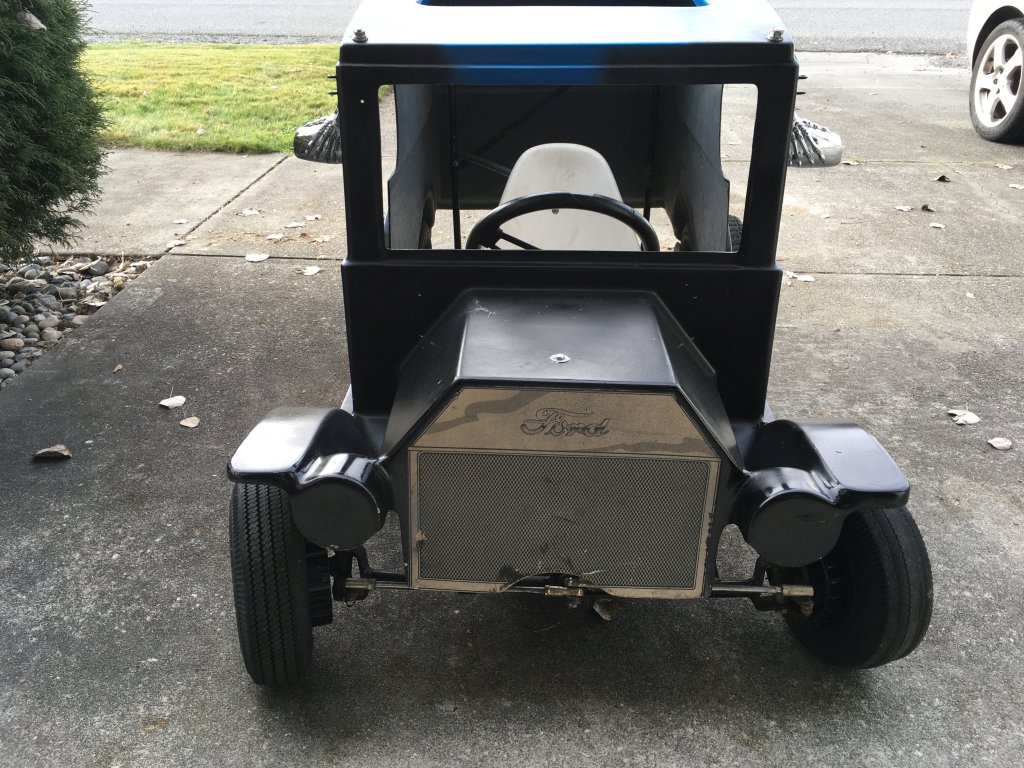
New guy here, last night I picked up a used go kart with a fiberglass Model T delivery van body.
gokart04.JPG
gokart05.JPG

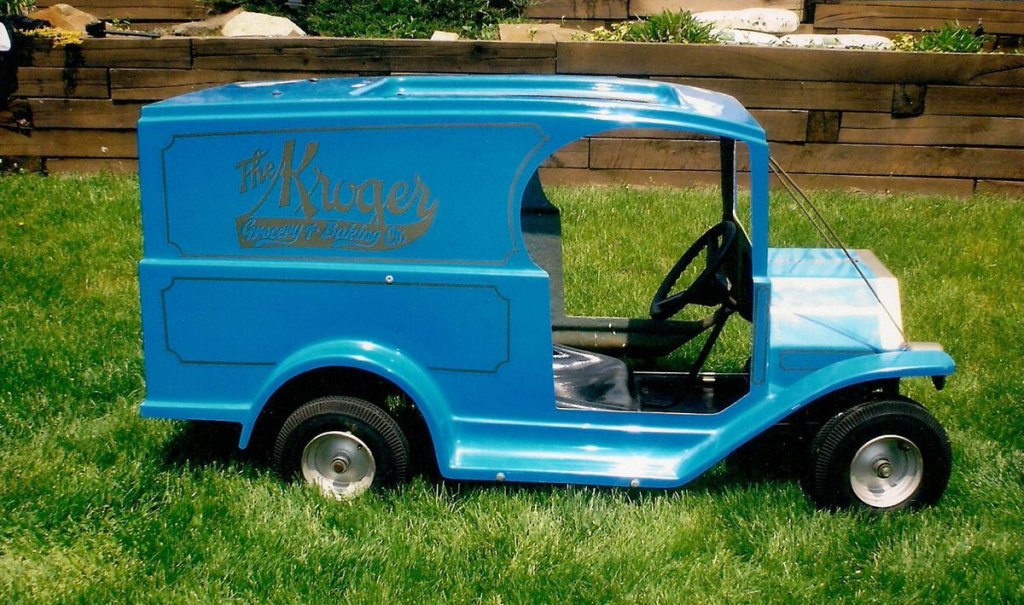
From what I've found it started life as a promotional go kart raffled off by Krogers and looked like this:
157271274_coca-cola-barney-kroger-truck-go-kart-by-miini-cars-f-w-.jpg

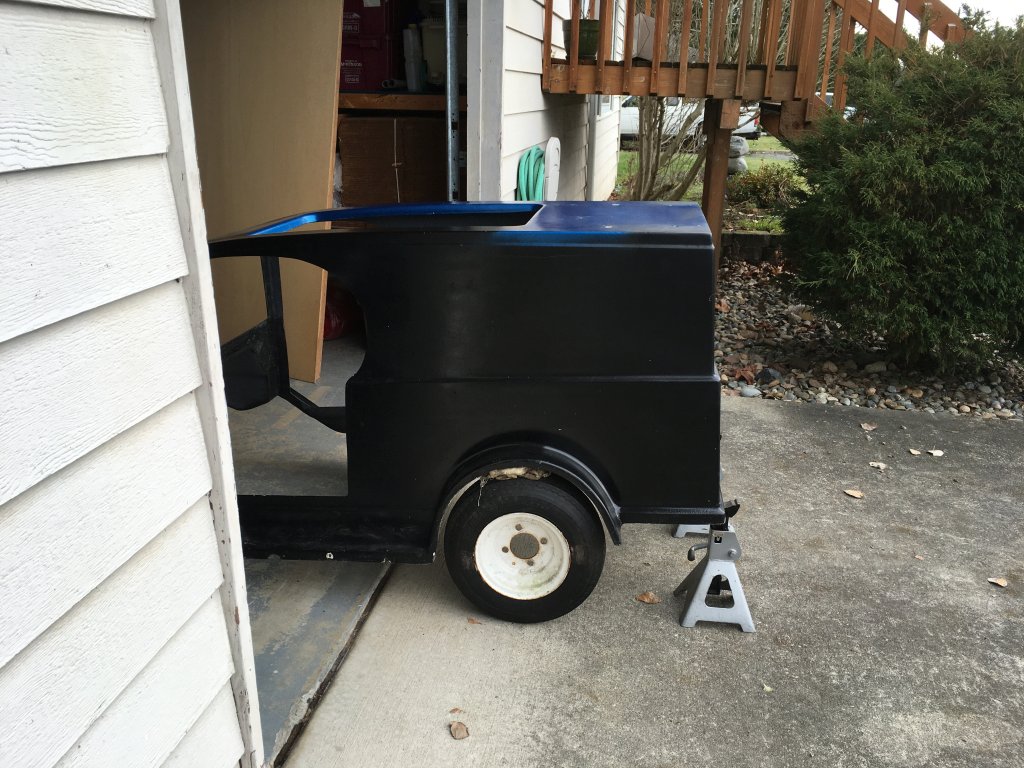
Not much information out there about it, don't know how many were made or how rare it is. The one I picked up was heading down the rat rod path but that's not really my thing so that will change, I'm not going to restore it either, it is missing too many original parts and I don't want to be forever on the hunt for them.

My thing is more miniature scale versions of things, when I first got the go kart itch I was looking more towards the Shriner Model T parade cars but those were way out of my budget plus I wanted to have fun with something without feeling like I was taking away from it's value, or afraid to use it. So I ended up buying this!

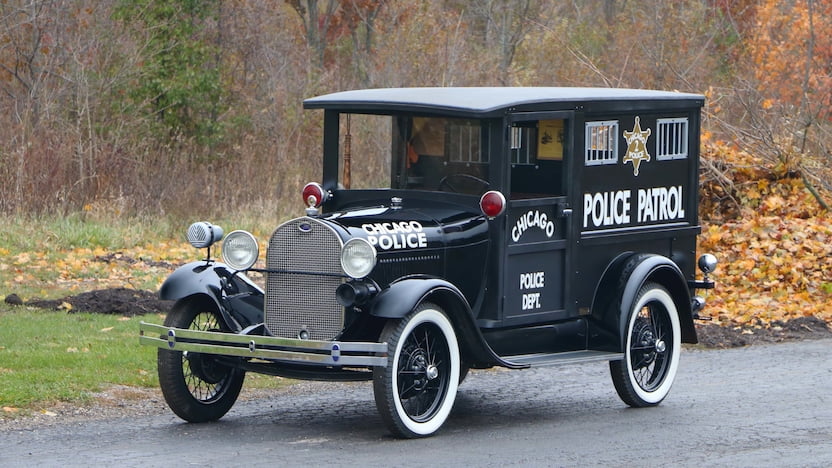
I don't know what direction I'll go with it, I was thinking paddy wagon like this:
1-1511196852105.jpg

Which would translate roughly to this:
00H0H_kcfjECo5uEj_1200x900 sheriff.jpg

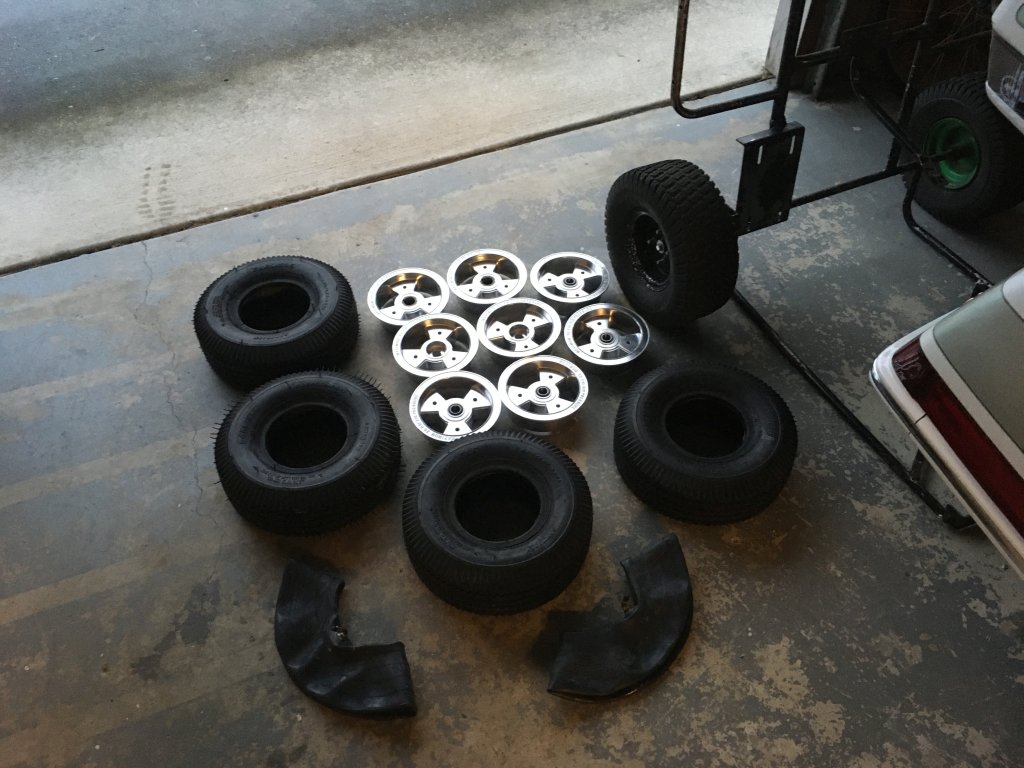
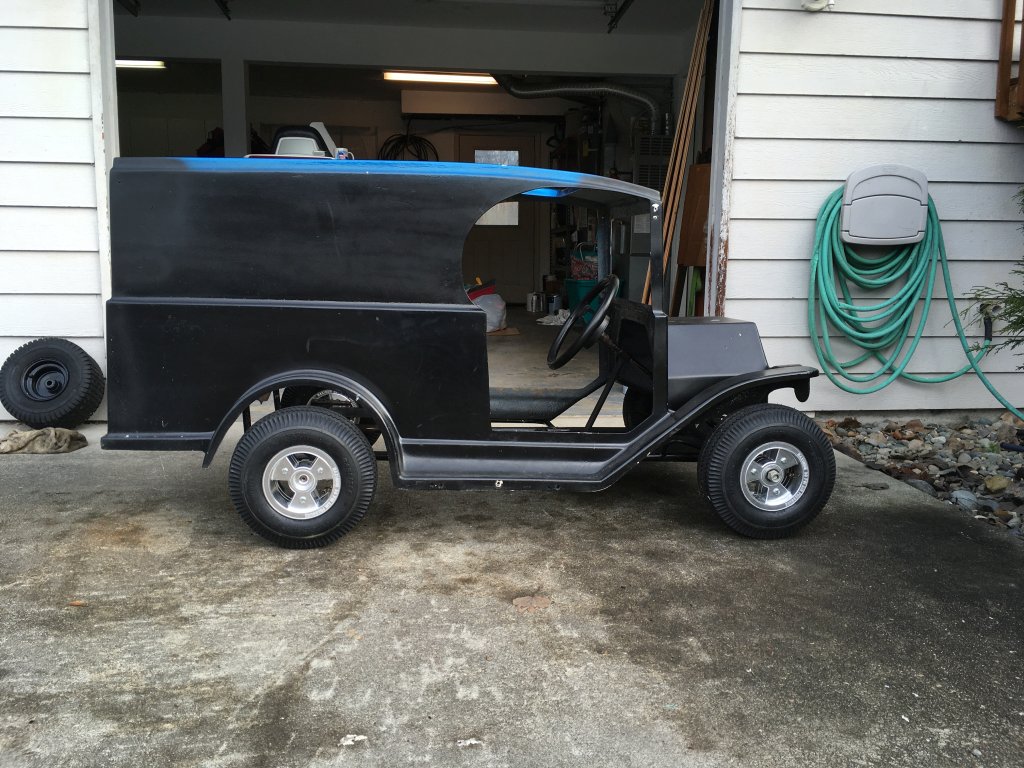
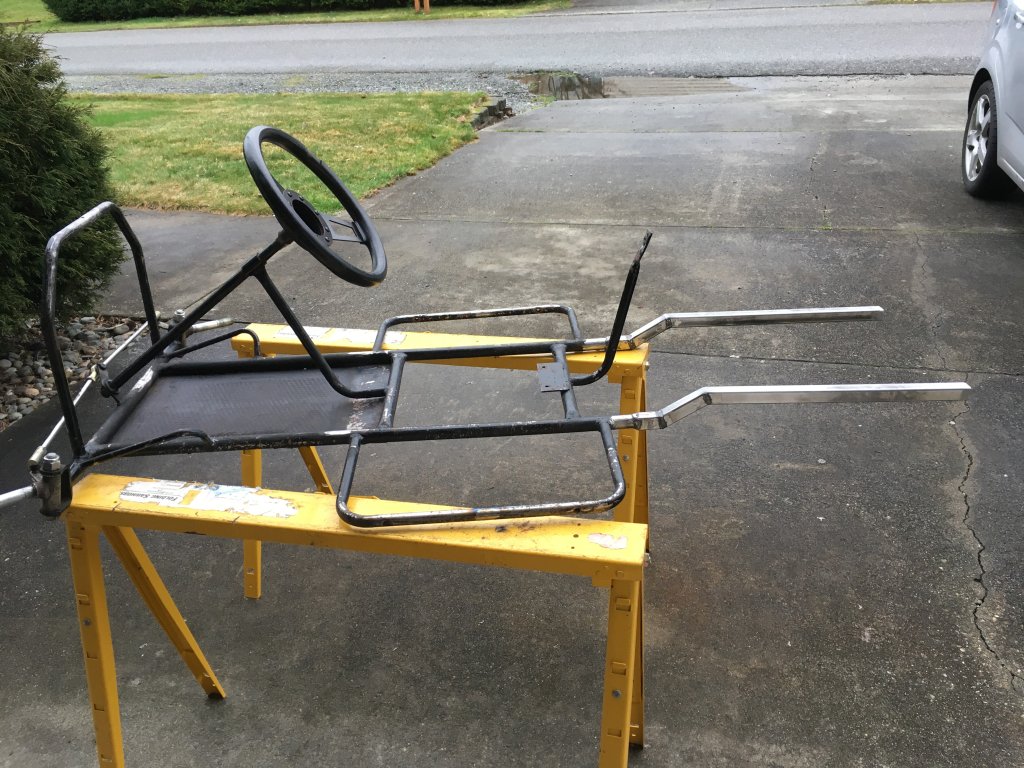
The body is actually in decent shape, just a couple minor cracks, it will eventually be repainted. The wing and side mirrors will go as well. Wheels and tires are getting ditched too, I'm leaning toward all four 4.80/4.00-8 trailer wheels/tires which will look more period correct being a little taller and skinnier.
IMG_2787.JPG

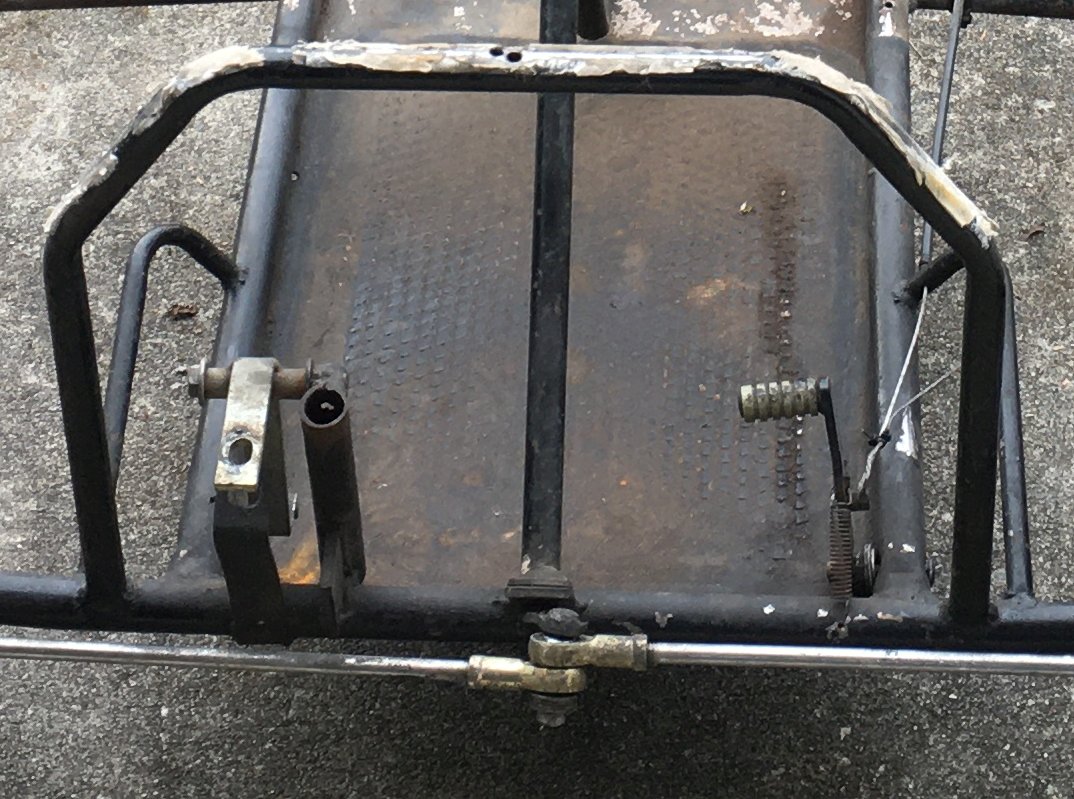
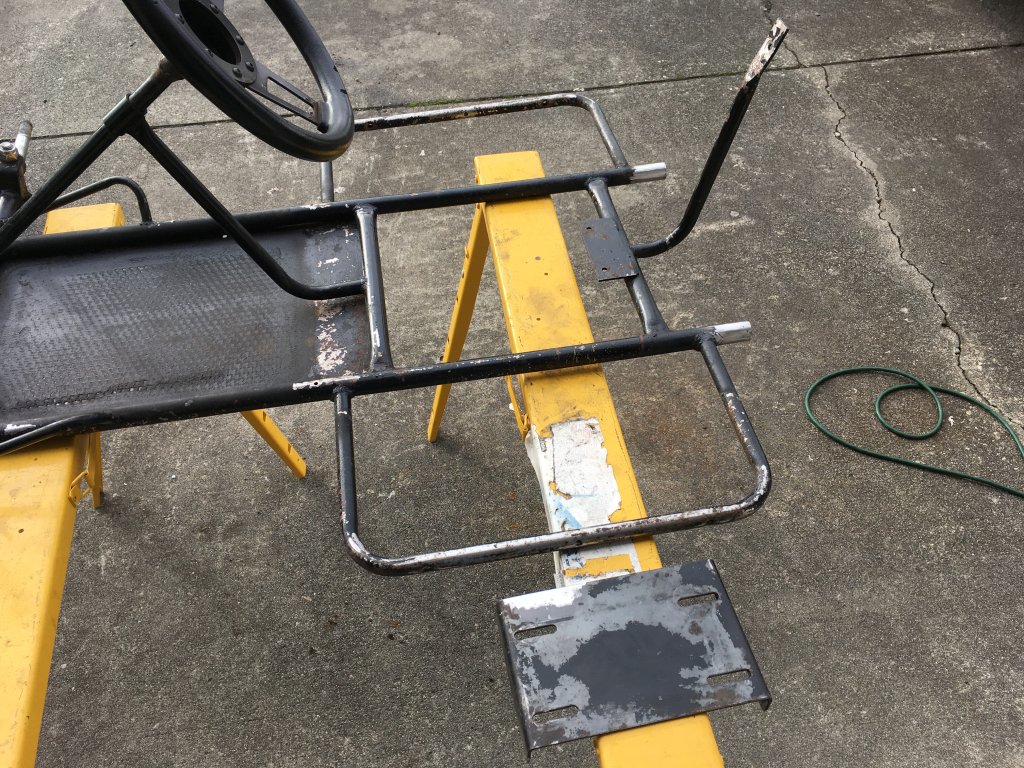
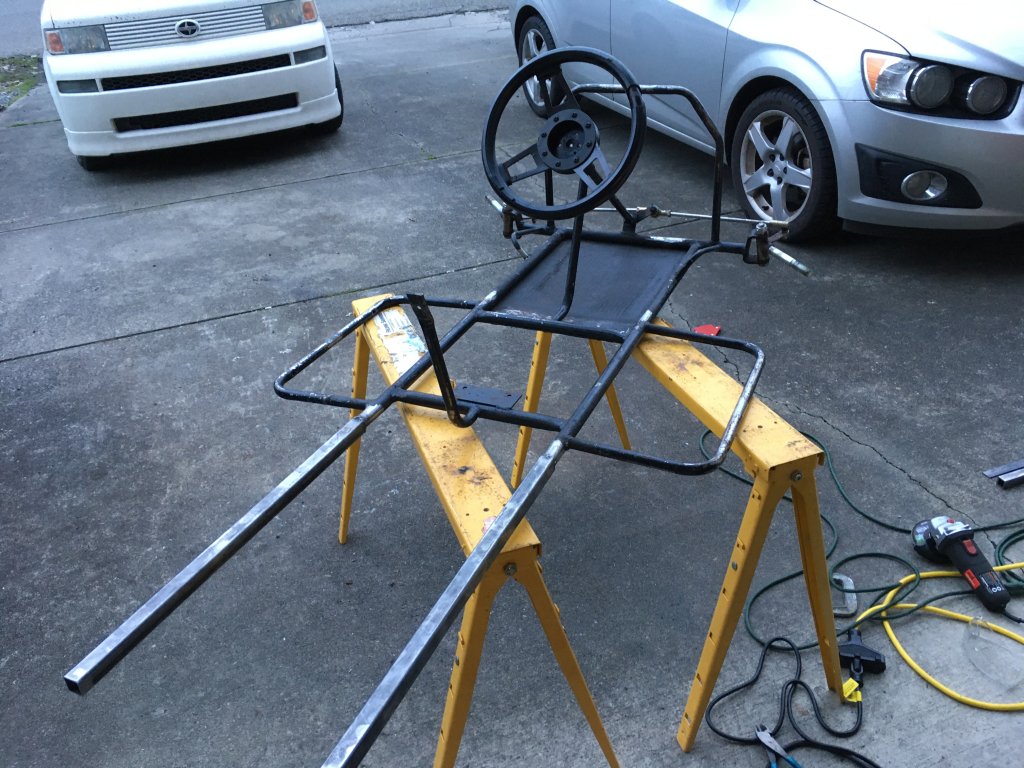
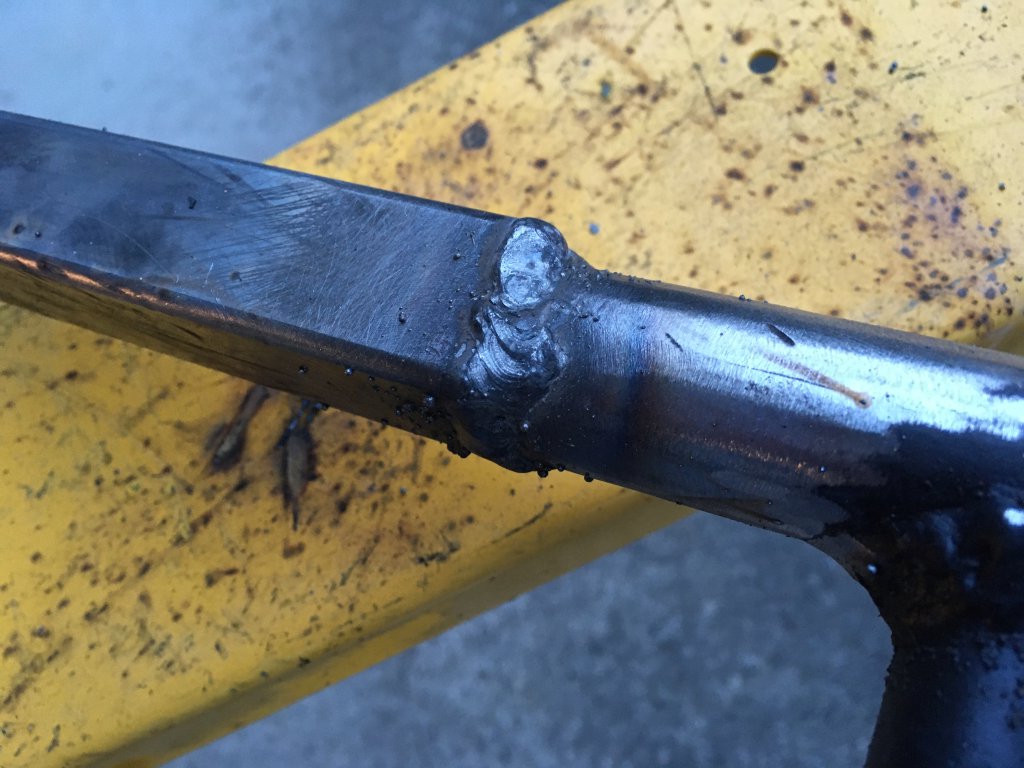
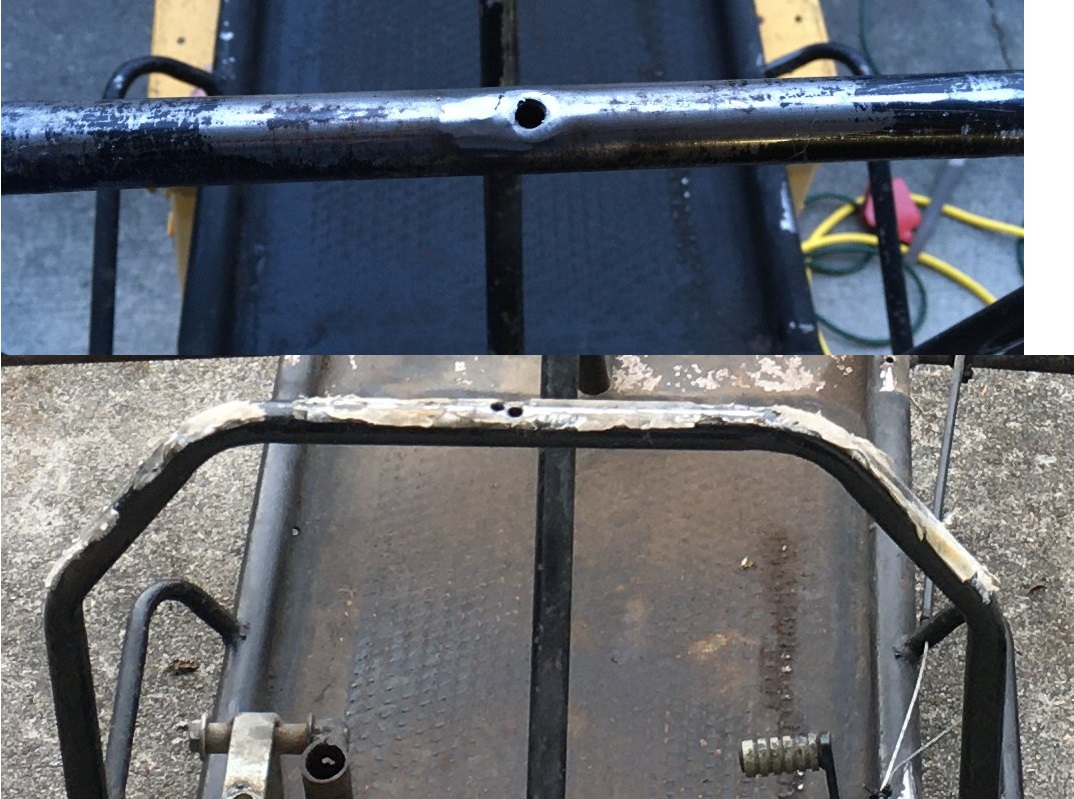
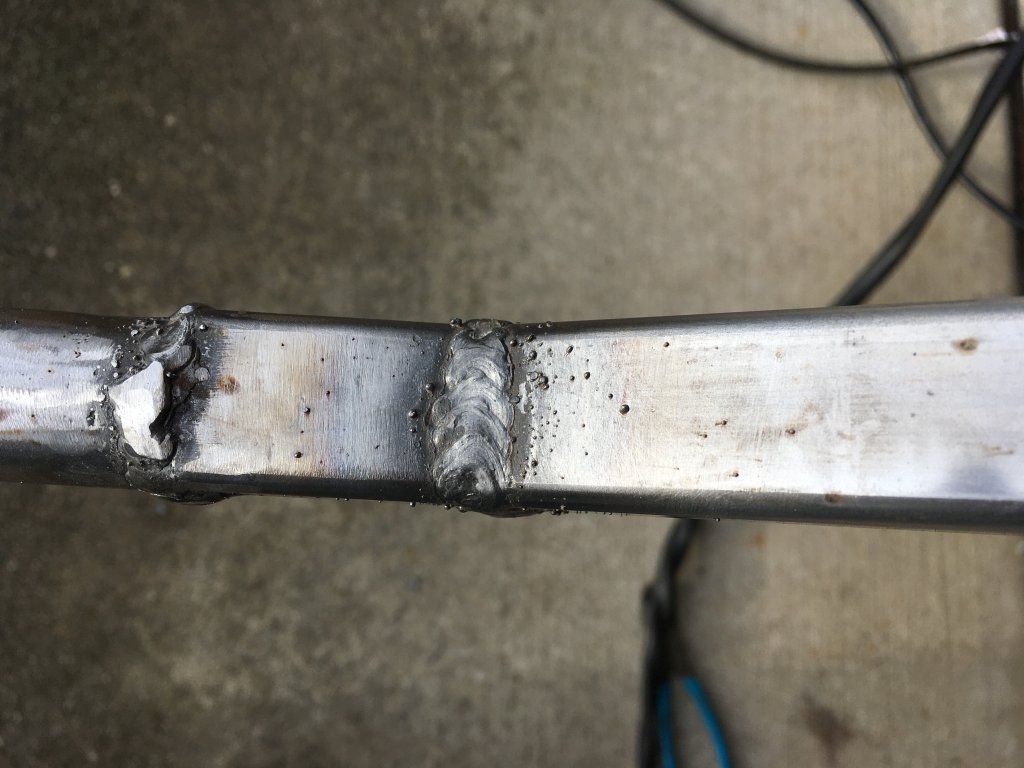
But first things first, I am going to get it running and go from there. I removed the non-original motor and gave it back to the guy when I bought it, I have a brand-new motor for it, and a new clutch is on the way. The frame clearly needs a little tweaking as well.

More to come!
Stewart
 
Last edited:

JTSpeedDemon

2019 Build Off Winner!
Messages
4,026
Reaction score
147
Location
Texas
Great find! I've never seen one of those before!
Maybe dress it up like a paddy wagon and stick your dog in there!:lolgoku:
You do have a dog, don't you? :toetap05:
 

Stew

Member
Messages
50
Reaction score
4
You know it! On the left we have "Poncho" who is half yellow lab, half Golden retriever and on the right is "Bubba" a black lab rescue dog.
IMG_2586.jpg
 
Last edited:

JTSpeedDemon

2019 Build Off Winner!
Messages
4,026
Reaction score
147
Location
Texas
:lolgoku:
I have two dogs, Chihuahua terrier mutts. One boy, one girl, from the same litter.
About 2 years old, the boy is named Pablo, and the girl is named Lizzie! I wonder how Pancho and Pablo would get along.....:roflol:
 

Stew

Member
Messages
50
Reaction score
4
I removed the body and checked everything out. Good grief, I think every nut, washer and bolt was different, almost none matched side to side or front to back on things. The seat appeared to be something you'd find in an elementary school, you know the kind with the chrome legs, and multiple mounting holes were drilled mere fractions of an inch apart for various things for no really good reason apparently. The two front tires and wheels did match but the two rears were different sizes with completely different wheels. The original gas and brake pedals were ditched, the new brake pedal looks like it used to be a motorcycle gear shift lever and the gas pedal is completely umm custom.
gokart07.JPG
gokart06.JPG
gokart08.JPG

After removing all the junk the frame is not as tweaked as it first seemed, it looked worse than it was due to the one taller rear tire and the body being mounted a little cockeyed.

In this pic you can see the extra offset front mounting hole mere millimeters away from the original mounting hole on that top bar with the foam tape residue, and to heck with the good factory pedals, lets make custom pedals that barely work!
gokart09.jpg

The body is removed as well as most of the jerry-rigged stuff. A pretty basic frame that's seen a hard life, perfect for me to practice welding on and hopefully improve it. Incredibly the brake works, sort of.
gokart10.jpg

I think the 4.80-8 trailer tire looks a little too big, I think I'll go with 5.30X4.50-6 which will be a little taller than the ones currently on the front, and some new wheels.
 
Last edited:

Stew

Member
Messages
50
Reaction score
4
Today I was able to spend a little time on my new toy. No new pictures but I got all the double sided foam tape scraped off, filed down the burrs from the extra holes that were drilled in the frame so I don't have to get a tetanus shot at the walk-in, and scrubbed it up a bit with some purple power.

I also ordered all new matching wheels and tires so I'll be able to start making actual progress on it when those get here. The fronts will fit on the existing spindles and from there I'll be able to figure out how wide of a rear axle I'll need to do the conversion to a live axle. I went with 5.30X4.50-6 all the way around which looked like the best fit for the body.

More to come!
 

JTSpeedDemon

2019 Build Off Winner!
Messages
4,026
Reaction score
147
Location
Texas
Eeeegh!:ack2:
That is some seriously nasty riggery!:eek:
At least the riggery on my kart makes sense!
 

JTSpeedDemon

2019 Build Off Winner!
Messages
4,026
Reaction score
147
Location
Texas
^^:roflol::lolgoku::funnypost:
I would have laughed out loud when I read that if I had my voice, and if my family wasn't asleep here in the living room!
 

Stew

Member
Messages
50
Reaction score
4
Did a little work while waiting for parts, cut off the wonky custom gas pedal and cleaned up the old welds and removed the brake pedal also. It will get new pedals here pretty soon.
IMG_2797.JPG
IMG_2798.JPG
 
Last edited:

Stew

Member
Messages
50
Reaction score
4
Got some parts over the last couple of days... 4 new 5.30/4.50-6 sawtooth tires, 4 new aluminum wheels and er um two new tubes. They accidentally sent me just two instead of two pair, I contacted them and the other two are on their way, hooray!
IMG_2806.JPG

Anywho, I can get the two fronts mounted up and measure the track width along with the step-down spacing from 1" to 3/4" on the rear wheels and then get the rear axle ordered next. I want the track width of the front and rear tires to be as close to the same as I can get them.

I like the additional height of the new tires compared to what's on there now but I actually do wish they were as skinny as the 4.10/3.50-6's

I'll get some more pictures tomorrow, man it gets dark out so early these days!

 
Last edited:

Stew

Member
Messages
50
Reaction score
4
The other day I got the rear wheels positioned so I could measure the width, now I can go ahead and get the rear axle ordered.
IMG_2820.JPG
IMG_2821.JPG
Also got a few other parts in to do the conversion, the caliper and bracket for the rear disc and pillow block bearings for the axle. Haven't made much progress with the holidays and incredibly short days but I'm still making progress.
IMG_2819.JPG
 
Last edited:

Budget GoKart

Aka a kenbar
Messages
2,195
Reaction score
118
Location
roachdale, indiana
i can see many issues mounting a live axle here but i think its possible are you just going to cut the old rear end bits off where the wheels attach or are you going to make a new rear entirely? when i get time ill put a pic of what i mean
 

Stew

Member
Messages
50
Reaction score
4
Placed the order for the axle, sprocket, brake disc, pedals, etc on Saturday (parts should be here Thursday) and am going to the steel yard on Friday so there should be more progress very soon.

Yep, the frame is getting chopped off just forward of the engine mounting plate and a new rear section fabricated!
 

Stew

Member
Messages
50
Reaction score
4
Now I'm starting to get somewhere. I've got all the parts I need and went and picked up my steel order today. This is where it was at, frame stripped ready for surgery.
IMG_2858.jpg

Here I chopped off the rear end just forward of the motor mount, and cut the motor mount free and cleaned it up to be re-used.
IMG_2859.jpg

I welded new frame pieces on for the live axle conversion.
IMG_2864.jpg

Today was the first time I've ever welded in my life, I've soldered wires and plumbing before so I'm not totally unfamiliar with the concept. This is what my welds looked like from the HF $100 flux core mig welder after about 2 hours of practice. Not great but I think they'll hold haha. I'm not going to grind the welds but I'll do a light pass with the grinder to knock the boogers off.
IMG_2863.jpg

I also went around the frame and welded up all the extra holes the previous owner drilled, that was a little challenging because some of them were kinda big and this tubing isn't that thick. It was good practice though. This pic shows one of the extra holes I'm talking about on the front body mount.
IMG_2865compare.jpg

Also while looking around online I discovered that this go kart appears to be made by FW & Associates Mini Cars, the frame looks exactly like every single other one, it looks like they made virtually every fiberglass body go kart from the mid '70's through the early '90's or so. The only difference between all the different frames was the mounts to attach the various bodies.

More updates coming soon!
 
Last edited:

JTSpeedDemon

2019 Build Off Winner!
Messages
4,026
Reaction score
147
Location
Texas
I'd say that weld actually looks pretty decent for a HF 125 and 2 hours of practice! It's blended pretty nicely with the metal, plus I don't see any pores on the surface!
 

Stew

Member
Messages
50
Reaction score
4
Thanks guys, I enjoy these kind of projects and practicing new skills, I know it's one of those things that improves with practice.

The new rear frame sections look a little long but some of that length will be taken up when I make a couple cuts/welds to make a slight upward step in the frame to try and keep the new live axle in the same position as the original axle. And it will all easily fit within the body. If I just bolt the pillow block bearings on right now it'll give it a slight forward rake which I don't want.
 

Stew

Member
Messages
50
Reaction score
4
Ok I'm starting to get the hang of this
IMG_2867.jpg

Finished the rear frame sections. I didn't cut all the way through, just three sides so I could bend it and weld it back up. Next I'll get the frame under the body so I can mark where the rear axle goes and get that bolted up, then weld in a couple cross braces.
IMG_2870.jpg
 
Last edited:
Top