Go Kart seat question

Flamdragz

New member
Messages
8
Reaction score
0
Location
Albuquerque, NM
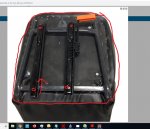
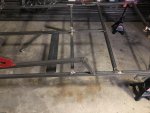
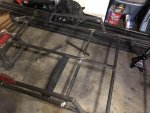
Maybe this was a mistake, but I am building a go kart by modifying some existing plans I found for free on the net (I’m increasing the size so it is a little bigger than the plans). I order 2 seats from BMI karts (bucket seats) as the bench seat was too narrow for the increased width of the frame.

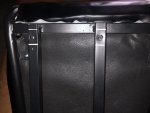
The seats arrived with no instructions for mounting, no hardware, nothing. I have scoured the web looking for how to install the seats with little luck.

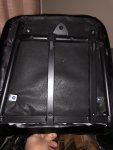
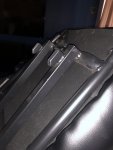
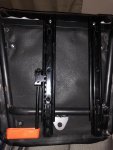
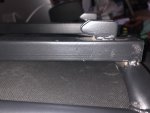
I am wondering if someone can help me figure out how to install the seats onto the frame. The driver seats has a slider, but the passenger seat does not.

Any help would be greatly appreciated!

Rob

---------- Post added at 10:12 AM ---------- Previous post was at 10:11 AM ----------

Here is the link for the seats I purchased:

https://www.bmikarts.com/Padded-Bucket-Seat-Set-2-for-Go-Kart_p_3216.html

Rob
 

anickode

Active member
Messages
2,296
Reaction score
14
Location
S.E. Michigan
They look fairly self explanatory... You'll have to weld in brackets to the frame to match up to the hole pattern on the sliders for the driver's seat, and the passenger seat has the same base bracket with 4 holes, minus the slider.

Really is just a matter of measure, cut, drill, weld, and insert bolts. If you're already modifying the frame, it should be pretty straightforward. :huh:
 

Bansil

Painter of gnomes....
Messages
1,360
Reaction score
914
Location
Mnts of the farthest NE TN you can go
Here is an idea that may help you get some cardboard, flip seat upside down.

Trace outside of seat on the card board for clearances and then put the 4 bolts holes in the card board

now you can use the cardboard to locate the seat and 4 tabs

red is outside of cardboard, the non locking rails needs to move up so it matches the locked on before you make holes in card board
 

Attachments

  • seat.jpg
    seat.jpg
    167.3 KB · Views: 6

Flamdragz

New member
Messages
8
Reaction score
0
Location
Albuquerque, NM
Thanks everyone. I guess what confused me was that there are these 2 L shaped brackets in the middle of the seat rails. I saw a video, where those were supposed to clip into something. And I couldn't figure out what i needed to buy to clip into.

The methods mentioned above is what I started, then stopped with the seats, just to be sure. When looking at the passenger seats, there is minimal clearance to get a bolt in the rail. And that is posing another seat of issues.

I will certainly take the advice and do the cardboard template. That will certainly make things a lot easier.

Thanks again!

Rob
 

anickode

Active member
Messages
2,296
Reaction score
14
Location
S.E. Michigan
Looks like you might have luck dropping bolts into the holes if you slide the seat all the way forward, bolt the rear, then slide it all the way back and bolt the front. ��
 

Flamdragz

New member
Messages
8
Reaction score
0
Location
Albuquerque, NM
Yes, that's what I will do with the driver's side seat, since it has the slides. Attach one end, then the other.

The passenger seat does not have slides, and the rails are completed all around (3/4" x 3/4" tube I am guessing). Also, the passenger seat has holes on different surfaces. 2 on the rail in the rear, 2 on the frame in the front (different planes).

I think the methods above will help and work on the driver's seat. But I am very perplexed by the passenger seat.

Rob

Here are some pictures:
 

Attachments

  • IMG_5951.jpg
    IMG_5951.jpg
    452.6 KB · Views: 7
  • IMG_5952.jpg
    IMG_5952.jpg
    296.8 KB · Views: 6
  • IMG_5953.jpg
    IMG_5953.jpg
    574.9 KB · Views: 6

anickode

Active member
Messages
2,296
Reaction score
14
Location
S.E. Michigan
Does kind of look like those tabs are meant to go around a flat bar or the lip of a piece of angle iron, then just bolt in the back.
 

Flamdragz

New member
Messages
8
Reaction score
0
Location
Albuquerque, NM
Ok....

And now one other issue that I failed to mention earlier, was I attempted to place the driver seat as suggested, mounted to bars at the front and rear. But I came to find out that at certain positions, the cross bar that connects to the front of the rails, was in the way of the release mechanism. Causing the seat to not be locked into place. This was also part of the issue that caused me to reach out here to get some help.

Also, I did contact the seller to ask for some advice, and I have received no help from them.

Rob
 

Flamdragz

New member
Messages
8
Reaction score
0
Location
Albuquerque, NM
Ok,


What a NIGHTMARE!!!!

I tried the cardboard template, and that is getting me somewhere, which is promising.

I was also able to mount a 1/8" thick x 3" wide piece of bar stock on the frame, and can get the holes to line up with the bar they will ultimately screw in/on to.

However, the holes on the passenger seat has a threaded insert of some type and the threaded side is on the top near the cushion. I am unable to remove the cushion despite it being screwed into place (appears to be one piece, or 2 pieces joined together and am unable to move the bottom cushion out of the way). I cannot get into the hole to find the thread pitch (pictures below), the bolt size appears to be 5/16". At my local Lowe's I could only find 5/16" - 18 bolts. And 18 TPI does not seem to be the correct thread pitch. I cannot fit my thread pitch gauge deep enough to see what it is, and I cannot reach it from the top side.

Does any body have any clue, as to what might be the thread pitch? Or something else that I can attempt to get this to work?

Thanks again for everyone's input!

Rob
 

Attachments

  • IMG_6065.jpg
    IMG_6065.jpg
    292.9 KB · Views: 1
  • IMG_6066.jpg
    IMG_6066.jpg
    323.8 KB · Views: 1
  • IMG_6067.jpg
    IMG_6067.jpg
    523 KB · Views: 1
  • IMG_6068.jpg
    IMG_6068.jpg
    110.8 KB · Views: 1
  • IMG_6069.jpg
    IMG_6069.jpg
    319.6 KB · Views: 1

Functional Artist

Well-known member
Messages
4,403
Reaction score
1,679
Location
Toledo, Ohio
5/16 bolts .312 dia

8mm ÷ 25.4 = .3149 dia

So good chance metric bolts

Have you called bmi? I have done 4 or 5 orders during this time and have talked/emailed several times

Yup, :iagree:

If they look to be ~5/16" holes, you only have like (4) options :thumbsup:

Imperial: 5/16 (course or fine thread)
Metric: 8mm (course or fine thread)
 

Flamdragz

New member
Messages
8
Reaction score
0
Location
Albuquerque, NM
I have e-mailed BMI with no response. I tried calling again today, and get a message saying "someone is not available to answer your call." I will reattempt a phone call in the morning.

Rob
 

Functional Artist

Well-known member
Messages
4,403
Reaction score
1,679
Location
Toledo, Ohio
I have e-mailed BMI with no response. I tried calling again today, and get a message saying "someone is not available to answer your call." I will reattempt a phone call in the morning.

Rob

Ohio is still on a "partial" shut down :ack2:
...so, their probably only running with a "skeleton" staff
…& if the info you want isn't in the specs (it isn't, I checked) they probably don't know :huh:

So, I would either (1)
...just take the seat to the hardware store & try bolts till I find the right ones that fit properly :thumbsup:

or (2)
...buy (2) 5/16" bolts (1 fine & 1 course)
…& (2) 8mm bolts (1 fine & 1 course)

Then, go back, return the wrong ones
…& buy (3) more of the right ones :2guns:
 

Flamdragz

New member
Messages
8
Reaction score
0
Location
Albuquerque, NM
Ok..... I had some thing come up, causing me to put this on hold for a few weeks. I came up with a back up plan, and then set forth to figure this out.

I bought 5/16 - coarse and fine thread
I bought 8mm - coarse and fine thread

Surprise, surprise...... NONE of them worked. Some thing must be screwed up with the threading. I had a 5/16 -18 tap nearby, so I tapped them hole. The 5/16 - 18 bolt now threads very smoothly. There is a very minimal amount of play, so probably it should have been an M8 tap, but I do not own any metric taps. There is just enough room on the other side of the bar to put a nut, so I will be getting this finalized very soon.

Thanks for all of the input I received. A lot more of a pain than it should have been.

My back up plan was to grind down the area where the extrusion sticks out. And in its place weld to bolts.

Rob
 

Karttekk

Well-known member
Messages
1,836
Reaction score
427
Location
Elizabeth, PA
A little late to the party here but those seats fit most Chinese buggy style karts like the Hammerhead, Trailmaster and similar. The "L" shaped brackets slide into "receivers" welded onto the kart frame, they resemble "open arms" so to speak. The L brackets slip into them to keep the front of the seat from lifting. The correct bolt size for future reference is M8 x 1.25 x 40.
 
Top