First time Go-kart build

EasySmokes

New member
Messages
8
Reaction score
2
Hello all,

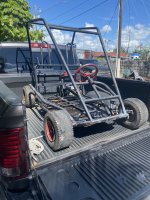
I recently picked up this go kart on offer up for $250. Not sure the brand or model but it was a 2 seater kids kart.
Goals are to make a fun and quick street / yard kart.
IMG_5449.jpg

IMG_5456.jpgIMG_5453.jpg

It came with a Tecumseh engine, clutch driven. One wheel peel.
The engine itself has oil in it and turns over just fine. It needs a new carb and some cleaning.

65072874195__DD702EA2-EE01-4470-AAD5-F06F623E8726.jpgIMG_5472.JPG

So i started by loading the kart into my shed/ workshop and started stripping everything off the kart. Leaving the kart bare and ready for the floor pan to get removed.

IMG_5460.jpg
IMG_5463.jpg
IMG_5464.jpg
IMG_5467.jpg
 

EasySmokes

New member
Messages
8
Reaction score
2
Here is the floor pan and the removal.
IMG_5468.jpg
IMG_5469.jpg
IMG_5478.jpg

I started cutting and grinding the remaining welds off the frame and went out and bought a couple sheets of 16ga sheet metal. Im a complete beginner to welding so i did the best i could to get the pan tack welded.

IMG_5500.jpg
IMG_5498.jpg
IMG_5503.jpg
IMG_5506.jpg
IMG_5508.jpg

And for the pipe that runs through the center of the floor pan, i ended up using self tapping screws as i want to weld it on the inside but it made me feel more secure as my welds are crap.

IMG_5511.jpg
 

EasySmokes

New member
Messages
8
Reaction score
2
Back on the top side.

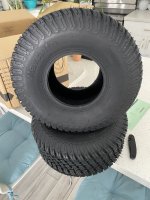
I ordered a Duromax 440cc, a torque converter, a single seat (as i am going to make this a single seat kart), a live axle kit, brake caliper, cables, rear wheels and tires, and new front tires. All from amazon.

Here is a pic of the live axle kit i ordered. Honestly pretty concerned on how im going to go about this, when i ordered this, i thought the brake disk and sprocket would be able to move left or right on the axle but it seems to be welded in place.

IMG_5519.PNG

I pulled the front tires off the rims and painted them

IMG_5514.jpg
IMG_5523.jpg
IMG_5531.jpg

The seat came in and i have been test fitting it and cut out a board with some 3/4 plywood i had laying around for a base. When the engine comes in, ill go ahead and finalize that.
IMG_5569.jpg
IMG_5570.jpg

You may be wondering what that caulking is around the floor pan, and that is a metal to metal adhesive because, 1 I didn't trust my beginner welds, and two, i sealed up what ever gaps around the welds.

One thing i need to do is bang or bend this bar back in place. I decided to run without the top cage. I like the look of a race kart. But i want to keep this bar as a protector.
IMG_5543.jpg

Ill keep you all updated as things continue.
 

madprofessor

"Loose Cannon Creations"
Messages
2,899
Reaction score
888
Location
Jacksonville, Florida
If you haven't blown any holes in that sheetmetal with that flux core welder yet, you're probably not running it hot enough to get really solid tacks. Put some scrap metals together, crank the welder all the way up, and start blowing holes trying to make some welds. See how that works, then turn it down a little at a time until you see a deep penetration (a good weld) that doesn't blow away the metal.
 

EasySmokes

New member
Messages
8
Reaction score
2
If you haven't blown any holes in that sheetmetal with that flux core welder yet, you're probably not running it hot enough to get really solid tacks. Put some scrap metals together, crank the welder all the way up, and start blowing holes trying to make some welds. See how that works, then turn it down a little at a time until you see a deep penetration (a good weld) that doesn't blow away the metal.
That's exactly what i did. I recently bought extra metal, plus the top cage and seat frame, ill use to practice my welds before i install the live axle kit.
And it was hot enough to blow a hole in the 16ga.
 
Last edited:

madprofessor

"Loose Cannon Creations"
Messages
2,899
Reaction score
888
Location
Jacksonville, Florida
Been using 16 ga. myself. If you can blow that away, you've got the right welder. Using a stick welder myself, a little more forgiving, but harder to arc.
 

madprofessor

"Loose Cannon Creations"
Messages
2,899
Reaction score
888
Location
Jacksonville, Florida
A common handheld propane torch will not only burn off in just seconds any paint and primer well enough for a quick swipe with your wire brush, but can preheat the heavier piece of metal so you get deep penetration without blowing away the thinner stuff.
 

EasySmokes

New member
Messages
8
Reaction score
2
I'm diggin the camo crocks :) I also have crocks as my shop shoes.

The build looks awesome so far! Definitely following. Keep it up.
It's a beotch when the little weld splatters fall in the holes and heal area tho :ROFLMAO:

Yeah thats exactly what happens to me. I love wearing crocs but the hot weld splatters do find their way right into the holes :ROFLMAO:
Also the welding advice is much appreciated, thank you both.
 

EasySmokes

New member
Messages
8
Reaction score
2
More parts came in...
IMG_5573.jpg
IMG_5668.jpg
IMG_5669.jpg
IMG_5682.jpg

So I went to mounting the tires onto the rims I had painted a few days ago.
IMG_5671.jpg
IMG_5672.jpg
 

EasySmokes

New member
Messages
8
Reaction score
2
Now that I had the engine i was ready to start tinkering. I had received the torque converter and unfortunately didnt realize that the 1" bore size wasn't a 40 series, but a 30 series torque converter.
I should have sent it back, but i hate returning things and i wanted to test the strength considering it has a 1 year warrantee anyways.

So i went to getting it fixed onto the engine.

IMG_5685.jpg

I had to grind off the plastic oil fill (1 of 2) and relocated some of the mounting holes on the converters mounting plate.

IMG_5691.jpg
IMG_5692.jpg
IMG_5694.jpg

I got the torque converter mounted. It could use better sized bolts, but for testing purposes, i will send it as is for now.

IMG_5701.jpg

Heres a look with the engine on the cart before i mounted the converter.

IMG_5686.jpg
IMG_5690.jpg

I should be receiving the live axle kit tomorrow. So ill probably be busy this weekend cutting, welding and grinding to get that installed.

Until then 👋
 
Top