212 Predator throttle/governor linkage

Karttekk

Well-known member
Messages
1,836
Reaction score
427
Location
Elizabeth, PA
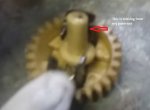
Maybe someone can help me figure out the issue with a 212 Predator engine that is on an old Manco 485-03 kart I recently picked up. Previous owner had removed the rod & springs from the governor arm to the carb and throttle lever and had a homemade throttle rod from the big throttle lever to the carb butterfly along with an assortment of return springs stretched everywhere. He was able to start it with a rope and handle he cut off an old mower since the pull start was missing. He lifted the back of the kart with the engine running at WOT. I replaced the rod & springs with factory parts, readjusted the governor and even popped the side cover off the engine, the governor "looked" okay. The only way I can get the engine to slow down is hold the butterfly back manually. The image I borrowed from Old Mini Bikes is how I have mine setup. Something is big time wonky, I can't seem to narrow it down. It's something with the governor it seems.

Thanks
 

Attachments

  • linkage.jpg
    linkage.jpg
    97.3 KB · Views: 21

Karttekk

Well-known member
Messages
1,836
Reaction score
427
Location
Elizabeth, PA
I think I might have stumbled across what's going on. I just watched a video of a 212 governor, there is a nylon stem I guess you could call it that sits on the center governor gear shaft. As the governor weights spread that stem pushes against the rod going through the block which in turn controls the throttle. That part isn't there plus I found small off white chunks of what could have been that stem disintegrating from when the previous owner unhooked the governor springs. Has anyone run across this? Thanks.
 

Attachments

  • MIA.jpg
    MIA.jpg
    32.3 KB · Views: 6

Crazznewt

Member
Messages
49
Reaction score
6
Location
Springfield, Missouri
Yes, when you do a governor delete you have to break the engine open and remove the inside parts!!!!! These shattered parts got into my compression release and made starting our engine extremely difficult.
 

Attachments

  • 20201022_214923.jpg
    20201022_214923.jpg
    958 KB · Views: 5

madprofessor

"Loose Cannon Creations"
Messages
2,899
Reaction score
888
Location
Jacksonville, Florida
Governor warning to all: Delete EVERYTHING if you disconnect that external arm. I left the rod that twists that arm just sticking up out of the block with the cotter key on it for safety. Key vibrated off, that "L-shaped" rod (turns 90 degrees inside of block) dropped down, the crankshaft counterweight hit it, bent it and jammed it against the block. All because I didn't want to split the case. When you do split it to remove the governor parts, DON'T FIGHT with needle-nose and screwdrivers and whatever to get that nylon gear and the 3 washers out of there. Just pop the flywheel off the other side to expose the pin that the gear spins on, and punch it into the block. Be sure to get all the parts out of the block, and drive a 1/4-20 bolt into the hole to seal it. If hard to get that "L-shaped" arm out, just pull the crankshaft toward you a smidge and let it fall out. Drive another of those bolts into that hole.
 

Crazznewt

Member
Messages
49
Reaction score
6
Location
Springfield, Missouri
The same thing happened in my first engine and govenor pieces/parts got into my compression release causing other problems.
With my newest engine's full govenor delete, I didn't go though the extra work of removing the flywheel and didnt have much trouble removing the plastic gear and other govenor parts from inside the engine.
When I removed the oil level sensor, I left the wiring/seal in the block and it works fine. I like having a little extra oil in the block as a result.
As I gain experience with these Predator Engines, I tend to believe these crankshafts are made with softer/cheaper metal than what I'm used to.
 
Last edited:

madprofessor

"Loose Cannon Creations"
Messages
2,899
Reaction score
888
Location
Jacksonville, Florida
Crazznewt, I've seen videos of people who got that gear out very easily, glad that it worked out that way for you too. It's the videos of nightmares with deleting governor parts that convinced me to not even try the hard way.
I made a shaft-locking tool out of angle iron for changing flywheels, and have holes in my workbench for locking motors down. That makes casually popping off flywheels a no-effort for me, and gets the nylon gear punched out in 5 seconds. Haven't had to cut off the shaft sticking up out of the engine yet either, why bother.
About that "little extra oil" in the block, you can expand on that by doing what I accidentally did. After carefully leveling my motor rack during the last build, too much force got exerted on the rack before the weld-out and slightly tilted the block toward the front. Happily that meant that as long as I topped the oil through the rear dipstick/fill hole all the way to the lip, there'd be even more of a "little extra oil" in the block beyond what I gained in my sensor delete, so I didn't shim it back level again. With my billet racing rod having a vastly improved ability to "scoop" instead of "splash" oil with every turn of the crank, high rpm's will have more oil flying around and running down all over the engine's innards and lower the oil level in the block until the rpm's slow down. I highly recommend that tilt if a billet rod is used.
 

madprofessor

"Loose Cannon Creations"
Messages
2,899
Reaction score
888
Location
Jacksonville, Florida
Karttek, if you already got the case sealed back up it was hopefully with a nice new sump sidecover gasket. Tip for the future, congrats if you already did this: High performance gasket kits cost basically the same as OEM kits for the same mating group. If you use the hi-perf kit you can get a much thinner stainless steel (not paper) head gasket (mine's .012", OEM's about .050") that will noticeably improve performance by increasing compression. 4 little bolts on the valve cover, 4 bigger bolts for the head, voila, better motor. The other gaskets should be of higher quality than OEM to boot, might not tear up next time they're removed. FYI: I'm not a fan of using loads of gasket maker or sealer on small engines to make up for damaged gaskets.
 

mckutzy

Well-known member
Messages
8,353
Reaction score
31
Location
bc, canada
Side plate gaskets need to be the paper type as the set the crank end play...
Gasket maker thins out too much to be this offset.
 

madprofessor

"Loose Cannon Creations"
Messages
2,899
Reaction score
888
Location
Jacksonville, Florida
Agree completely about the gasket maker. Many people use RTV as a gasket because it's "Room Temperature something or other" that sets and cures at room temperature in the absence of oxygen or something like that, and they believe it's the cure for everything.
I couldn't care less. The proper seal is made by the gasket compressing to an absolutely uniform thickness as the bolts torque down. You cannot get that when squishing down some gooey gasket maker. The seal has to be made by the bolts, not by random hardening of an unevenly squished bunch of goo.
About crankshaft endplay, I do have to say that checking the shaft correctly gets done with paper or goo just fine the first time you check it. The problem with goo is that once you snug down the sidecover bolts and check the endplay, if you need to change the shimming and remove the side cover again, on reinstallation you have to goo all over again, and uniformity has gone out the window. And maybe goo has gone into your crankcase.
 
Top