2019 - Road Runner Kart

Status
Not open for further replies.

slicksonly

Mechanical Member
Messages
64
Reaction score
1
Location
Northern Michigan (USA)
Welcome all builders;
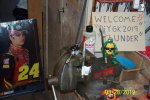
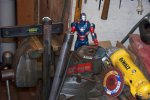
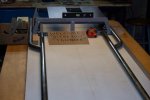
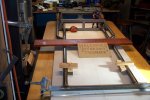
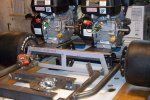
This is my entry for 2019 DIY GK - thunder, karts name Road Runner. Wanted to build my own for a while, started the rear some what, hopefully I can finish this year.
Good luck to all builders
 

Attachments

  • 100_1333.jpg
    100_1333.jpg
    326.6 KB · Views: 39

RobertD

Administrator
Staff member
Messages
3,019
Reaction score
56
Location
Texas
Looks like a great pile!!! Can't wait to see it come together!
 

slicksonly

Mechanical Member
Messages
64
Reaction score
1
Location
Northern Michigan (USA)
Looks like I'm in!! thanks guys;
To start assembly I made a fab table out of plywood painted white for layout lines and hold parts in place. The rear carrier plate was than centered and screwed down to stay. I'm using 1 1/4" pillow block bearings for good thrust and radial loads. Next I'm working on the front steering.
 

Attachments

  • 100_1338.jpg
    100_1338.jpg
    277.2 KB · Views: 18
  • 100_1340.jpg
    100_1340.jpg
    293 KB · Views: 19
  • 100_1336.jpg
    100_1336.jpg
    287.7 KB · Views: 16

slicksonly

Mechanical Member
Messages
64
Reaction score
1
Location
Northern Michigan (USA)
Working on the front steering, It's a good time to get your measurements tire width and axle spacing ( wheel base ) will be 54" inch. Building my own spindles a little heavier I built a jig to hold parts and angles in place during welding.

Tie rods are easy and fun to make, 3/8 round stock, left and right die nuts, use tap-magic for all your drilling and cutting. practice makes perfect, for the best hand cut threads use a die nut holder with guides.
 

Attachments

  • 100_1343.jpg
    100_1343.jpg
    262.2 KB · Views: 14
  • 100_1341.jpg
    100_1341.jpg
    276.1 KB · Views: 17
  • 100_1347.jpg
    100_1347.jpg
    290.8 KB · Views: 17
  • 100_1351.jpg
    100_1351.jpg
    288.4 KB · Views: 17
  • 100_1344.jpg
    100_1344.jpg
    286.3 KB · Views: 17
  • 100_1353.jpg
    100_1353.jpg
    216.9 KB · Views: 13
  • 100_1354.jpg
    100_1354.jpg
    280.8 KB · Views: 14

slicksonly

Mechanical Member
Messages
64
Reaction score
1
Location
Northern Michigan (USA)
Frame work;
With the wheel base and measurements complete, I started the frame work, when cutting, coping, bending pipe I mark TDC both ends mark 4 quadrants so I can cut the same.
 

Attachments

  • 100_1359.jpg
    100_1359.jpg
    294.1 KB · Views: 9
  • 100_1361.jpg
    100_1361.jpg
    252.9 KB · Views: 10
  • 100_1364.jpg
    100_1364.jpg
    240.2 KB · Views: 13
  • 100_1367.jpg
    100_1367.jpg
    208.3 KB · Views: 9
  • 100_1370.jpg
    100_1370.jpg
    208.1 KB · Views: 10

slicksonly

Mechanical Member
Messages
64
Reaction score
1
Location
Northern Michigan (USA)
When your building like this, you get a lot of wild Idea's in you head about the next build?? With this winter weather holding out, things are going fast on this build.

good luck builder's ******************** Armand
 

slicksonly

Mechanical Member
Messages
64
Reaction score
1
Location
Northern Michigan (USA)
Frame work;
Things are moving right along here as you can see, the frame being the main thing, makes the build fast. Wire welding next.
 

Attachments

  • 100_1365.jpg
    100_1365.jpg
    269.3 KB · Views: 10
  • 100_1366.jpg
    100_1366.jpg
    198.7 KB · Views: 9
  • 100_1369.jpg
    100_1369.jpg
    184.7 KB · Views: 10
  • 100_1368.jpg
    100_1368.jpg
    272 KB · Views: 16
  • 100_1362.jpg
    100_1362.jpg
    231.9 KB · Views: 12
  • 100_1314.jpg
    100_1314.jpg
    244.8 KB · Views: 11
  • 100_1305.jpg
    100_1305.jpg
    307.4 KB · Views: 9
  • 100_1375.jpg
    100_1375.jpg
    278.6 KB · Views: 12

slicksonly

Mechanical Member
Messages
64
Reaction score
1
Location
Northern Michigan (USA)
Wire welding frame & attachments;
This is the fun part knowing Mechanically this is my build and things are going together. The welder I bought at a garage sale last year, The cart my wife bought me for my birthday and I just put it all together this year, very proud to have it!!

This contest requires lot's of photo's So I try, let's see frame, floor pan clips, peddle mounts, steering, The Super Heroes that you are seeing is provided by the Grand Son with fittest. :popcorn:
 

Attachments

  • 100_1319.jpg
    100_1319.jpg
    311.4 KB · Views: 9
  • 100_1373.jpg
    100_1373.jpg
    244.9 KB · Views: 10
  • 100_1374.jpg
    100_1374.jpg
    260.2 KB · Views: 10
  • 100_1379.jpg
    100_1379.jpg
    371.6 KB · Views: 9
  • 100_1377.jpg
    100_1377.jpg
    232.3 KB · Views: 11
  • 100_1384.jpg
    100_1384.jpg
    276.2 KB · Views: 11
  • 100_1381 (2).jpg
    100_1381 (2).jpg
    333.2 KB · Views: 15
  • 100_1382 (2).jpg
    100_1382 (2).jpg
    336.8 KB · Views: 11
  • 100_1376.jpg
    100_1376.jpg
    275.6 KB · Views: 13

slicksonly

Mechanical Member
Messages
64
Reaction score
1
Location
Northern Michigan (USA)
Hello DIY kart builders;
Working on gas and brake peddles, steering support, I bought the peddles and made them lighter, with a cut out for the throttle clevis 1/4 20 thread. Made two 90 degree bends on my JD one inch dom tubing 0.095 wall thickness. I'm getting some great Idea's for my next kart.
 

Attachments

  • 100_1386.jpg
    100_1386.jpg
    319.9 KB · Views: 10
  • 100_1385.jpg
    100_1385.jpg
    337.2 KB · Views: 10
  • 100_1387.jpg
    100_1387.jpg
    331.3 KB · Views: 11
  • 100_1389.jpg
    100_1389.jpg
    250.6 KB · Views: 10
  • 100_1388.jpg
    100_1388.jpg
    279.4 KB · Views: 9
  • 100_1390.jpg
    100_1390.jpg
    299.6 KB · Views: 12
  • 100_1392.jpg
    100_1392.jpg
    252.1 KB · Views: 12
  • 100_1394.jpg
    100_1394.jpg
    242.5 KB · Views: 11
  • 100_1396.jpg
    100_1396.jpg
    215.8 KB · Views: 15
  • 100_1395.jpg
    100_1395.jpg
    321.8 KB · Views: 17

slicksonly

Mechanical Member
Messages
64
Reaction score
1
Location
Northern Michigan (USA)
Hello DIY kart people;
Finishing up most of the top stuff, steering, gas & brake peddles, mechanical throttle body, hydraulic brakes. Getting ready to pull the frame out of the jig and Weld the flip side. I know what your thinking?? where are the slick's and motor?? coming soon. :popcorn:
 

Attachments

  • 100_1397.jpg
    100_1397.jpg
    334.8 KB · Views: 8
  • 100_1433.jpg
    100_1433.jpg
    274.3 KB · Views: 11
  • 100_1434.jpg
    100_1434.jpg
    238.1 KB · Views: 11
  • 100_1436.jpg
    100_1436.jpg
    282.8 KB · Views: 11
  • 100_1435.jpg
    100_1435.jpg
    269 KB · Views: 10
  • 100_1437.jpg
    100_1437.jpg
    308.1 KB · Views: 13
  • 100_1326.jpg
    100_1326.jpg
    244 KB · Views: 11

slicksonly

Mechanical Member
Messages
64
Reaction score
1
Location
Northern Michigan (USA)
Hello DIY People;
Hydraulic brake rotor install, the kart is design for two motors so I did a motor set up to locate the brake rotor. I wanted to put a seven inch rotor on the right side, but no room, good place for a right side drive motor but that is not available. So I ended up with a 6 inch rotor under the right side motor. built the bracket holding the caliper using a card board cut out, on to 3/16 steal plate, mark, fab, fit, clamp, hold, and weld. piece of cake.
 

Attachments

  • 100_1438.jpg
    100_1438.jpg
    315.2 KB · Views: 13
  • 100_1439.jpg
    100_1439.jpg
    328.5 KB · Views: 11
  • 100_1440.jpg
    100_1440.jpg
    350.4 KB · Views: 12
  • 100_1443.jpg
    100_1443.jpg
    261.2 KB · Views: 14
  • 100_1460.jpg
    100_1460.jpg
    389.1 KB · Views: 14
  • 100_1457.jpg
    100_1457.jpg
    232.7 KB · Views: 16
  • 100_1458.jpg
    100_1458.jpg
    234.9 KB · Views: 13
  • 100_1459.jpg
    100_1459.jpg
    246 KB · Views: 15

JTSpeedDemon

2019 Build Off Winner!
Messages
4,026
Reaction score
147
Location
Texas
Ooohooohoo...
I like the twin engines! Dual stage 4s would be absolutely insane! 40+ HP! But then again, that would cost about 1.5k. :ack2:
 

slicksonly

Mechanical Member
Messages
64
Reaction score
1
Location
Northern Michigan (USA)
Thanks people for your mechanical observation;
OK with the two motors measured and recorded. I decided to go with one motor with torque convertor drive, I wanted to see what all the fuss was about with the TC. Specifcations 212 pred., tav 30 3/4 12t China brand torque convertor to a 60t drive, 35# chain, to a 12 x 9.00 - 6" rear slick. Speed will be just fast enough for sight seeing.

torque convertor notes:
mounting plate or carrier, make sur it fits flat with clearance for back oil plug fill, cut out for 0.020 th. feller gauge clearance.

the two flat faced pulleys on the inside are fixed they don't move in or out, they only turn. Check for angle & off set alignment, correct any thin g out over 0.063 th.

Safety guard needs to be cut out for chain drive, use dry lube on chain to keep oil and dirt off converter.
 

Attachments

  • 100_1463.jpg
    100_1463.jpg
    296.2 KB · Views: 15
  • 100_1465.jpg
    100_1465.jpg
    262.1 KB · Views: 17
  • 100_1467.jpg
    100_1467.jpg
    272.6 KB · Views: 17
  • 100_1466.jpg
    100_1466.jpg
    337.4 KB · Views: 18
  • 100_1468.jpg
    100_1468.jpg
    326.1 KB · Views: 18
  • 100_1469.jpg
    100_1469.jpg
    383.2 KB · Views: 20
  • 100_1470.jpg
    100_1470.jpg
    215.9 KB · Views: 27

gegcorp2012

Active member
Messages
491
Reaction score
62
Location
Alabama
Hi @slicksonly,

Did you have to make the 9/16 spacer for the engine shaft to get the TAV drive clutch to line up ?

Sent from my SM-J700T using Tapatalk
 
Status
Not open for further replies.
Top