2018 - Manco Dingo suspension & a little extra

Status
Not open for further replies.

BeaterofAincrad

2018 Build-Off Contestant
Messages
232
Reaction score
0
Location
Vermont
This is my first build-off so I hope I'm doing it right. Here is the gokart I'm going to be modifying, I just so happened to get a Manco dingo with a Tecumseh 195cc(~6.5hp) OHV engine used two winters ago. I test drove it but the chain needed to be shortened and we did that but then the engine needed to be slid forward but one of the bolts was put in the wrong way so it got stuck and we were running out of time so i took it for i think $120. It was in pretty rough shape, the frame was in great condition, but the brake was horrible(the drum somehow started tapering so the brake slides right off), the carb needed some tuning/cleaning, the rear tires were almost bald, the front left gets about 45 min and then its flat, and their was like 1-2" of play in the sprocket(the spot weld from previous owner gave out a few hours after I got it running decently). I got the brake and sprocket "fixed".
I machined a new sprocket hub and just have to bring it to a guy to hv a keyway put in it, I put a new throttle cable on cuz the previous one just barely reached the motor(that was also part of the tuning, it wouldn't run right). So now it runs good, I got a 30 series torque converter for my bday last fall and it was sooo worth the $80.
I'm currently in the process(have them mostly designed) of machining some joints so I can put some rear suspension(front shocks off junkyard kids atv) on it and machining an adapter for a 54 mm air filter(didn't have one before, one bolt is broken in the carb gonna get that taken care of soon). Then once I'm close to done making those I'm going to order a 1900 mm hydraulic brake line, master cylinder for foot brake, brake pads(4 the calipers off kids atv), air filter, and a new belt. I plan on using the disk brake & caliper off the atv but its at my grandparents house cuz I was working on something there, if it is too small I'll see if I can bore it out.
Ive been contemplating on whether to buy a straight pipe or make one. Last night I decided to make one, I used a piece of 1/8" steel and a part of an exhaust off a ride-on lawnmower like the one in the pic(the one it was taken off of had already been taken to the dump by the time i learned of this contest) and ended up just about finished, its more of a "J" pipe atm. I also got the broken bolt out of the carb, I also may buy a new bowl/carb cuz the current one has a pinhole in it. Currently it has epoxy on it but it seems to only last a few months.
 

Attachments

  • gokart pic 02.jpg
    gokart pic 02.jpg
    453 KB · Views: 46
  • gokart pics.jpg
    gokart pics.jpg
    429.9 KB · Views: 40
  • gokart pic 03.jpg
    gokart pic 03.jpg
    376.8 KB · Views: 43
  • gokart pic 04.jpg
    gokart pic 04.jpg
    489.3 KB · Views: 38
  • gokart pic 06.jpg
    gokart pic 06.jpg
    231.9 KB · Views: 29
  • gokart pic 05.jpg
    gokart pic 05.jpg
    246.1 KB · Views: 30
  • gokart pic 07.jpg
    gokart pic 07.jpg
    264.4 KB · Views: 27

BeaterofAincrad

2018 Build-Off Contestant
Messages
232
Reaction score
0
Location
Vermont
This week I finally got to work on the swing arm hinge, it’s going quite smoothly. I’m working on it in my Manufacturing Tech class so I only have about an hour each day(including setup & cleanup).

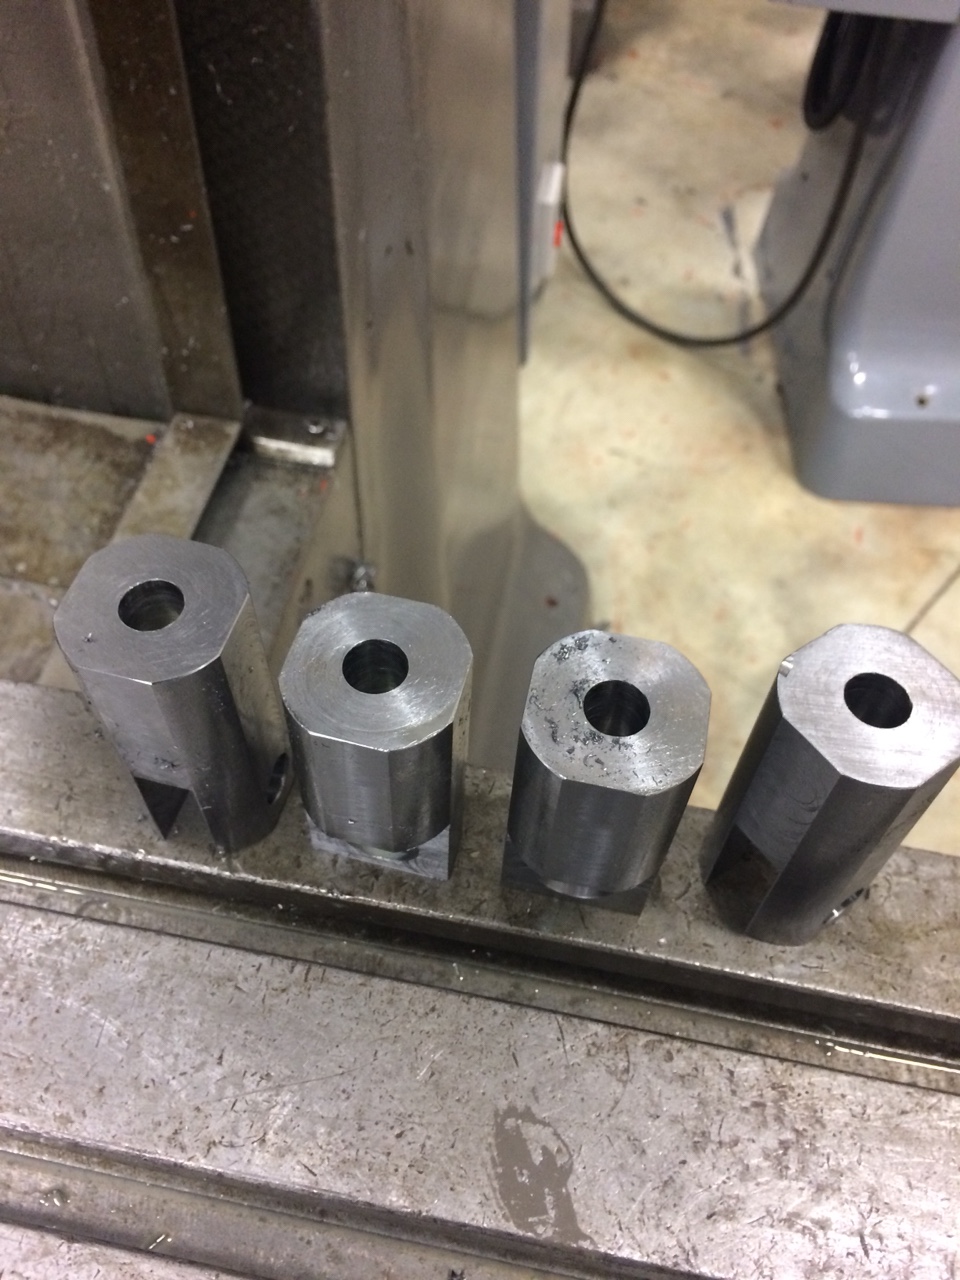
So far I’ve cut 4 pieces of 1.5” steel round stock to length in the lathe, and milled 4 flats and drilled the hole on each.

If all goes well I could be done spiral milling the hole that will slide over then be welded to the frame, cutting the slots, spiral milling(or boring) the hole for the bushing, and making the bushing by Wednesday next week.

I’ll post the blueprints later.


BeaterofAincrad

2018 Build-Off Contestant
Messages
232
Reaction score
0
Location
Vermont
2018 Manco Dingo suspension & a little extra

I forgot to mention, I got the bolt out of the carb.

Here are the prints, the brace is 4 parts, 2 pieces of square tube welded together with 2 pieces of .125x1” sheet metal welded on as brackets for the shock.

Sorry, the first one printed wrong because my baby brother tried helping and pulled it out before it was done.
 

BeaterofAincrad

2018 Build-Off Contestant
Messages
232
Reaction score
0
Location
Vermont
2018 Manco Dingo suspension & a little extra

I haven’t gotten to working on the hinges this week, my teacher is having me work on finishing up our capstone. My part of the capstone should be done either tomorrow or Thursday.

Today I picked up some materials from the pile in my class shop(I’ll post pic later, most of them were donated so there’s a bunch of odd shaped stuff, bolts, etc. we won’t even use) and am hoping to start cutting some parts tonight.

First on the agenda is finishing up fixing a weed whacker, it should take about 45min to an hour. Then I’ll focus on the kart.
 

BeaterofAincrad

2018 Build-Off Contestant
Messages
232
Reaction score
0
Location
Vermont
2018 Manco Dingo suspension & a little extra

Here’s the material pile and what little progress I made today. I bent a new/extension sprocket protector and cleaned up the straight pipe weld so that I could fit the bolts on. I’m on the fence about whether or not I should try to straighten out the pipe because I know my weld will look ugly. I’m thinking I’ll see how it sounds and then decide.

I also cut a support for the motor mount to be welded to, however I may end up using different material as I’m not sure if the square tube will be strong enough.

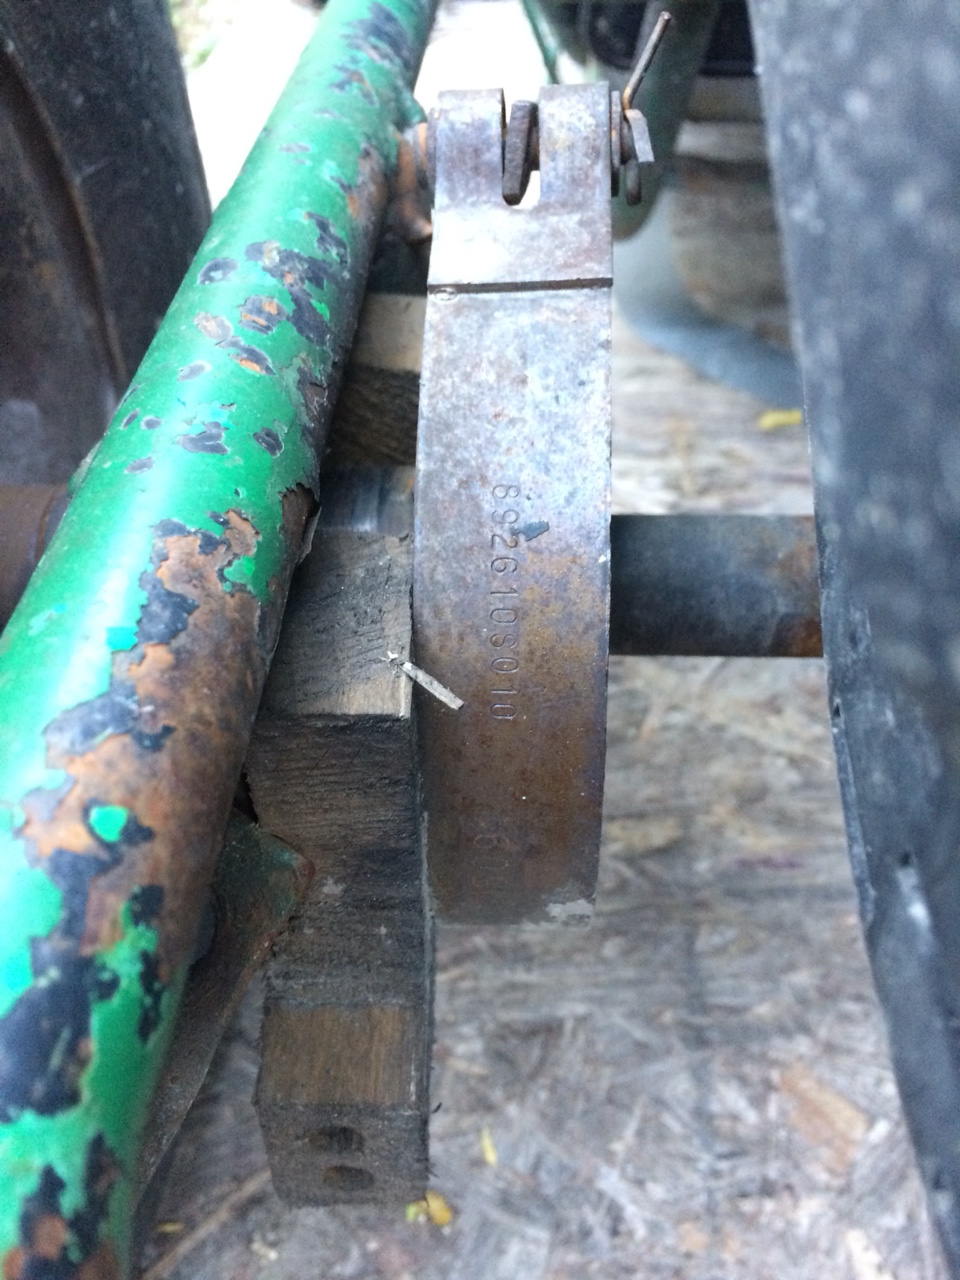
I also finally got a pic of the gas tank, last time I went to, my phone died as I went to take it. I also took a pic of what I have on there atm to stop the brake band from sliding off the drum(PO somehow tapered it). It works well and it hasn’t smelled like anything was burning.
 

BeaterofAincrad

2018 Build-Off Contestant
Messages
232
Reaction score
0
Location
Vermont
2018 Manco Dingo suspension & a little extra

Unfortunately I didn’t get to work on the parts too much this week. Wednesday my teacher had to go to a tech center to help them setup their plasma table(due to safety reasons we can’t work in the shop if the teacher isn’t there), and yesterday I had to finish up my part of our capstone. I’m considering posting the capstone so you guys aren’t like what is this he keeps talking about.

Anyways today I milled the flats on the sides of the hinge and set the machine up for drilling/boring the hinge concentric. So I can attempt to do that on Monday.

I think I should have probably designed the middle part .75” wide instead of .55” because then I could buy a bushing and it’d also be stronger. But what’s done is done and I don’t have time atm to make another one.

Next Thursday I’ve got to go down south for my sisters graduation and I won’t be back until the 27th. So that leaves 4 weeks for me to finish making the swing arm, bushing, boring(or make another hub) the disc brake, air filter adapter, and anything else I come up with. If I do have time I may go back and make another set with it .75” wide.

I have the HS40 carb coming in today and a new belt coming in on the 14th. I’m not sure if I should put the straight pipe on and the new carb and adjust them so they are ready or wait till the swing arm is done to keep the hype going.

How about you guys vote what I should do. I don’t have a YouTube so I’m not sure if I can post a vid directly from my phone camera roll or not.


BeaterofAincrad

2018 Build-Off Contestant
Messages
232
Reaction score
0
Location
Vermont
The carb came in yesterday day and I installed it. I had some random pieces of gas line laying around and made it happen somehow. I’ll probably have to change it later when I get the air filter.

Quick question, I think I have a spare(new) gas filter for a weed whacker, can I put that on the OHV tube that went into the carb or does it have to be a specific one? And should I consider that when designing the air filter adapter?

The belt came earlier than expected, I haven’t installed/opened it yet though.


BeaterofAincrad

2018 Build-Off Contestant
Messages
232
Reaction score
0
Location
Vermont
Yesterday I got the slots milled and they fit together nicely. The surface finish turned out really nice.


Today I got the pilot hole drilled and ready to be drilled to size.


I won’t be updating for the next week and a half because I’ll be in Louisiana for my sisters graduation.
 

BeaterofAincrad

2018 Build-Off Contestant
Messages
232
Reaction score
0
Location
Vermont
I managed to somehow survive the humidity down south and started working on the kart a little over the past few days.

Today I drilled the holes for the frame to slide into. I didn't have time to clean them because by the time I cleaned up my machine and got everything put away the bell had already rung. Now I just have to put a fillet/chamfer on the edges of the hinge joints to allow for clearance and then machine some bushings. I'm thinking of making some out of both brass and delrin because delrin is softer and I think it will absorb impact better but will still last for a reasonable amount of time.
IMG_9012.jpg
I also pulled the sprocket off and while doing so I found that I'll need to buy a new bearing for the axle in the near future and probably a new sprocket. The sprocket is damaged like in the img on about 10 of the 54 teeth.
IMG_9016.jpg

IMG_9017.jpg
The bearing that's on it cost something like $20(1) at Tractor Supply and I was considering adding a pillow bearing in the center to add support. As I'd like to spend as little money as possible I may end up having to bend 2 mounts out of sheet metal so I can put a pillow bearing($18(2) amazon) on each side and then put the good one in the middle.

I also found that the part of the frame that is the back of the seat broke on both sides so I'll have to weld that together somehow.
 

BeaterofAincrad

2018 Build-Off Contestant
Messages
232
Reaction score
0
Location
Vermont
Today I finally made a visible dent, though in the end it's still small.

I got together some parts, removed the pedals & cables, removed the engine, TAV, seat, top of the seat frame, and wires/kill switch, removed the shroud from the engine, worked on an idea for later if I have the time/funds, and took some measurements for the seat pan, foot pan, and adding 6" to the rear.

I wasn't kidding when I said I wanted to save money #leftovermetallicspraypaint


I was going through parts and the hydraulic cable that was on the dump pick atv should work so that will save me $10-15
 

BeaterofAincrad

2018 Build-Off Contestant
Messages
232
Reaction score
0
Location
Vermont
Sunday I picked up my other project and all my parts from my grandparents house. I thought that the rear wheels on the picked atv were different but it turns out I can use them. Unfortunately the wheel hubs are too small for me to even bore so I'll have to either switch rims(one on the kart is bent a little) or buy bigger hubs.

I also got the disc brake, I'll have to bore it and put a keyway in it.

Yesterday I finished 2 bushings and pressed them in. Today I made 8 extra bushings(9th is out of tolerance but might be able to use), found some bolts I can use on the swing arm, and scavenged some bolts for the ones that were missing on the shroud. I'm thinking about putting a grease plug(forgot it's name) on the joint if I have a tap and get to it.

After the end of this week I probably won't get to work on the kart for a while because I gotta finish up some papers and prepare for a competition the week of the 25th.

That reminds me, anyone near Louisville Kentucky?


Sent from my iPod touch using Tapatalk
 

BeaterofAincrad

2018 Build-Off Contestant
Messages
232
Reaction score
0
Location
Vermont
Welp I got back at like 1:30 am yesterday. And while I was gone my parents went to order the parts but they forgot I told them they were in a list not the cart and they didn’t want to bug me so I don’t hv any parts to work on the cart yet.

I’m going to try to go to Miles Lumber down the road and get some sand paper and scotch brite today. I got some advice for the paint from my teacher(manufacturing tech. class), he said I could do something like this since my dad has an hvlp(?) paint gun:
Chipped paint smooth over with 220-320 paper, red scotch brite larger chunks, no primer, 1 quart TSco. Tractor paint(might be Magic brand) 50/50 thinned, enamel hardener 1/2 pint., ratio measuring cup.

I’m going to have a guy call for a quick mower and lawn job in a few days so I’ll get a good $20-30 for parts from that, I’m going to prep and put rust preventative on my dads dump trailer at some point this summer, and I’m hoping to start working for my dad soon. So I’ll get some extra cash for parts and stuffs.

EDIT:
I forgot to mention, my teacher was going through some scrap and he had an old machinist vice and it was a little dinged up so he gave it to me. So now I’ve actually got a vice and it should make things easier. Before I was just using a bunch of C clamps.
 

Kansaskart

New member
Messages
452
Reaction score
0
Looking good. Also, if your humidity is worse than it is here in eastern Kansas I can't imagine. Totally disgusting here right now makes things very frustrating!
 

BeaterofAincrad

2018 Build-Off Contestant
Messages
232
Reaction score
0
Location
Vermont
I live in VT and it has been pretty hot and humid the past few days however I still wear pants and short sleeves with a fan going to help with the heat and blow the mosquitos away, it works pretty well.

Quick question, should I spend $40 on a new axle or continue using this one?

I’m already spending $40 on new wheel hubs plus all the other parts which brings it to around $100.

I’ll post an update with pictures tomorrow since it’ll look like more was completed once I’m done cleaning up and welding a few things.
 
Status
Not open for further replies.
Top