2014 - Black 3 Car 2014 race microd

Status
Not open for further replies.

BigDuke6

New member
Messages
76
Reaction score
0
I did miss read the instructions, as for date and password.
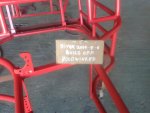
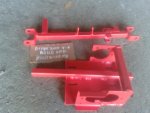
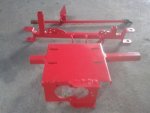
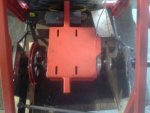
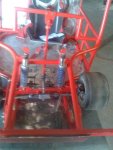
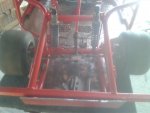
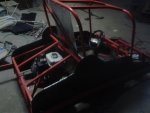
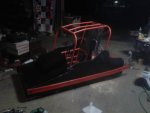
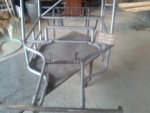
I finished the welding of square tube to a rescued tubular roll cage today and threw the first coat of paint on it. I'll be there doing more tomorrow and repost proper entry photos.
You will have to decide if I'm half way done or not.
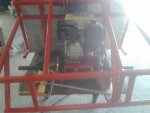
As my title says this car will race in a specific class, with a tech sheet check before we are allowed on track. We are in MR1 class on dirt with Honda 6.5 HP rule set.

http://www.tricountymicrod.com/wp-content/uploads/2010/02/2010-Planbook.pdf

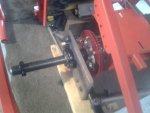
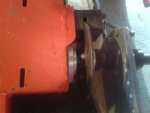
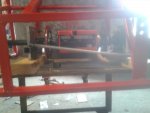
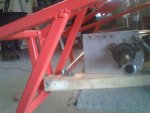
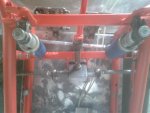
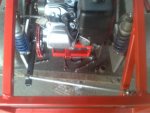
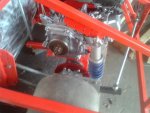
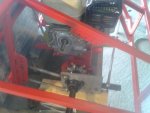
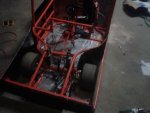
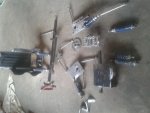
Ours will be 4 link rear suspension, coil over clicker shocks, live rear axle, solid front axle fully suspended with coil over shocks.
Very few parts come from last years car. over sizing everything from axle dia. to heim joint and radius rod size. 11 tooth clutch to 58 tooth gear. hope to see 30+ mph. April 27th is first practice, May 10 is first race :smiley_omg: tick tick.
 

Attachments

  • 20140405_115759.jpg
    20140405_115759.jpg
    65.3 KB · Views: 54
  • 20140405_115828.jpg
    20140405_115828.jpg
    75 KB · Views: 41
  • 20140405_115852.jpg
    20140405_115852.jpg
    62.8 KB · Views: 40
  • 20140405_120208.jpg
    20140405_120208.jpg
    73 KB · Views: 44

Doc Sprocket

*********
Messages
15,677
Reaction score
10
Location
Ontario, Canada
I'm trying to get a feel for what you're up against, as far as qualifying under the 50% rule. It looks like you still have quite a bit ahead of you, being that this will be a suspended buggy. Perhaps by the time you post up a qualifying entry pic, I'll have it sorted out. Dang neat build though! Never heard of those!
 

BigDuke6

New member
Messages
76
Reaction score
0
Usually they are raced on pavement. We are racing on the only dirt track, Chassis rules are the same but durability is a huge
consideration. If you look close at turn 2 you see we lift the left rear, haze it. no stagger, no lead in axle, equal roll out for max straightaway speed.:auto: Can't race tanks, but that is a very ambitious build!!! I too will be throwing mine together fast, and know exactly how I want it built for adjustability. Good luck to you Felineman. :popcorn:

http://www.youtube.com/watch?v=cPyBI0UIIKk
 

BigDuke6

New member
Messages
76
Reaction score
0
Here's a proper pict for entry.
The other 3 are of motor/ brake mount,
front axle and steering column. In rule 6 of completeness of project, I could be there in days, passing the tech requirements on the link I provided will take much longer. I won't concider it "done" till it turns consistent laps under Dale's complete control.

As for the Redneck/nascar comment.

I:feedtroll:

But I will point out for the ignorant. An oval car is non symmetrical, it's dimensions, change under load. Controlling the elongation and change is the art in chassis setup. A well setup car turns left by itself, drivers turn right on straightaways, and releases tension into and through a corner.:iagree: ?
 

Attachments

  • 20140406_124157.jpg
    20140406_124157.jpg
    77.2 KB · Views: 31
  • 20140406_124358.jpg
    20140406_124358.jpg
    73 KB · Views: 23
  • 20140406_130525.jpg
    20140406_130525.jpg
    63.5 KB · Views: 24
  • 20140406_130552.jpg
    20140406_130552.jpg
    64 KB · Views: 21

BigDuke6

New member
Messages
76
Reaction score
0
Guessing since the post is moved, I get in. Thank you. :backtotopic:

Got the floor pan in, and started on the back firewall. -N- like a rookie ran out of cutting discs. Prior to running out of discs I painted the other 3 pieces, couldn't play with them now.:oops:
The aluminum plate is 1/8" thick. Mandatory per spec "$160.00 expensive, second only to motor and shocks" or 3/4" plywood, not practical weight wise or impact resistance.

On the right side of the steering shaft above I used a 1/2" drive wobble attachment, impact grade. Removed the button and drilled through for a pin. Not sure if I'll use a pipe to connect it to the steering rack "rigid" or use a series of nuts with a socket over it flexible like a spline. This allows for chassis travel, but also allows me to move the seat from slightly left of center "dirt" to way off center "pavement"
 

Attachments

  • 20140407_171009.jpg
    20140407_171009.jpg
    84.3 KB · Views: 24
  • 20140407_170943.jpg
    20140407_170943.jpg
    63.5 KB · Views: 19

BigDuke6

New member
Messages
76
Reaction score
0
Got rained out so put fire wall on and mocked up the rear end.
1 & 1/4" high carbon steel axle, 4 premium sealed bearings, 2 different style nervo pillow blocks. The 2 outer bearings have shims from outer race to 1/2" thick aluminum plate, keeps the shock from rolling the plate into bind with axle. Motor mount bearings are free to move in their pillow blocks. The brakes need to be shimmed, rotor floats 1/8" left to right. Gear hub is my quicker than yours design, 2 gears 58 and 60, 1 will be shimmed so a split lock collar can be swapped left side to right, automatically aligning #35 chain. 1/16" float on gear hub. 2 quarter inch key ways connect inner race to inner race, all locked down by lock collars

Azusa hubs and split rims on the outside, they will determine in or out placement on the radius rods.The rear sway bar attaches left bearing block to right frame, both sides adjustable. The 1" square tube forwards of the motor plate gets an vertical, adjustable radius rod, heims on each end, it's used to level the motor, and fight rotation from braking and motor input.


https://www.youtube.com/watch?v=3akKoD6jG2E&feature=youtu.be
 

Attachments

  • a (1).jpg
    a (1).jpg
    68.2 KB · Views: 26
  • s.jpg
    s.jpg
    68.3 KB · Views: 21
  • d.jpg
    d.jpg
    66.6 KB · Views: 21
  • f.jpg
    f.jpg
    58.6 KB · Views: 21
  • g.jpg
    g.jpg
    71.2 KB · Views: 23
  • j.jpg
    j.jpg
    59.1 KB · Views: 21
  • h.jpg
    h.jpg
    66.5 KB · Views: 22

Felineman

Death by misfortune
Messages
840
Reaction score
0
Location
Muskoka Lakes,Ont
Nice progress I'm stuck till I get my engine delivered once the ground drys out so may be a month, BUT I do have a new project coming tomorrow.
 

andrewmacc

Canadian Wonderboy
Messages
66
Reaction score
0
Location
Surrey BC Canada
Very cool project. Do you have to pass inspection to meet tech guidelines? If so, before you throw any more paint at it, now would be the time to grind out suspect welds and redo them, unless the rules are pretty lax on chassis construction?
 

BigDuke6

New member
Messages
76
Reaction score
0
http://www.tricountymicrod.com/wp-content/uploads/2010/02/Tri-County_Microd_Club_Vehicle_Inspection.pdf

^Tech sheet^
They leave that to the car builder, originally microds were made of wood with a roll cage screwed/bolted to to floor.
I sanded the tubular body before painting it, checking all welds, tuned a few.
All my square welds were ground down and checked before paint.
I did screw up a few spots where welds interfered with washers/bolts on the front end assembly. easy to fix. get some more picts up this weekend. The cars in the beginning of this vid are all wooden, with no suspension. 33 was ours.

http://http://www.youtube.com/watch?v=NfonwqleUHs
 

BigDuke6

New member
Messages
76
Reaction score
0
Thrashed on it this weekend.
Motor degoverned, new linkage setup, trimmed rods in front and back.
Going to need larger rear swaybar and 4 larger rods for the front.
Wondering about the steering, I redrilled the spindles, they stay parallel straight and full left turn.
 

Attachments

  • 11.jpg
    11.jpg
    78.1 KB · Views: 37
  • 22.jpg
    22.jpg
    61.8 KB · Views: 25
  • 33.jpg
    33.jpg
    69 KB · Views: 21
  • 44.jpg
    44.jpg
    85.1 KB · Views: 18
  • 55.jpg
    55.jpg
    73.8 KB · Views: 15
  • 111.jpg
    111.jpg
    59.9 KB · Views: 17
  • 99.jpg
    99.jpg
    75 KB · Views: 27
  • 88.jpg
    88.jpg
    73.6 KB · Views: 18
  • 77.jpg
    77.jpg
    78.9 KB · Views: 22
  • 66.jpg
    66.jpg
    71.9 KB · Views: 18

BigDuke6

New member
Messages
76
Reaction score
0
10 tomorrow is first inspection and practice, ain't ready, may rain.
Body is almost done, need front inner fenders, hook up gas pedal, complete and tweek rear end, back bumper. hood is temporary got black anodized 0.040 aluminum everywhere else. kill switch header, brakes all hooked up, sounds awesome. Should be race ready by sunday night. then some upgrades after I get the setup right.
 

Attachments

  • 20140425_210308.jpg
    20140425_210308.jpg
    61.6 KB · Views: 27
  • 20140425_210334.jpg
    20140425_210334.jpg
    66.5 KB · Views: 16
  • 20140425_210401.jpg
    20140425_210401.jpg
    54.6 KB · Views: 27

BigDuke6

New member
Messages
76
Reaction score
0
Thrashin with a passion, 19 hours into it in last 2 days.Found one broke line to the brakes, better now than later. Take a shot at tech next Sat. and I'll put some video up.:wai:
 

BigDuke6

New member
Messages
76
Reaction score
0
Hit our first milestone, passed inspection. Our fastest lap was a 1/2 second off fastest car.
Handling sux, kept getting up on 2 wheels till he rolled it over. Everything held up good though so that's a plus. First race is next sat., I won't have time to touch it till friday night, sigh racing life.
:stir:
 
Status
Not open for further replies.
Top