First build, Grand Daddy

Denny

Canned Monster
Messages
8,470
Reaction score
4,705
Location
Mayberry, Indiana
Build is looking good! Darn septic! You will get it figured out. If you are planning on replacing it yourself, and have questions, I "might" have some helpful info. Mine backed up a few years ago and I replaced all the lines+added an extra branch to the leach field. This one was a beast, but did it with a garden tiller, shovel, and about 3 gallons of whiskey. Probably $600-$700 in all took a while, but saved thousands.
Must be nice living somewhere it does not freeze. In Indiana we have to go down deep to keep from freezing. Then bury it in a gravel bed.
 

TNThomas

Well-known member
Messages
386
Reaction score
369
Location
Washington
Must be nice living somewhere it does not freeze. In Indiana we have to go down deep to keep from freezing. Then bury it in a gravel bed.
Yup, its real nice for home renovations. My uncle owns a plumbing company in Alaska, and I feel like im cheating compared to what they deal with. Im about 10 miles North of Seattle. Tons of moisture off the Pacific, but mild temps. Code is 3 ft or deeper in our soil. But realistically you can't go much deeper in my area without major work as the glacial till is as little as 2.5-4ft beneath the surface. We had around 4,000ft of ice on us 16,000 years ago (last ice age). Hard as cement, and up to 30 ft thick. I had to get the pic-axe out to get the proper slope in a few spots. A weird one that can happen here is in the winter months, there is so much rain that it will sit on top of the till. Essentially an elevated water table, or sewage table depending on how the drain field is working :)
 

MTScott

Active member
Messages
146
Reaction score
128
Location
Montana
Build is looking good! Darn septic! You will get it figured out. If you are planning on replacing it yourself, and have questions, I "might" have some helpful info. Mine backed up a few years ago and I replaced all the lines+added an extra branch to the leach field. This one was a beast, but did it with a garden tiller, shovel, and about 3 gallons of whiskey. Probably $600-$700 in all took a while, but saved thousands.

I appreciate the offer... sounds like you have a bit more going on that I did, but I've been through the rounds with this one before. The tank just doesn't operate well. Put in a new pump, and also had to repair some of the exit lines, vent lines, etc... clean out the filter, unclog some stuff. Anyway, I got going. The poo is flowing well, and I never though I'd have been so excited about it.
 

MTScott

Active member
Messages
146
Reaction score
128
Location
Montana
Okay gents, I've been at it for a few weeks to get this all dialed in and rolling, and I was doing decent... lets see, what did I do.

Finished up a custom exist pipe/can install and a mount, burned in all the welds on the subframe, transmission mount and painted it the subframe. Sized and build chains (master link). I'm using a 420 chain, which seems plenty beefy enough. The 530 chains I ordered were way overkill, and heavy.

I bent hard lines for part of the brake system, and used the nylon stuff in parts where I needed a bit of flexibility, then joined them all with compression fittings which is what MCP sent with with it. I primarily used hard lines because there wasn't enough nylon line, but I suppose if I was thinking ahead far enough I could have ordered some. Bleeding the brakes turned out to be a bit frustrating, but I mostly got that figured out

I set up a bracket for the gearbox shifter, and and mounted a lever for a parking brake (not yet functional). Once I new how everything would install on the floor, I cut the corners for the floor (36x36 sheet of diamond plate aluminum from home depot). I drilled all of the wholes, cut slots, etc for the floor to fit. I did this by just installing the floor and redrilling all the wholes that are already in the frame through the aluminum, or marking where I need to cut slots. I secured the floor down with some self tapping screws which I predrilled pilot holes for.

Once I was done with everything as far as I wanted to take it, I broke it all down, then burned in all of the welds on the frame that were just tacked in... and there was plenty, and I still missed a couple, but there is plenty of metal there to secure it. I planned on painting the whole thing, but it is cold here, so I have to get the garage warm and do a little at a time, spray, exit, let it cure for a moment, then air the garage out, and start again.

The hammered finish is nice when it sprays good.... but it seems to stop spraying good when you get about halfway through a can, and it proved to be slow and tedious. I learned this on the subframe. I could have dealt with this in a vented space, but, it took too long in the garage... even with a respirator, you still breath the vapors that are flashing, and that **** can kill ya, so.... it'll be in primer until next spring. I may end up getting the rustoleum hammered in a can, and attempt to spray it with my HVLP gun... possibly the primer nozzle. We'll see, that project is in the future.

I was going to run out of krylon hammered anyway, so, I just cobbled together all the primer cans I could find and covered the frame in that for a bit of protection. This sprayed fast and I wasn't too worried about getting it perfect.

So, once all put back together, I took a short test ride, but it was snowing windy and cold, so, only to the top of my driveway and back in the garage. Didn't like the steering, not sure about the pedals.... so, adjustments to make.
 

MTScott

Active member
Messages
146
Reaction score
128
Location
Montana
With the goofy way I set up the steering rack and rods, the boots actually caused bind before full lock, and also shortened where the tie rods mount to the steering arm (I had drilled a couple options in the temporary bracket I made to accommodate ackermans angle). So I took off the steering rack, and cut the boots down a bit to see if that would help, then reinstalled the rods closer to the kingpins on the steering arms. Slipping the steering wheel rod back on the rack to test changes... it all seemed to help, so time for a little test ride.

It is late, dark, and snowy again.... but my little drive up to the driveway and back proved that my changes help, I felt pretty good about it, so time to move on. I'm bringing it back down the driveway, and about 20 feet from the garage, I feel a little pop, and all of a sudden no control of the steering. The tires go right, where there is a drop off that goes straight down about 45*, or at least 30* anyway. It is steep, lots of rocks, then runs into a smaller road going down to my pasture. the total elevation drop is over 15 feet and it happens pretty quick.

The brakes also were not working well - A, it turns out one of my compression fittings had a leak, B with the way the pedals are a set up, it is actually kind of hard to tell the difference between the gas and the throttle (I'll address that later). So, rather than panic even more, I hung on, said "oh ****" and road it out. After some smashing, bouncing and cussing, this thing stayed upright and settled in my pasture. One of the few advantages of a swingarm style subframe, it helps keep these things from rolling.

There was damage though. I bent the lower A-arm, and tie rod. That actually seemed about it, surprisingly. The frame itself seemed rock solid, so I was happy about that. The way the A-arm bent is not surprising, as the shock mount location has no support other than where it is welded at the end of the arm near the kingpin.

So, I threw a bit of a toddler fit for my family to see.... I was pretty upset about smashing this thing up after not having more than 300 feet of mileage on it, and pretty mad at myself for the carelessness that caused it.

Remember when I was adjusting my steering rods? You know that little blot that clamps the steering wheel rod to the splines? Yeah.... it is pretty important. It was too late, I was too tired, and too eager to see if my changes worked. Make sure your steering linkage and brakes are rock solid folks before you test things out. I know that is obvious, but when you're short on time and tired it is easy to make mistakes.

I'm just glad this happened to me before I let my son make a test ride.
 

MTScott

Active member
Messages
146
Reaction score
128
Location
Montana
Okay, some pictures.

The steering arm that took the worse beating:
1202221401b_copy_873x1164.jpg

1202221401c_copy_873x1164.jpg

The other side is bent too, but not near as bad.

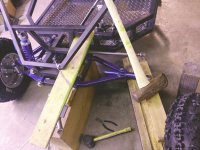
I don't have a before picture of the A-arm, but this is how I straightened it. I installed it upside down, then supported each end with blocks, and tried to reverse how the shock bent it. The leg that the shock mounts too was forced downward, putting a bend right where the A-arms legs mount to the center for the heim joints. I zipped tied a 2x4 up to the frame (it was vertical before this picutre), and took some hits with the splitting mall, and it took some big swings, like I'm trying to split knotted up bull pine, but I did eventually get it pretty close.
1201221816_copy_1164x873.jpg
 

MTScott

Active member
Messages
146
Reaction score
128
Location
Montana
Here is a short overview video.... a bit off the cuff, but you'll get a quick go around of the kart.


Denny

Canned Monster
Messages
8,470
Reaction score
4,705
Location
Mayberry, Indiana
The stupid blots! You got to put them all back in! May I make one suggestion? Get those brake lines from under the floor pan to above it. All it would take is one branch or stick at speed to end them! A big rock or curb would do it too!! Those nylon lines would not stand a chance and you’d never know it until too late. Off roading is fun ain’t it?
 

MTScott

Active member
Messages
146
Reaction score
128
Location
Montana
The stupid blots! You got to put them all back in! May I make one suggestion? Get those brake lines from under the floor pan to above it. All it would take is one branch or stick at speed to end them! A big rock or curb would do it too!! Those nylon lines would not stand a chance and you’d never know it until too late. Off roading is fun ain’t it?

Sound advice. They are only nylon until they go under the floor, then transition to hard line, then back to nylon, then hard line again before finally making it to the caliper. I'll make an overview of it soon, but I still do question if I should have run them on top. They are somewhat protected. I'm more likely to ad something underneath to protect them more.
 

MTScott

Active member
Messages
146
Reaction score
128
Location
Montana
Well I have many more updates to put out here for you guys.... it just takes some time to put together the pics and videos while you're scrambling to actually do the work and still go to all the family holiday events.

...I have made some improvements and discoveries on the transmission mount. One of my main issues is the chain was slipping after several readjustments. Despite efforts to use heavy steel for a mount, I think it still moves and flexes a bit under load. So, first step was to create an additional support on the opposite side of the transmission on the input shaft. I figure if nothing else it'll support the internal bearings of the transmission as well. I'm still working on that, but I also decided to switch up to an 11 tooth sprocket (from a 10) on the output shaft of the gearbox, and a 54 tooth on the axle (from a 40).

There are two expected benefits from the sprocket swap:
1. I like more teeth on the gearbox sprocket - 10 just feels wrong. I've never liked having less than 13 teeth on the primary sprocket on any of my motorbikes. Maybe that shouldn't be a real concern, but to me it means more chain engagement, less wear, and less chance of the chain slipping (or so I've convinced myself).

2. The 54 tooth sprocket seemed the most common and cheapest option in a steel sprocket. For whatever reason, there doesn't seem to be much available between 40 and 54 in steel. The 11:54 combo is about a 1:5 ratio vs 1:4 with the 11:40 combo and I think that may work better for now. We're also probably going to run tire chains most of the winter, and might need the lower ratio and wheel speed.

I was reminded that I have to uninstall the entire axle and remove the wheel hub to get to the sprocket, so, a split sprocket starts sounding appealing, but I can only seem to find them in aluminum, which i'm not a fan of (especially in these narrow sprockets), but I may have to consider it.

....speaking of taking the whole axle apart, I discovered something while taking the wheel hub off - the key was missing. The hub seemed to have locked itself in place by spinning and galling up the aluminum enough to bind. Then I come to the sprocket hub, same thing... i can't quite tell yet, but I think the other wheel hub and the brake hub are in the same boat. Possibly every single key is missing. I'm not sure how this drove at all, but I think they all bound themselves the same way - by chewing up the aluminum enough to bind.

So maybe I did something wrong?? I clamped down the hubs with the allen screw as much as was reasonable. I naively though that was enough. There were no key set screws on any of the hubs.

So, I've ordered up more of the aluminum "keyed" two piece clamp/collars for a 1.25" axle: 1-1/4'' Aluminum Axle Lock Collar

My plan is to install two of these on either side of each hub, and install keys all the way through. These collars don't have a key set screw either... I'm not sure if their design makes the key groove shallow enough to clamp the key in place or not. I'll so some testing, but I may end up drilling and taping them to add a set screw.

Anyway, I'm hoping the axle isn't too screwed by all of this. I'll see if everything still spins true after I reinstall it all. I'll need to take some emory cloth to it to knock down the burrs. It was a bugger getting the wheel hub off.
 
Last edited:

Denny

Canned Monster
Messages
8,470
Reaction score
4,705
Location
Mayberry, Indiana
One reason to hate aluminum axles. But I know you will make it through. I think a 6:1 ratio would be better but it’s your call. Good idea to support the trans shaft though.
 

MTScott

Active member
Messages
146
Reaction score
128
Location
Montana
One reason to hate aluminum axles. But I know you will make it through. I think a 6:1 ratio would be better but it’s your call. Good idea to support the trans shaft though.

The sprocket hub, as one might expect took the worst of it.... I couldn't actually remove it (It was very tight brand new, even without the bolt clamped). I just did enough to position it. Tried to tap it into a "trued" position, but it still has a bit of throw in it. Everything else seems okay.

I bought aluminum two piece clamps from OMB (end up less than 5 bucks a piece), then drilled and tapped the key way for 3/16 set screws. Lock-tighted everything, and let plenty of it leak down into the keys. I think they're all solid now. I took my time on it. Given the issue on the sprocket hub, I think both the hub and axle are hosed in that spot, so a chromoly axle is probably in the future, but for now it works. I have research to do there. I'm not sure how well aluminum hubs will fair on a steel axle (galvanic corrosion and such).

The transmission itself has a 1.3 ratio, so in the end the math comes out to about a 6.5 ratio. It is a bit slow now, but, that's okay. Less stress on the transmission.

After clearing up the axle issues, I built some adjustable mounts to support a bearing on the input shaft of the transmission. this helped make it all very solid, so, no movement there, and with the addition of the 11 tooth drive sprocket, I think all slipping issues have been eliminated.

I was able to adjust the idle down to about 1200, it didn't seem to want to go lower than that without stalling, but it helped keep the belt from wanting to grab (in stock trim it wanted to idle around 1500-1700 warmed up), and we can actually shift into neutral at idle. If I can find the mixture, or air bleed, whichever it has I'll see if I can get it a bit lower, but it might be fine as is.

I've decided I hate the governor. Besides the lowered RPMs, the throttle feel and response is just terrible. So, my next engine upgrade will probably be governor removal, and I think I'll add a billet flywheel at the same time, along with heavier valve springs.

All that said, it is in fairly good operation. There are more things to do and change, but for now I'm going to let the kids have fun on it until I tear into it again.

When I have a chance to catch my breath, I'll try to put some pics/vids together of all of this.
 

MTScott

Active member
Messages
146
Reaction score
128
Location
Montana
Looks like a friggin blast! So cool! Literally! When can I get a set of your plans?

Oh man... I'm not sure when I'll have the tenacity to actually put plans together... and the go kart is ever changing

While I've complained about some of the stuff in the grand daddy plans, my hat is off to anyone who can put forth the effort to create plans like that.
 

Denny

Canned Monster
Messages
8,470
Reaction score
4,705
Location
Mayberry, Indiana
Oh man... I'm not sure when I'll have the tenacity to actually put plans together... and the go kart is ever changing

While I've complained about some of the stuff in the grand daddy plans, my hat is off to anyone who can put forth the effort to create plans like that.
I’d buy the plans, as I have no problem paying for them. I just need paper copies not digital. I only have a dumb phone! Heck I’ll even pay for the paper!
 

MTScott

Active member
Messages
146
Reaction score
128
Location
Montana
So, how much has this build cost? I'm just a teen and trying to build my second gocart, off of that plan...
Well, I would guess in into it 2500-3000, but it could be done cheaper... I bought nice wheels than I needed too, and sombre fasteners and steel I didn't end up using. It could penaltybe done for 2k, but I wouldn't count on any less. Call your local steel supplier and get a quote on the steel, source the engine, then the wheels and tires, steering wheel, etc.... Build it out on paper first to get a real idea of cost
 

BaconBitRacing

Well-known member
Messages
2,180
Reaction score
1,296
Location
N.C.
Well, I would guess in into it 2500-3000, but it could be done cheaper... I bought nice wheels than I needed too, and sombre fasteners and steel I didn't end up using. It could penaltybe done for 2k, but I wouldn't count on any less. Call your local steel supplier and get a quote on the steel, source the engine, then the wheels and tires, steering wheel, etc.... Build it out on paper first to get a real idea of cost
Great advice, you hit the nail on the head. Whenever someone asks, I always say planning is the best way to save money and time, not shortcuts or low quality parts.
 
Top