Grand Daddyish build

TNThomas

Well-known member
Messages
384
Reaction score
368
Location
Washington
Looks good! I just hope you can get it to steer.
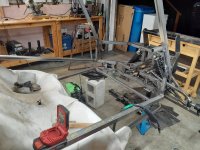
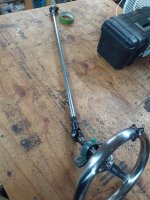
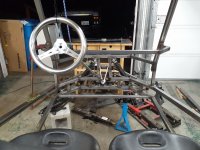
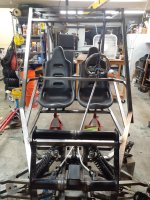
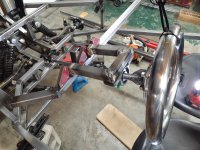
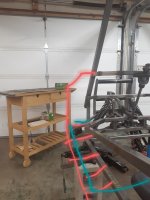
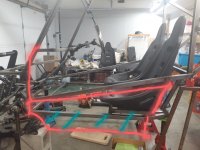
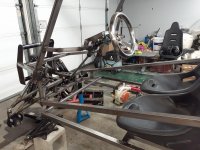
Me too! Worst case, Ill chop off the rear axle, and salvage the parts for a different build. Im hopeing the lengthened frame from front to back helps with the turning. The front tire width/stance is a about 4" wider than the rear, so that may help as well.
 

redflash

Well-known member
Messages
650
Reaction score
619
I did the Mazda Miata diff on my arachnid. You tube has a great video on how to build a miata diff for a go kart. You can take it out of its factory housing and insert all the necessary gearing into a 4 inch tube. Remove the ring gear and replace it with a drive sprocket. works great. and looks very cool !

Da Redflash
 

TNThomas

Well-known member
Messages
384
Reaction score
368
Location
Washington
I did the Mazda Miata diff on my arachnid. You tube has a great video on how to build a miata diff for a go kart. You can take it out of its factory housing and insert all the necessary gearing into a 4 inch tube. Remove the ring gear and replace it with a drive sprocket. works great. and looks very cool !

Da Redflash
Ah, thanks! That would solve my problem. I am not looking forward to building it, but that would be the right choice. Two seperate diffs, one for each rear axle. Did you use a solid steel axle on either side of the diff, and rely soley on the standard "sypidercarts" suspension setup? Or did you do A-arms in the back too? Could you possibly send me a photo of your setup? That would be very helpful! I am guessing people mostly use Miata diffs due to the light weight, lower cost, and availability right? Or is there some other perk they offer? Thanks for any extra info
 

TNThomas

Well-known member
Messages
384
Reaction score
368
Location
Washington
I did the Mazda Miata diff on my arachnid. You tube has a great video on how to build a miata diff for a go kart. You can take it out of its factory housing and insert all the necessary gearing into a 4 inch tube. Remove the ring gear and replace it with a drive sprocket. works great. and looks very cool !

Da Redflash
Ah, never mind, I found your posts with photos (this one Arachnid). Thats a clean little setup for the rear diff! How much did that cost you if you don't mind me asking? What size rear axle is that as well? That's definitely what I should do, It doesn't look too terribly complicated either! I literally go to bed thinking, I have to build this, but this thing is going to suck at turning sharp! Haha. That would work with how I am planning on splitting the power between the two axles too, big thanks!
 
Last edited:

redflash

Well-known member
Messages
650
Reaction score
619
I believe between the ebay diff and all the associated pieces, it was not much over $100...I'm sure there are better ways of mounting the axles.
I stayed with the arachnid rear suspension ( no rear A arms), and did not use the miata swing arm system. 1 inch solid axle.
Check out the you tube guy, just google miata differential for go kart......and you should find him. There are two different diff's. One is a little smaller, than the other. that relates to the miata motor size back then. You may be able to get it some cheaper at a U PULL IT junk yard.

Da Redflash
 

TNThomas

Well-known member
Messages
384
Reaction score
368
Location
Washington
I believe between the ebay diff and all the associated pieces, it was not much over $100...I'm sure there are better ways of mounting the axles.
I stayed with the arachnid rear suspension ( no rear A arms), and did not use the miata swing arm system. 1 inch solid axle.
Check out the you tube guy, just google miata differential for go kart......and you should find him. There are two different diff's. One is a little smaller, than the other. that relates to the miata motor size back then. You may be able to get it some cheaper at a U PULL IT junk yard.

Da Redflash
Oh man, you are my hero right now! Much appreciated!
 

TNThomas

Well-known member
Messages
384
Reaction score
368
Location
Washington
Trying to follow the daily minimum of 1 cut and 1 weld per day. Currently working on a support bar that will suppert the weight of the steering wheel. Secondary purpose is for a basic dashboard. Two 3/4" pillow block bearings will be used for the steering, in addition to two weld on knuckles. Pillow blocks are a lityle overkill here, but should help keep everything smooth.
Lower knuckle has a spline to pair up with the rack and pinion.
 

Attachments

  • 20220928_231018.jpg
    20220928_231018.jpg
    2.8 MB · Views: 10
  • 20220928_230818.jpg
    20220928_230818.jpg
    2 MB · Views: 10

TNThomas

Well-known member
Messages
384
Reaction score
368
Location
Washington
I always have a few "Irons in the fire," I am also currently teaching myself to hand cast lead bullets (with molds), powdercoating (acts as a lubricant), and how to reload in general. Here is a my first round for the big ol' Ruger 480.
 

Attachments

  • 20220926_221413.jpg
    20220926_221413.jpg
    3.3 MB · Views: 8
  • Screenshot_20220731-235759_Gallery.jpg
    Screenshot_20220731-235759_Gallery.jpg
    434 KB · Views: 8

TNThomas

Well-known member
Messages
384
Reaction score
368
Location
Washington
Does the powder coating leave a buildup in the barrel?
Negative, so long as the projectiles pass the "smash test." After powdercoating, grab one, smash it with a hammer. If the powdercoat still sticks, your good to go. If it flakes off, then remelt or recoat and try again. Running naked lead rounds down the barrel is the big issue, hence the term "barrel leading." The old school lubricant is basically a wax coating, but the pro of PC is that it can be faster, last longer, it covers the whole projectile, reduces lead exposure, looks cool, and actually helps stabilize softer lead alloys allowing for higher velocity reloads. An interesting note is that cast bullets are typically oversized by 0.002" larger than the barrel. Basically squeezing it in. Additional or thick powder coatings can be used as a tool to "widen" a bullet if needed. It's about 0.001" or 0.002" per coat. Those Ruger 480 rds are about $3.50-$4.00 per, but I can churn them out for about 30 cents per once I have the brass. Pretty dang cool if your into old guns too as you can tailer the cast bullet to your barrel. Abused WW2 rifles can especially benefit from this (think .303 British), just measure the bore dia, and cast that baby big.
 
Last edited:

TNThomas

Well-known member
Messages
384
Reaction score
368
Location
Washington
3 cuts, 3 welds today. Got the main steering support bar/dashboard/grab handle installed. Steering wheel is very close to its final pisition. Ill have a think tomorrow on final brackets to mount the pillow blocks, but I think ill be able to get the lower pillow block on tomorrow. Feeling a push to get this baby out. Also, im definitely clear coating the metal, no colored paint. Im digging the all steel/rough look, and going to run with it.
 

Attachments

  • 20220929_215127.jpg
    20220929_215127.jpg
    3.1 MB · Views: 13
  • 20220929_215139.jpg
    20220929_215139.jpg
    2.7 MB · Views: 13
  • 20220929_215212.jpg
    20220929_215212.jpg
    1.8 MB · Views: 12

TNThomas

Well-known member
Messages
384
Reaction score
368
Location
Washington
This cold cut chop saw has been awesome. I should have bought it out of the gate, but glad I have it now. Fantastic tool. At the start I was using the Portable band saw for the majority if my cuts. I still use it however, just not as much.
 

Attachments

  • 20220929_223835.jpg
    20220929_223835.jpg
    2.8 MB · Views: 7

TNThomas

Well-known member
Messages
384
Reaction score
368
Location
Washington
I did the Mazda Miata diff on my arachnid. You tube has a great video on how to build a miata diff for a go kart. You can take it out of its factory housing and insert all the necessary gearing into a 4 inch tube. Remove the ring gear and replace it with a drive sprocket. works great. and looks very cool !

Da Redflash

Thanks for the advice, I was able to find two used Miata diffs for $25 each! They are the slightly bigger ones (1994-2005), but should work great. I found that video as well, very imformative:

I might reach out with a few questions once I have them in hand @redflash . Specifically surrounding the splined output shaft connections to the axle. It looks like you created your own mounting plate to bolt up to the miata output shaft plate. And I like how many Zirc fittings your rig has. Excited to have these! Stay tuned
 
Last edited:

TNThomas

Well-known member
Messages
384
Reaction score
368
Location
Washington
-Still need to weld the bracket to the support bar, and the bearing to the bracket.
-I have found bottle jacks, car jacks, and vices to be helpful for working out waros in 90deg angles. The basicall "fall in" once the inside welds happen.
-New 240v 50amp outlet right at my welding spot. Will double as an electric car charger once our we go that route.
-I'll get some bracing in later on for the support bar.
-I'll also put some sort of steel down to make a sort of dash on those bars
-I basically made everything to maximize leg room
-The top of the bracket will be a good spot to mount electrical stuff later on.
 

Attachments

  • 20221012_230616.jpg
    20221012_230616.jpg
    3 MB · Views: 14
  • 20221012_230515.jpg
    20221012_230515.jpg
    2.8 MB · Views: 16
  • 20221012_230413.jpg
    20221012_230413.jpg
    4.1 MB · Views: 14
  • 20221012_230340.jpg
    20221012_230340.jpg
    2.9 MB · Views: 15
  • 20221012_225524.jpg
    20221012_225524.jpg
    2.6 MB · Views: 14
  • 20221012_225312.jpg
    20221012_225312.jpg
    1.8 MB · Views: 12
  • 20221013_001446.jpg
    20221013_001446.jpg
    1.5 MB · Views: 12
  • 20221013_001347.jpg
    20221013_001347.jpg
    2.6 MB · Views: 14

TNThomas

Well-known member
Messages
384
Reaction score
368
Location
Washington
If I have time after finishing the back, I may put side baskets on both sides of the lower frame. Similar to how the Chenworth buggy is set up from earlier pics. Would double as a mudflap mount, and structural support for the roll cage.
 

Attachments

  • 20221012_235308.jpg
    20221012_235308.jpg
    2.4 MB · Views: 5
  • 20221012_235641.jpg
    20221012_235641.jpg
    2.4 MB · Views: 5

TNThomas

Well-known member
Messages
384
Reaction score
368
Location
Washington
A few updates:
-Got the steering support welded on.
-I got the 2 diffs in, I also bought the 4 splined shafts that the axles mount to. Photos to come. Great deal on the diffs, these are the "bigger" version. $25 per pre-shipping.
 

Attachments

  • 20221018_080449.jpg
    20221018_080449.jpg
    3.1 MB · Views: 15
  • 20221017_000007.jpg
    20221017_000007.jpg
    3.2 MB · Views: 14

TNThomas

Well-known member
Messages
384
Reaction score
368
Location
Washington
Cool! Where were you able to pick those up from?
Midwest Miata. They seem to be a miata dealership focused on parts for racing miatas. Cheaper than ebay. These were being sold essentially to the "drifters" to weld up to turn their miata into live axles. Really good steel, and super solid.
 

Attachments

  • 20221018_234621.jpg
    20221018_234621.jpg
    4.6 MB · Views: 10
  • 20221018_234614.jpg
    20221018_234614.jpg
    4.9 MB · Views: 10

TNThomas

Well-known member
Messages
384
Reaction score
368
Location
Washington
Friday night Tie Rod and Bourbon parts order. The 3/8-24 threads for the stock rack and pinion are too small/weak, so im going to drill and tap them to 1/2-20. McMaster Carr, what a cool website! First order with them.
 

Attachments

  • 20221021_230242.jpg
    20221021_230242.jpg
    3.2 MB · Views: 11
  • Screenshot_20221022-003852_Chrome.jpg
    Screenshot_20221022-003852_Chrome.jpg
    203.3 KB · Views: 11
Top