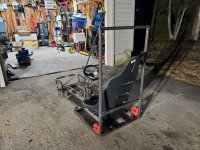
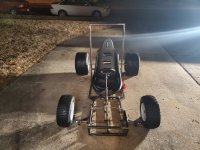
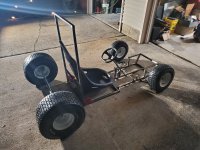
Full Suspension Big Block Mini-Buggy Build

SquidBonez

Active member
Messages
502
Reaction score
114
Location
New Jersey, USA
Good call on the quick-release for the steering wheel, I've got 3 of that type. Slips right on without any difficult lining up like another one I have with a single point that has to line up. You may find when it's finished that you want to get a larger diameter steering wheel though. That 10 degrees of caster will straighten you out at speed very well, but may make it a bear to turn with a little 10" steering wheel.
I could always see if they sell another larger wheel with the same (or similar enough to drill out, which is what I had to do) bolt pattern. Now with the double a-arm setup I can adjust caster where as before it was fixed. In fact, I'll be able to adjust camber, caster, and obviously toe.
 

SquidBonez

Active member
Messages
502
Reaction score
114
Location
New Jersey, USA
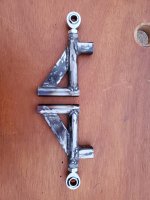
Got the beginnings of the bottom arms done. I still have to add bracing obviously and a place to mount the shocks. I also decided to go with round tubing rather than square. For the bracing I'm going to use 1/4" thick flat bar instead of tube. This whole assembly will look cleaner and be lighter than my single a-arm design.
20220116_182024.jpg
I was curious how much travel I was going to be able to get out of such short arms before the heim joints reached their limits. Before I was using cone spacers as a way to get more throw out of the heims and I managed 4.5" of travel before they hit their limit. Swapped out cone spacers for some regular spacers and managed 5.25" of travel. This was a surprising amount of difference for just swapping spacers. My concern was that the heim joints were going to hit their limit before the shocks bottomed out (I can only assume this would be terrible for the heims) but it looks like I'll probably be fine if I ditch the cone spacers. The shocks have a little under 2.5" of travel and I'll be mounting them relatively close to the wheel, so I'm estimating about 4" of travel at the wheel once it's all put together. Should be enough to smooth things out and hit some small jumps.
 

SquidBonez

Active member
Messages
502
Reaction score
114
Location
New Jersey, USA
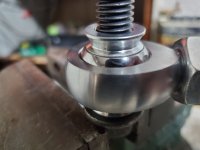
Did some more research on heim joints and picked up a set of high misalignment spacers. These spacers actually reduce my 5/8" heim joints down to 1/2". This reduction in bolt size allows the heims to articulate more.
20220121_144303.jpg
Compared to using just 5/8" spacers, I went up from 5.25" of travel to 6.5" of travel before the heims maxed out. My final suspension travel (after I attach the shocks) number will likely be unchanged but these misalignment spacers ensure that the limiting factor is in fact the shocks - not the heims.
 

madprofessor

"Loose Cannon Creations"
Messages
2,899
Reaction score
888
Location
Jacksonville, Florida
these misalignment spacers ensure that the limiting factor is in fact the shocks - not the heims.
Bravo, Squid. Far too many people allow the mechanical limits of a frame to be their bumpstops, and dat ain't rite.
Not necessarily good to have shocks as a bumpstop either, but some have them built in for that very usage, which is very efficient. Here's an example of that, the ones I put on the front of my monstrosity..............
Amazon.com: Monroe MA775 Max-Air Adjust Shock Absorber : Automotive
 

Attachments

  • IMG_20210710_163030.jpg
    IMG_20210710_163030.jpg
    2.8 MB · Views: 12

TNThomas

Well-known member
Messages
382
Reaction score
361
Location
Washington
Got the beginnings of the bottom arms done. I still have to add bracing obviously and a place to mount the shocks. I also decided to go with round tubing rather than square. For the bracing I'm going to use 1/4" thick flat bar instead of tube. This whole assembly will look cleaner and be lighter than my single a-arm design.
View attachment 131134
I was curious how much travel I was going to be able to get out of such short arms before the heim joints reached their limits. Before I was using cone spacers as a way to get more throw out of the heims and I managed 4.5" of travel before they hit their limit. Swapped out cone spacers for some regular spacers and managed 5.25" of travel. This was a surprising amount of difference for just swapping spacers. My concern was that the heim joints were going to hit their limit before the shocks bottomed out (I can only assume this would be terrible for the heims) but it looks like I'll probably be fine if I ditch the cone spacers. The shocks have a little under 2.5" of travel and I'll be mounting them relatively close to the wheel, so I'm estimating about 4" of travel at the wheel once it's all put together. Should be enough to smooth things out and hit some small jumps.
"Cone spacers" didn't even know these existed, and this is an exact issue I needed to solve in a few weeks. Thanks for the level of detail!
 

madprofessor

"Loose Cannon Creations"
Messages
2,899
Reaction score
888
Location
Jacksonville, Florida
"Cone spacers" didn't even know these existed, and this is an exact issue I needed to solve in a few weeks. Thanks for the level of detail!
BMI has some 8mm Full Range of Motion washers for extra range of the joints, but only in that size. I was using 5/16" bolts on 3/8" rod ends with those and was never happy with it............Full Range of Motion Washers for 8mm Tie Rod End | FRM-8 | FRM-8_Steel | BMI Karts And Parts
Found 3/8" cone washers at NAPA, tried those out with correct 3/8" bolts, and got zero extra motion from them, the only change was that they acted like a short stack of washers.
Click enlargement on pic below of previous front end setup (R.&P., now cut off and remade as pitman arm setup) to see FRoM washers in action.
 

Attachments

  • 100_0168.JPG
    100_0168.JPG
    2.6 MB · Views: 8

SquidBonez

Active member
Messages
502
Reaction score
114
Location
New Jersey, USA
Got the bottom arms almost completely done. Just have to add the shock mounts to the piece of square tubing when I'm ready.
20220124_172044.jpg
I think they turned out pretty well. Working with round tubing is a bit more tricky. If I did them again I would probably just use square again. They're also a decent bit lighter than my single a-arm design. The 1/4" flat bar adds a ton of strength too. I also want to mention that I'm very impressed with this little harbor freight flux core welder. This thing is rated for 3/16" steel max and welds 1/4" no problem. Not bad for $80 used.
 

SquidBonez

Active member
Messages
502
Reaction score
114
Location
New Jersey, USA
Sorry for the inactivity lately, I've been a bit busy the last few weeks. I did manage to get a little bit of fabrication and a whole lot of mocking up done today.
20220208_175631.jpg
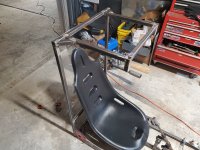
I welded in the bar that the engine mount will attach to. It just barely clears the back of the seat which was intentional.
20220208_175713.jpg
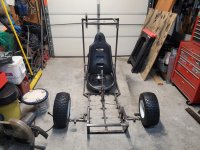
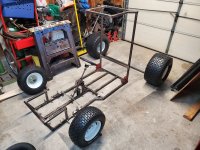
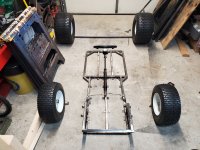
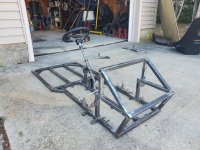
Also did another mock up to get a basic idea of the footprint on the buggy. I'm expecting a 58" wheelbase and a max width of 50" - both measurements of which are within my ideal parameters.
20220208_181752.jpg
20220208_182119.jpg
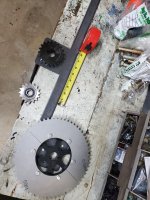
I also did a very rough mock up of my rear swingarm. The black 20 tooth sprocket is on the jackshaft which also acts as the suspension pivot. The silver 14 tooth with the bearing is an idler sprocket; I have to work out a way to use it as a chain tensioner. Finally the 60 tooth sprocket represents the axle. The end of the tape measure is where a support bar will connect both pieces of the swingarm as well as provide a place to mount the shocks.
20220208_191552.jpg
I also still need to figure out a way to raise the engine plate a bit more. The way I have it set now will mean that under full bump, the rear axle will be just 2" away from the bottom of the frame. While this technically works, I'd much rather more wiggle room just to be safe.
 

SquidBonez

Active member
Messages
502
Reaction score
114
Location
New Jersey, USA
It has a roof now!
20220215_202502.jpg
20220215_193017.jpg
I have plenty of headroom even with a helmet. The small pieces of square tubing towards the end of the roof that are pointed down are where the bars that finish the cage are going to attach to. And don't worry, I have plenty of room between them and my head. I'm probably going to round them off or cut them short after I finish the cage anyway.
 

SquidBonez

Active member
Messages
502
Reaction score
114
Location
New Jersey, USA
Been busy working on a homemade art table for my girlfriend so the buggy took a back seat for the past 2 weeks. Finally got back to it today after finishing the table. I went back to work on the front suspension.
20220227_151121.jpg
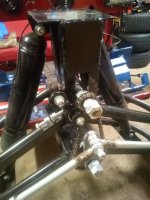
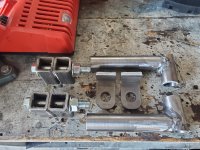
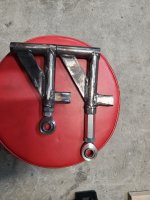
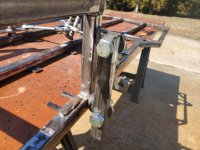
The square tubing with the bolts through them are going to be the shock mounts. The two bent tabs are actually a rear suspension pivot off of a Yerf Dog that I cut in half to act as a mount for the top A-"arms" (if you can even call them that) which are the round tubes welded in an L shape. The upper arms are a lot simpler than the bottom because they aren't going to have any load on them. That's why I can get away with a single tab for each one rather than having one on each side of the arm (like the bottom arms are). I like this design better than the single a-arms because I can tune them way more and it gets rid of the camber gain under compression as well as reduce bump steer.
 

SquidBonez

Active member
Messages
502
Reaction score
114
Location
New Jersey, USA
Been toying with the idea of widening the buggy from 50" to 60" and increasing the wheelbase from 58" to 60", that way it will be as wide as it is long. Not only will this make it more stable but will increase suspension travel (by about 1" front and rear) but will also allow me to fit larger shocks for even more travel. Shouldn't add much weight either. Most of my riding is done in open fields so the 50" width isn't a requirement. This machine was originally inspired by the old FL250 but is now more similar to an FL350 in both size and the fact that it is full suspension. Pictures of the new width mocked up below:
20220301_181702.jpg
20220301_175637.jpg
Do you think I should go through with it or should I keep it at 50"? My main concern is that it will be less prone to drifting if I widen it because...well, who doesn't love drifting?
 

SquidBonez

Active member
Messages
502
Reaction score
114
Location
New Jersey, USA
Since I've decided to go 60" wide rather than 50", that allows me to make the a-arms longer. I didn't feel like making a third set, so instead I did a quick and dirty way. The connector nut is going to get welded to the end of the a-arm. I just cut the threads off of a grade 8 bolt and threaded the nut into the a-arm. I'll probably build a new proper set of a-arms (even longer than these) when I eventually upgrade to ATV shocks or if these break, but these should do for now. I'm looking at a little over 5" of wheel travel on the front which is pretty good.
20220310_183239.jpg
 
Last edited:

SquidBonez

Active member
Messages
502
Reaction score
114
Location
New Jersey, USA
Nice to see somebody besides myself also using allthread couplings on a gokart. So many folks don't think of it.
I work in the HVAC buisness and we occasionally use these to hang furnaces in attics or shops. You'd be surprised of the amount of HVAC-related parts are being used in the creation of this buggy.
 

redflash

Well-known member
Messages
650
Reaction score
619
I see a problem with that width.....can't put it in back of pick me up......not many utility trailers will be wide enough. How do you take it to an ohv park or desert location ? your stuck with back yard use only...in my humble opinion !

Da Flash
 

madprofessor

"Loose Cannon Creations"
Messages
2,899
Reaction score
888
Location
Jacksonville, Florida
You'd be surprised of the amount of HVAC-related parts are being used in the creation of this buggy.
No, I absolutely would not be surprised. I'm retired after about 35 years in the HVACR industry, not to mention Florida Junior College where I originally trained for it. Hello, and happy to see you that way here. Never caught that on previous threads.
Don't know about your experience, but I retired at the top of my field doing full redesigns and modifications to everything the manufacturers were putting out when it suited me, to make them more than they were ever incorrectly designed to be. Working on chiller and boiler systems for hospitals, schools, etc. got to be actually boring for me in the end, modern electronics started doing my job for me. To a certain degree. Always preferred taking the stuff that should have been (or was by others) condemned long ago back to life for many more years.
I used more rod couplings hanging Solaronics gas-fired infrared heaters in factories and warehouses than anywhere else, your experience with those couplings in shops means we inhaled a lot of the same dust.
 

SquidBonez

Active member
Messages
502
Reaction score
114
Location
New Jersey, USA
I see a problem with that width.....can't put it in back of pick me up......not many utility trailers will be wide enough. How do you take it to an ohv park or desert location ? your stuck with back yard use only...in my humble opinion !

Da Flash
I'll have to take the tires off. Then it will fit. If not, I can get a small trailer. No biggie.
No, I absolutely would not be surprised. I'm retired after about 35 years in the HVACR industry, not to mention Florida Junior College where I originally trained for it. Hello, and happy to see you that way here. Never caught that on previous threads.
Don't know about your experience, but I retired at the top of my field doing full redesigns and modifications to everything the manufacturers were putting out when it suited me, to make them more than they were ever incorrectly designed to be. Working on chiller and boiler systems for hospitals, schools, etc. got to be actually boring for me in the end, modern electronics started doing my job for me. To a certain degree. Always preferred taking the stuff that should have been (or was by others) condemned long ago back to life for many more years.
I used more rod couplings hanging Solaronics gas-fired infrared heaters in factories and warehouses than anywhere else, your experience with those couplings in shops means we inhaled a lot of the same dust.
We are on completely opposite ends of the field LOL. I am an apprentice, I've been in the field for about year and a half now (1 year maintenence half year residential install). I've done a few commercial jobs but 99% of my work is in people's homes doing swap-outs. Cool to see other people have HVAC experience.
 

SquidBonez

Active member
Messages
502
Reaction score
114
Location
New Jersey, USA
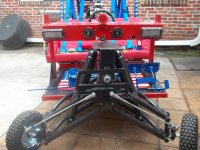
Got a good chunk of progress done today since I got off work early. Basically finished the front suspension minus the top shock mounts (which will be added once I decide the ride height). Here's a quick mock up:
20220316_144334.jpg
I also got the top suspension arm mounts welded on. I made sure they were identical on both sides by drilling 2 holes into a peice of tubing and using that as a really simple "jig" if you can even call it that.
20220316_130656.jpg
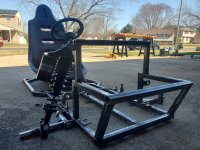
Finally I got the front half of the cage done, as it's incorporated into the shock mounting bar/leg guard. Starting to look like something now!
20220316_160243.jpg
The cage is now ready to go in. I already have the main roll bar and roof assembled, it's just a matter of welding it into the main frame and attaching the two down bars to connect the roof to the rest of the cage. It's also starting to sink in for me how fast 50 mph is gonna feel in this thing. It's still very small and is basically built around my body. Even though it will have full suspension, full roll cage, 4-point harness, and hydraulic brakes, I'm assuming it's still gonna feel really sketchy, especially with this 440cc Duromax on it.
 
Top