
 |
Fig. 1 |
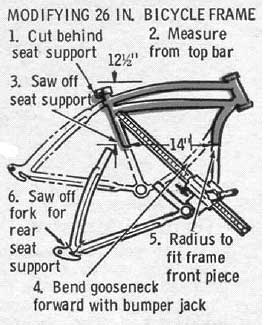 |
Fig. 2 |
 |
Fig. 3 |
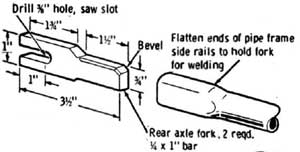 |
Fig. 4 |
 |
Fig. 5 |
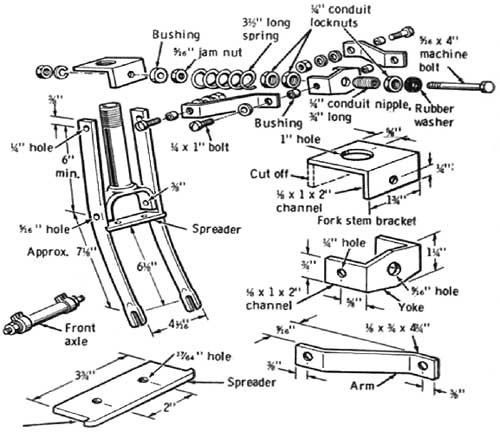 |
Fig. 6 |
Mini Bike Frame Design
Convert a Bicycle, or Build Your Own
These plans will show you first how to convert a junked bicycle frame to become the base for your mini bike. Though at first this sounds odd, it's really a unique idea that will save you money, and provide pre-bent handlebars, and the bearing connection at the neck.
Finding a Suitable Frame
First you'll need to find a bike frame that you can use successfuly for this project. You'll need to weld onto this frame, so aluminum is out. Preferably, find an old bike with a solid-feeling steel frame. If you can't find this, you'll have to build the frame up from scratch. No problem, simply use the diagrams as your basis.
Modifying The Frame
Start by cutting the bike frame so you come out with the portion shown in fig. 2. It's probably necessary to bend the "gooseneck" section of the frame forward to make room for the engine.
This can be done with a large jack, as shown. Bend carefully to avoid flattening the tubing. Heating with a propane torch will make the job easier. If the tubing's strength is compromised at this step, you'll end up with a possibly dangerous bike later. If you have any qualms about the safety of the frame, build you own or find a different donor to modify.
Remove the rear fork as shown, but don't throw it away. It become the rear support for the seat.
After bending the gooseneck forward, cut it and the seat post so that they are both 12.5" long as measured from the top bar. Their ends should be spaced 14" apart.
Now make a simple welding jig from wood, as shown in fig. 3.
Rest of the Frame
The lower part of the mini bike's frame is made from 1/2" pipe. You may use threaded pipe as shown with the T's, or just weld it, which would be better.
The rear forks are made from 1/4" x 1" flat stock, as in fig. 4. The frame tubing should be pounded flat, and these inserted deep inside, then welded.
Springer Front End
The spring-action front wheel is made by cutting the legs off a regular bike fork. Bolt the legs to this stub fork as shown, with the spreader bar inserted between them. The upper ends of the legs, which now extend above the fork, are anchored to a spring that bears against a plate on the steering column. As the legs pivot on the fork, they compress the spring, giving the front wheel a sof, cushiony suspension. See figs. 5 & 6.
Fasten the front and reat forks to the blocks on the jib, and you are now ready for welding. Shape the crossties as shown for a close fit inside the side rails. For clean welds, remove the paint from all weld points. Tack weld all joints to hold the assembly rigid, then remove the frame from the jig to complete the welding. Tack the threaded joints at the T's to prevent their twisting.